Thunderobot Storm 17 оюн ноутбугунун колдонуучу колдонмосу
Модель: 17-бороон
1. Киришүү
This manual provides essential information for setting up, operating, maintaining, and troubleshooting your Thunderobot Storm 17 Gaming Laptop. Please read this manual thoroughly to ensure proper usage and to maximize the performance and lifespan of your device.
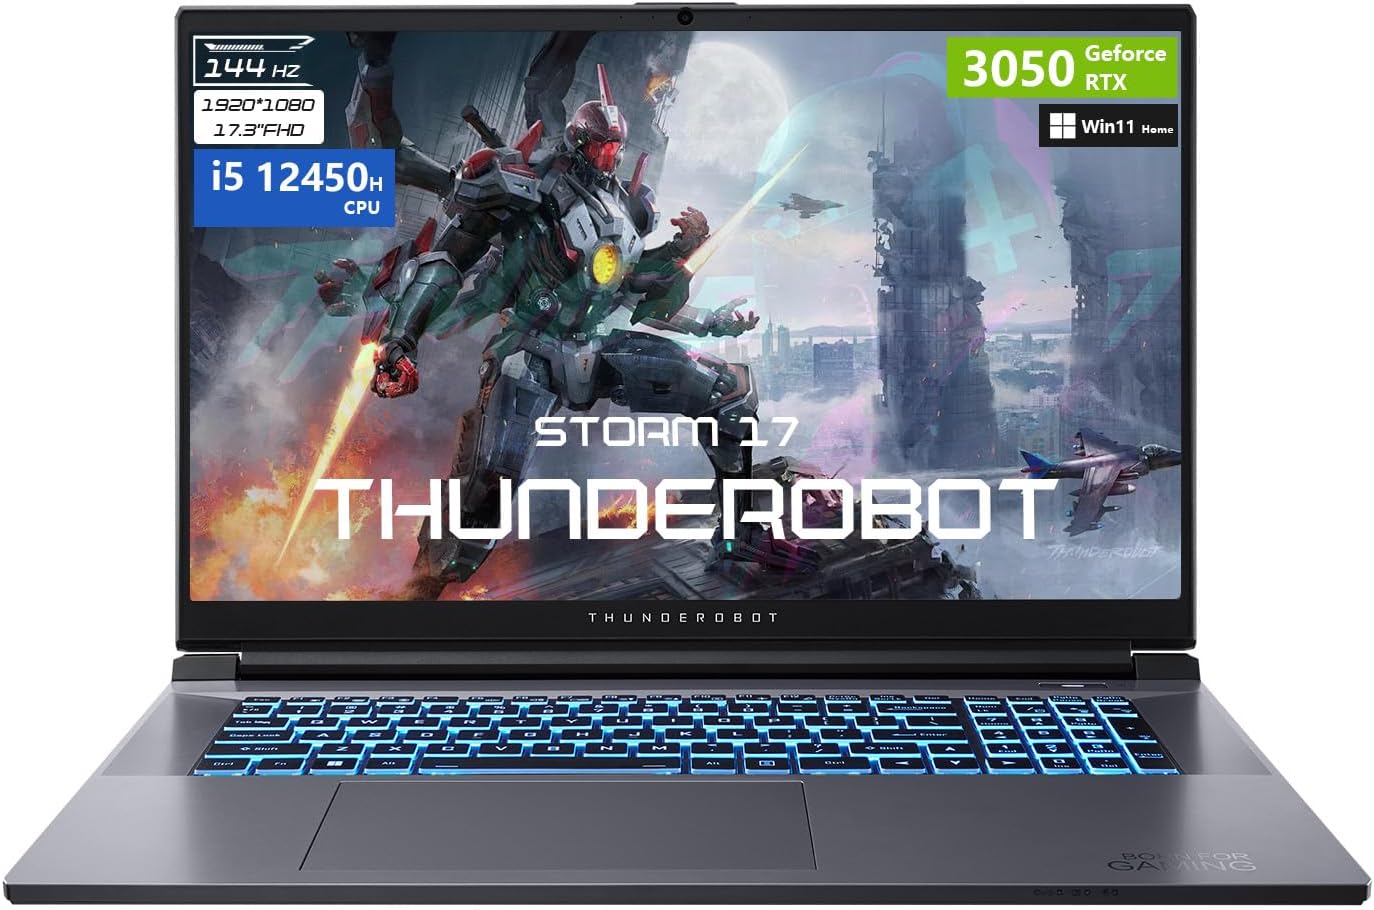
Сүрөт 1: Алдыңкы view of the Thunderobot Storm 17 Gaming Laptop.
2. Кутуда эмне бар
Таңгакта бардык буюмдар бар экенин текшериңиз:
- Thunderobot Storm 17 ноутбугу
- Кубаттуу адаптер жана кабель
- Колдонуучунун Колдонмосу (бул документ)
- Кепилдик картасы (эгер бар болсо)
3. Баштоо (Орнотуу)
3.1. Таңгактан чыгаруу жана алгачкы текшерүү
Carefully remove the laptop and all accessories from the packaging. Inspect the laptop for any signs of physical damage. If any damage is found, contact your retailer immediately.
3.2. Кубат адаптерин туташтыруу
- Электр кабелин кубат адаптерине туташтырыңыз.
- Кубат адаптерин жерге туташтырылган электр розеткасына сайыңыз.
- Insert the DC output plug of the power adapter into the DC-IN port on the side of your laptop.
Биринчи колдонуудан мурун батареяны толук заряддоо сунушталат.
3.3. Алгачкы жүктөө жана Windowsту орнотуу
- Ноутбуктун капкагын ачыңыз.
- Ноутбукту иштетүү үчүн кубат баскычын басыңыз.
- Follow the on-screen instructions to complete the Windows 11 Home operating system setup. This typically involves selecting your region, language, creating a user account, and accepting license agreements.
3.4. Перифериялык түзүлүштөрдү туташтыруу
Your laptop supports various external devices. Refer to the 'Ports and Connectors' section for port locations.
- USB түзмөктөрү: Connect USB mice, keyboards, external drives, or other peripherals to the available USB Type-A or USB Type-C ports.
- Тышкы дисплей: Use the HDMI or Mini DisplayPort to connect an external monitor or projector.
- Ethernet: For a wired network connection, plug an Ethernet cable into the RJ-45 port.
3.5. Тармактык туташуу (Wi-Fi)
Зымсыз тармакка туташуу үчүн:
- Windows тапшырма тилкесиндеги Wi-Fi сөлөкөтүн чыкылдатыңыз.
- Тизмеден каалаган Wi-Fi тармагын тандаңыз.
- Эгер суралса, тармактын коопсуздук ачкычын (сырсөз) киргизиңиз, андан кийин "Туташуу" баскычын басыңыз.
4. Ноутбугуңузду иштетүү
4.1. Баскычтоптун функциялары
The Thunderobot Storm 17 features an RGB backlit keyboard with a numeric keypad. Function keys (F1-F12) can be accessed by pressing the Fn баскычын каалаган функция баскычы менен бирге басыңыз.
- Жарыкты башкаруу: Adjust keyboard backlight brightness and effects using dedicated function key combinations.
- Сандык баскычтоп: Provides a full set of number keys for data entry.
- Медиа башкаруу элементтери: Function keys allow control over volume, playback, and screen brightness.

Figure 2: RGB Backlit Keyboard layout.
4.2. Сенсордук панелди колдонуу
The integrated touchpad supports multi-touch gestures for navigation. Refer to Windows settings for customizing touchpad sensitivity and gestures.
4.3. Дисплей орнотуулары
Your laptop features a 17.3-inch Full HD (1920x1080) display with a 144Hz refresh rate. To adjust display settings:
- Иш тактасын оң баскыч менен чыкылдатып, "Дисплей орнотууларын" тандаңыз.
- Under 'Scale & layout', you can adjust text size.
- Under 'Multiple displays', you can configure external monitors.
- For refresh rate, navigate to 'Advanced display settings' and select '144Hz' for optimal performance.
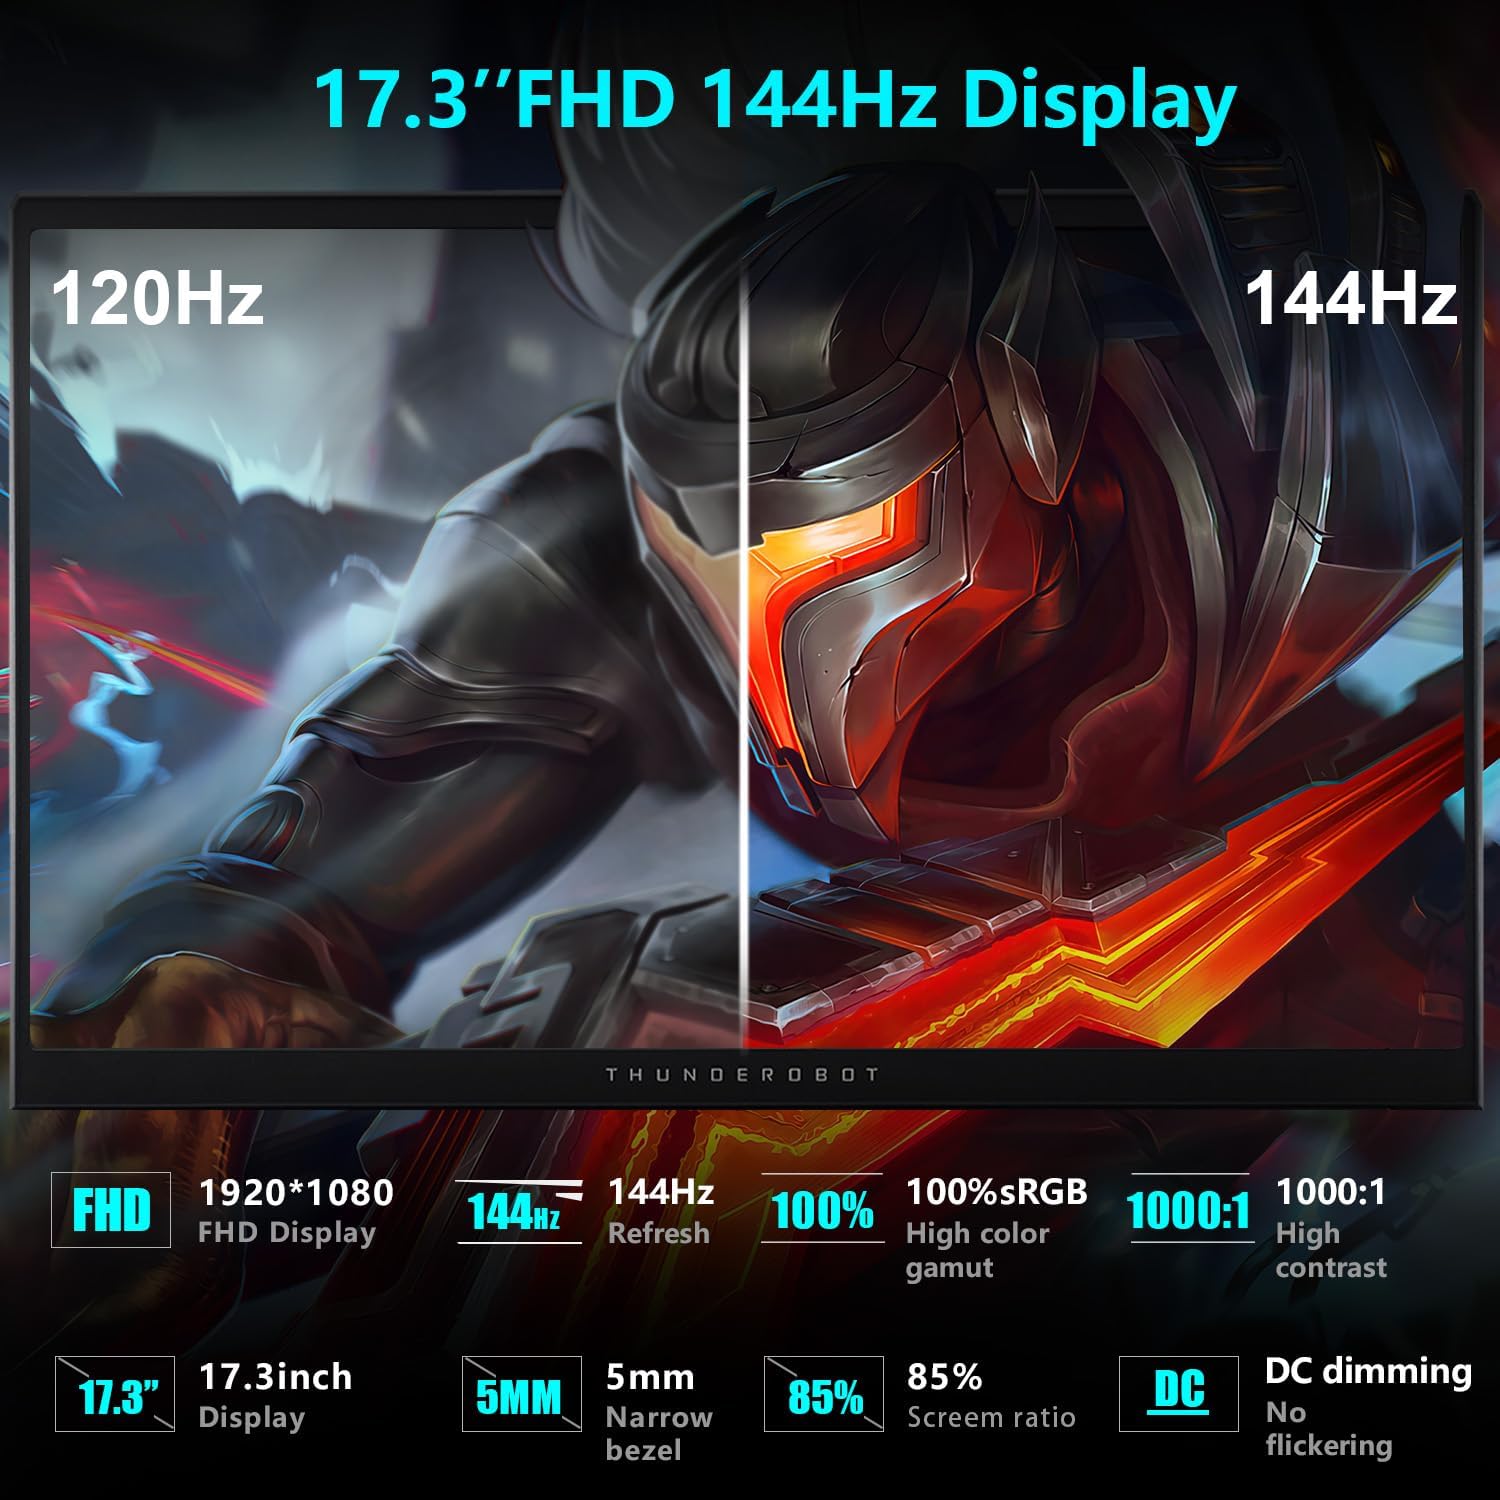
Figure 3: Display specifications highlighting 144Hz refresh rate.
4.4. Аудио конфигурация
The laptop's audio system provides a wide range of sound. You can adjust volume using the function keys or through the Windows sound settings. Connect headphones or external speakers to the 3.5mm audio jack for private listening or enhanced sound output.

Figure 4: Illustration of the laptop's audio capabilities.
4.5. Thunderobot Control Center
The Thunderobot Control Center software allows you to customize various aspects of your laptop's performance, cooling, and lighting. This application provides access to:
- Аткаруу режимдери: Switch between modes like 'Berserk' (full performance), 'Game' (balanced), and 'Audio and Video Office' (power-saving).
- Желдетүүчү жөндөө: Manually control fan speeds for optimal cooling.
- Жарык орнотуулары: Customize the RGB keyboard backlight effects and colors.
To access the Control Center, search for 'Control Center' in the Windows search bar. Note that system mode switching in Control Center requires the device to be connected to a power source.

Figure 5: Thunderobot Control Center interface.
4.6. Порттор жана туташтыргычтар
Familiarize yourself with the various ports on your laptop for connecting external devices:
- USB 3.2 Gen 1 Type-A: Перифериялык түзүлүштөр үчүн жогорку ылдамдыктагы USB порттору.
- USB 2.0 Type-A: Стандарттык USB порту.
- USB Type-C: Versatile port for data transfer and display output.
- HDMI порту: Тышкы дисплейлерге туташуу үчүн.
- Mini DisplayPort: Another option for external display connections.
- RJ-45 Ethernet порту: Зымдуу тармак туташуусу үчүн.
- 3.5mm Combo Jack: For connecting headphones with a microphone.
- DC-IN уячасы: Кубат адаптерин туташтыруу үчүн.
- Kensington Lock Slot: Ноутбугуңузду шайкеш кулпу менен камсыз кылуу үчүн.
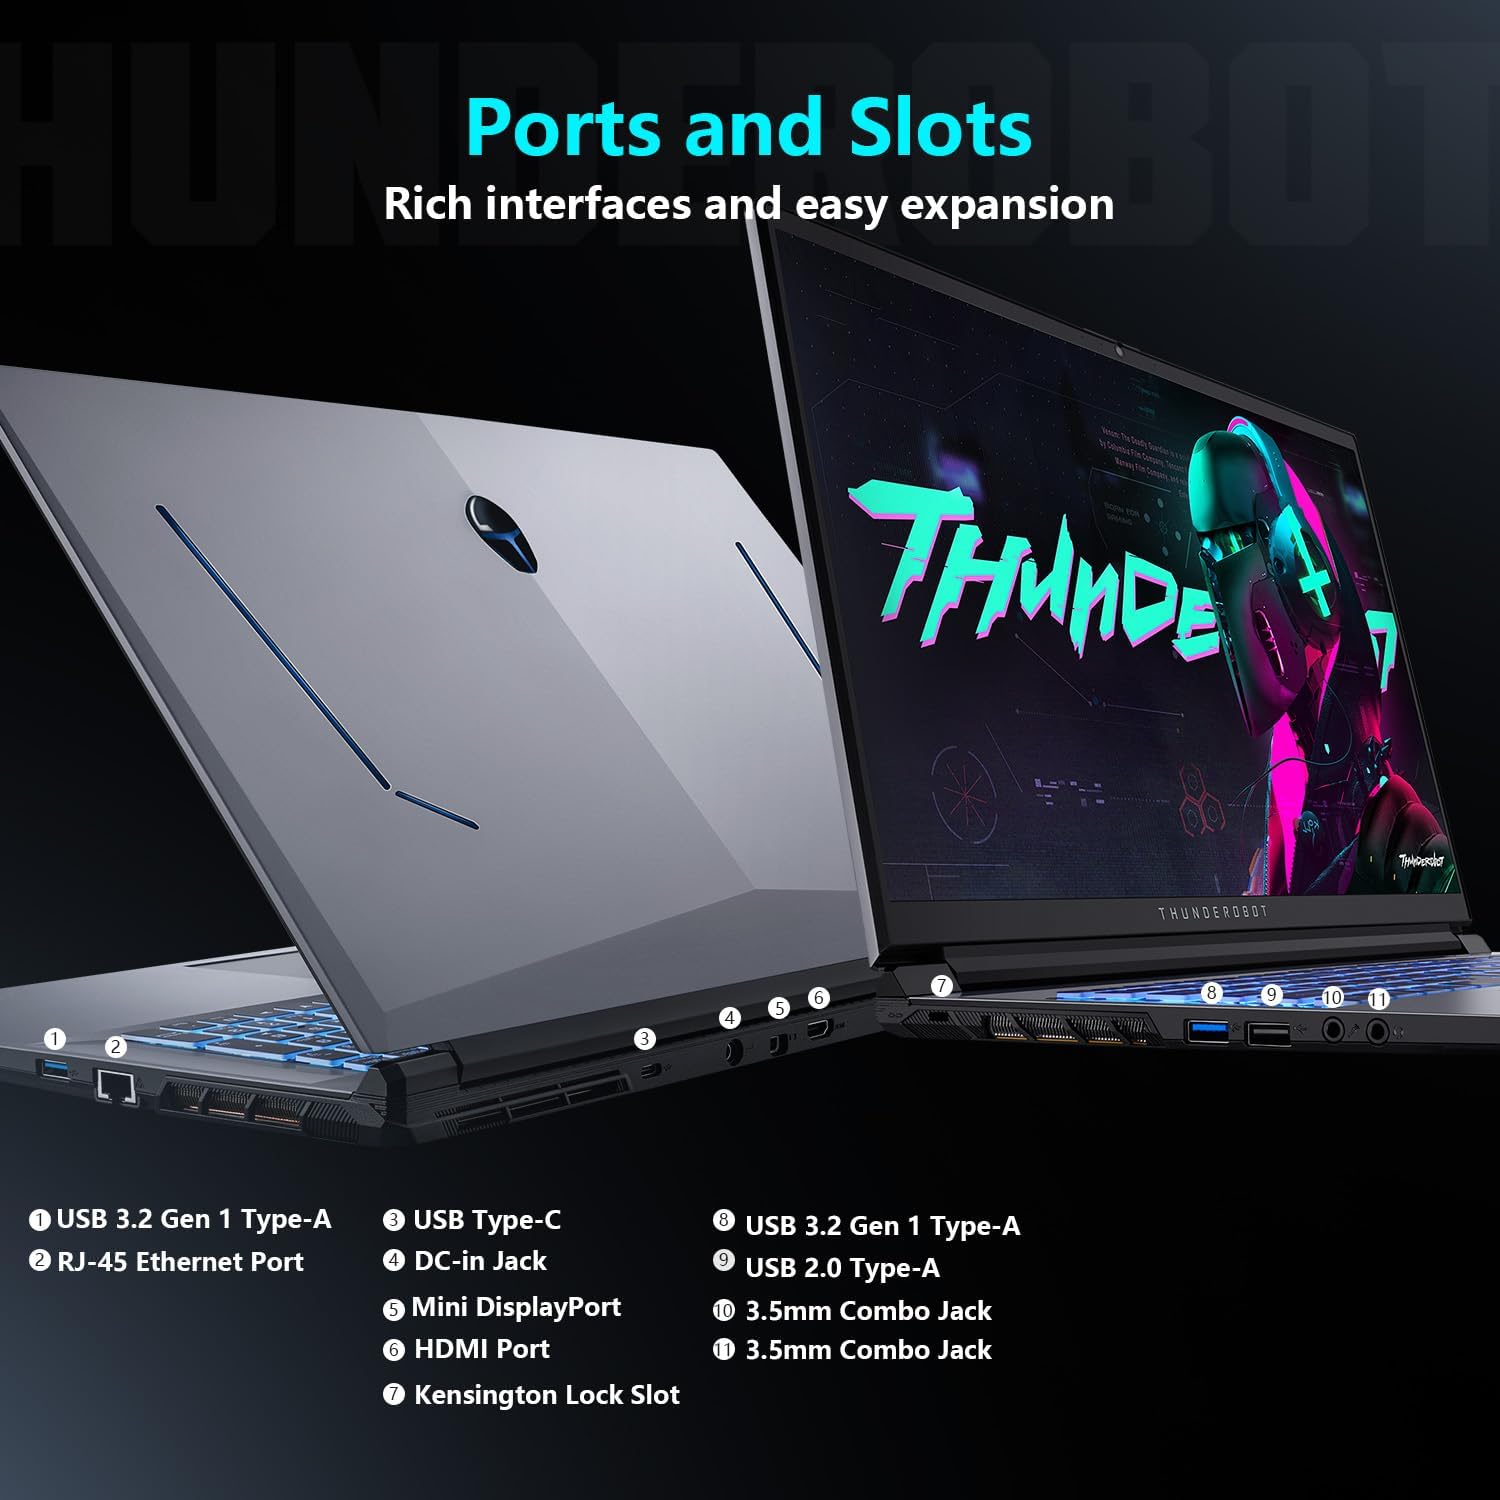
Figure 6: ашыкview of laptop ports and connectors.
5. Техникалык тейлөө жана кам көрүү
5.1. Тазалоо боюнча көрсөтмөлөр
- Экран: Жумшак, түксүз кездемени жеңил колдонуңуз dampсуу же экран тазалоочу менен бүттү. Катуу химиялык заттардан алыс болуңуз.
- Баскычтоп: Use compressed air to remove dust and debris between keys. Wipe keycaps with a soft, damp кездеме.
- Шасси: Wipe the laptop's exterior with a soft, damp кездеме.
- Тазалоодон мурун дайыма ноутбукту өчүрүп, кубат адаптерин ажыратыңыз.
5.2. Жылуулук башкаруу
Storm 17 кош турбовентиляторлор жана жез жылуулук түтүктөрү менен натыйжалуу муздатуу системасына ээ. Оптималдуу муздатуунун иштешин сактоо үчүн:
- Ensure that the air vents are not obstructed. Avoid placing the laptop on soft surfaces like beds or carpets.
- Periodically clean dust from the air vents using compressed air.
- Utilize the Thunderobot Control Center to adjust fan speeds, especially during demanding tasks.

Figure 7: Direct-Flow Cooling Technology diagram.
5.3. Батареяны оптималдаштыруу
- Батареянын тез-тез толугу менен зарядсызданышынан алыс болуңуз.
- Ноутбукту узак убакыт бою колдонбосо, салкын, кургак жерде сактаңыз.
- Disconnect the power adapter once the battery is fully charged if you plan to use it on battery power.
5.4. Software and Driver Updates
Regularly update your operating system and device drivers to ensure optimal performance and security. Check the Thunderobot support website for the latest drivers for your Storm 17 laptop.
5.5. Сактагычты башкаруу
Мезгил-мезгили менен керексиз тазалоо files and applications to maintain sufficient free space on your 1TB SSD. This helps ensure smooth system operation.
6. Кыйынчылыктарды
6.1. Жалпы маселелер жана чечүү жолдору
- Кубат жок:
- Кубат адаптери ноутбукка да, иштеп жаткан электр розеткасына да бекем туташып турганын текшериңиз.
- Электр розеткасынын иштешин текшериңиз.
- Катуу баштапкы абалга келтирүү үчүн кубат баскычын 15 секунд басып, кармап туруңуз.
- Дисплей көйгөйлөрү:
- If the screen is blank, try connecting an external monitor to check if the laptop is functioning.
- Функционалдык баскычтарды колдонуп, экрандын жарыктыгын тууралаңыз.
- Ensure display drivers are up to date.
- Тармакка туташуу маселелери:
- For Wi-Fi, ensure Wi-Fi is enabled and you are connected to the correct network. Restart your router.
- Зымдуу туташуу үчүн Ethernet кабелин жана роутер байланышын текшериңиз.
- Тармак драйверлерин жаңыртыңыз.
- Аудио көйгөйлөр:
- Check volume levels in Windows and ensure speakers/headphones are properly connected.
- Verify that audio drivers are installed and up to date.
- Performance Lag:
- Фондо иштеп жаткан керексиз тиркемелерди жабыңыз.
- Ensure the laptop's cooling system is not obstructed and fans are operating correctly.
- Жетиштүү бош орун бар экендигин текшериңиз.
- Графикалык драйверлерди жаңыртыңыз.
- Switch to a higher performance mode in the Thunderobot Control Center.
6.2. Restoring System
Windows 11 provides options for system recovery, including resetting the PC while keeping your files or performing a clean reinstallation. Access these options via 'Settings > System > Recovery'.
6.3. Колдоо кызматы менен байланышуу
If you encounter issues that cannot be resolved using this manual, please visit the official Thunderobot support webсайтка же жардам үчүн кардарларды тейлөөгө кайрылыңыз.
7. Продукттун спецификациялары
| Өзгөчөлүк | Спецификация |
|---|---|
| Модель аты | Бороон 17 |
| Дисплей өлчөмү | 17.3 дюйм |
| Max Screen Resolution | 1920x1080 пиксел (FHD) |
| Жаңыртуу ылдамдыгы | 144Hz |
| Процессор | Intel Core i5-12450H (8 өзөктүү, 12 жиптүү, 4.4 ГГц чейин) |
| RAM | 16 ГБ DDR4 (3200 МГц) |
| Сактагыч | 1 TB PCIe M.2 SSD |
| Графикалык сопроцессор | NVIDIA GeForce RTX 3050 (6 GB GDDR6 Dedicated) |
| Операция системасы | Windows 11 Home |
| Зымсыз байланыш | 802.11ac Wi-Fi, Bluetooth |
| Порттар | 3x USB 3.0, 1x USB 2.0, 1x USB Type-C, 1x HDMI, 1x RJ-45, 1x Audio Port, 1x Mini DisplayPort, 1x Kensington Lock Slot |
| Баскычтоп | RGB арткы жарыктандырылган баскычтоп, сандык баскычтоп |
| Элемент Салмагы | 11 фунт |
| Продукциянын өлчөмдөрү | 15.62 x 10.35 x 1.01 дюйм |
8. Кепилдик жана колдоо
8.1. Продукцияга кепилдик
Ар бир Thunderobot ноутбугунда төмөнкүлөр бар: 12 айлык кепилдик сатып алынган күндөн тартып. Бул кепилдик өндүрүштүк кемчиликтерди камтыйт жана эксперттик колдоо, кылдат диагностика жана зарыл болгон оңдоолор үчүн оригиналдуу тетиктерди камсыз кылат. Мындан тышкары, 90 күндүк кепилдик бардык кепилдик алмаштыруучу тетиктерде камтылган, бул оңдоо иштерин кыйынчылыксыз жүргүзүүнү камсыз кылат.
8.2. Кеңейтилген коргоо пландары
Optional extended protection plans may be available for purchase to extend coverage beyond the standard warranty period. These plans typically offer additional years of coverage for peace of mind.
8.3. Кардарларды колдоо кызматы
Техникалык колдоо, кепилдик боюнча дооматтар же тейлөө боюнча суроолор үчүн, расмий Thunderobot сайтына кириңиз website or contact their authorized service centers. Have your product model and serial number ready when contacting support.


