1. Киришүү
Thank you for choosing the Olvy A10 Cordless Stick Vacuum Cleaner with Mop Function. This appliance is designed for efficient cleaning of various floor types, offering both vacuuming and mopping capabilities. Please read this manual thoroughly before use to ensure proper operation, maintenance, and safety.

Image: The Olvy A10 Cordless Stick Vacuum Cleaner in its full assembly, alongside various attachments and the wall mount.
2. Коопсуздук нускамалары
Өрт, электр шок же жаракат алуу коркунучун азайтуу үчүн, электр шайманын колдонууда ар дайым негизги коопсуздук чараларын сактаңыз.
- Шайманды колдонуудан мурун бардык нускамаларды окуп чыгыңыз.
- Сыртта же нымдуу беттерде колдонбоңуз.
- оюнчук катары колдонууга жол бербеңиз. Балдар тарабынан же алардын жанында колдонулганда кылдат көңүл буруу зарыл.
- Бул колдонмодо сүрөттөлгөндөй гана колдонуңуз. Өндүрүүчү сунуштаган тиркемелерди гана колдонуңуз.
- Бузулган шнур же сайгыч менен колдонбоңуз. Эгерде шайман керектелип иштебесе, кулап, бузулуп, сыртта калып же сууга түшүп кетсе, аны тейлөө борборуна кайтарыңыз.
- Тартпаңыз же шнур менен көтөрүп жүрбөңүз, шнурду тутка катары колдонбоңуз, шнурга эшикти жаппаңыз же шнурду курч четтеринен же бурчтарынан тартпаңыз. Шайманды шнурдун үстүнөн иштетпеңиз. Шнурды ысытылган беттерден алыс кармаңыз.
- шнурду тартып сууруп албаңыз. Электр розеткасынан сууруп алуу үчүн шнурдан эмес, сайгычтан кармаңыз.
- Штепсель же шайманды нымдуу кол менен кармабаңыз.
- Тешиктерге эч кандай нерсени салбаңыз. Бөгөттөлгөн ачуу менен колдонбоңуз; чаңдан, түктөн, чачтан жана аба агымын азайта турган нерселерден алыс болуңуз.
- Чачты, кенен кийимдерди, манжаларды жана дененин бардык бөлүктөрүн тешиктерден жана кыймылдуу бөлүктөрдөн алыс кармаңыз.
- Электр розеткасынан ажыратуудан мурун бардык башкаруу элементтерин өчүрүңүз.
- Тепкичтерде тазалоодо өзгөчө этият болуңуз.
- Бензин сыяктуу күйүүчү же күйүүчү суюктуктарды алуу үчүн колдонбоңуз же алар болушу мүмкүн болгон жерлерде колдонбоңуз.
- Тамеки, ширеңке, ысык күл сыяктуу күйүп жаткан же чылым чеккен нерселерди албаңыз.
- Чаң чөйчөктөрү жана/же чыпкалары жок колдонбоңуз.
- Кокусунан баштоонун алдын алуу. Батарея топтомуна туташтыруудан, шайманды көтөрүүдөн же алып жүрүүдөн мурун өчүргүч өчүк абалда экенин текшериңиз.
- Өндүрүүчү көрсөткөн заряддагыч менен гана заряддаңыз. Батарея топтомунун бир түрүнө ылайыктуу заряддагыч башка батарея таңгагы менен колдонулганда өрт чыгуу коркунучун жаратышы мүмкүн.
- Адепсиз шарттарда батареядан суюктук чыгып кетиши мүмкүн; байланышты болтурбоо. Кокусунан тийип калса, суу менен жууп салыңыз. Эгерде суюктук көзгө тийсе, кошумча медициналык жардамга кайрылыңыз. Батареядан чыккан суюктук дүүлүктүрүүгө же күйүүгө алып келиши мүмкүн.
3. Пакеттин мазмуну
Пакетте бардык компоненттер бар экенин текшериңиз:
- Негизги блок (кол чаң соргуч)
- Жөнгө салынуучу узартуучу түтүк
- Пол щетка башчысы
- Алынуучу батарея
- Water Tank (for mopping)
- Моп Pad
- 2-in-1 Brush куралы
- Жарака куралы
- Дубалга орнотуу кронштейн
- Кубаттуу адаптер
- Replacement HEPA Filter (2x)
- User Manual

Image: A visual representation of all components included with the Olvy A10 Cordless Stick Vacuum Cleaner.
4. Продукт бүтүп калдыview
The Olvy A10 features a powerful 350W motor providing up to 35,000 Pa suction, an integrated mop function, and a multi-stage HEPA filtration system. It includes an intelligent LED display for monitoring status and an auto-mode for adaptive cleaning.
Негизги өзгөчөлүктөрү:
- Күчтүү соргуч: 350W motor with 35,000 Pa for deep cleaning on various surfaces.
- 2-ин-1 Функциясы: Seamlessly switch between vacuuming and mopping.
- Акылдуу LED дисплей: Provides real-time information on battery level, suction mode, and dust concentration.
- Авто режим: Automatically adjusts suction power based on detected dirt levels.
- HEPA 13 Filtration: Captures 99.99% of fine particles, suitable for allergy sufferers.
- Узак иштөө убактысы: Up to 60 minutes on a single charge with a 2200 mAh removable battery.
- Lightweight and Versatile: Easy to maneuver and convert into a handheld vacuum for various cleaning tasks.

Image: Close-up of the intelligent LED display showing battery indicator, low power warning, auto mode, dust concentration, and control panel.

Image: The LED display indicating 'Auto-mode' and the current power level during operation.
5. Орнотуу жана чогултуу
5.1 Алгачкы заряддоо
Before first use, fully charge the battery. The battery takes approximately 4-5 hours to fully charge.
- Remove the battery from the main unit by pressing the release button.
- Кубат адаптерин батареянын заряддоо портуна туташтырыңыз.
- Plug the adapter into a power outlet. The battery indicator on the LED display will show charging status.
- Толук заряддалгандан кийин адаптерди ажыратыңыз.

Image: The removable battery unit, highlighting its 2200 mAh capacity, 4-5 hour charging time, and up to 60 minutes run time.
5.2 Чаң соргучту чогултуу
- Батареяны тиркөө: Slide the charged battery into the main unit until it clicks into place.
- Узартуу түтүгүн тиркөө: Connect the adjustable extension tube to the main unit. Ensure it clicks securely.
- Пол щеткасын тиркөө: Connect the floor brush head to the other end of the extension tube.
- Дубалга орноткучту орнотуу (милдеттүү эмес): Choose a suitable location for the wall mount. Secure it to the wall using the provided screws and anchors. This allows for convenient storage and charging.
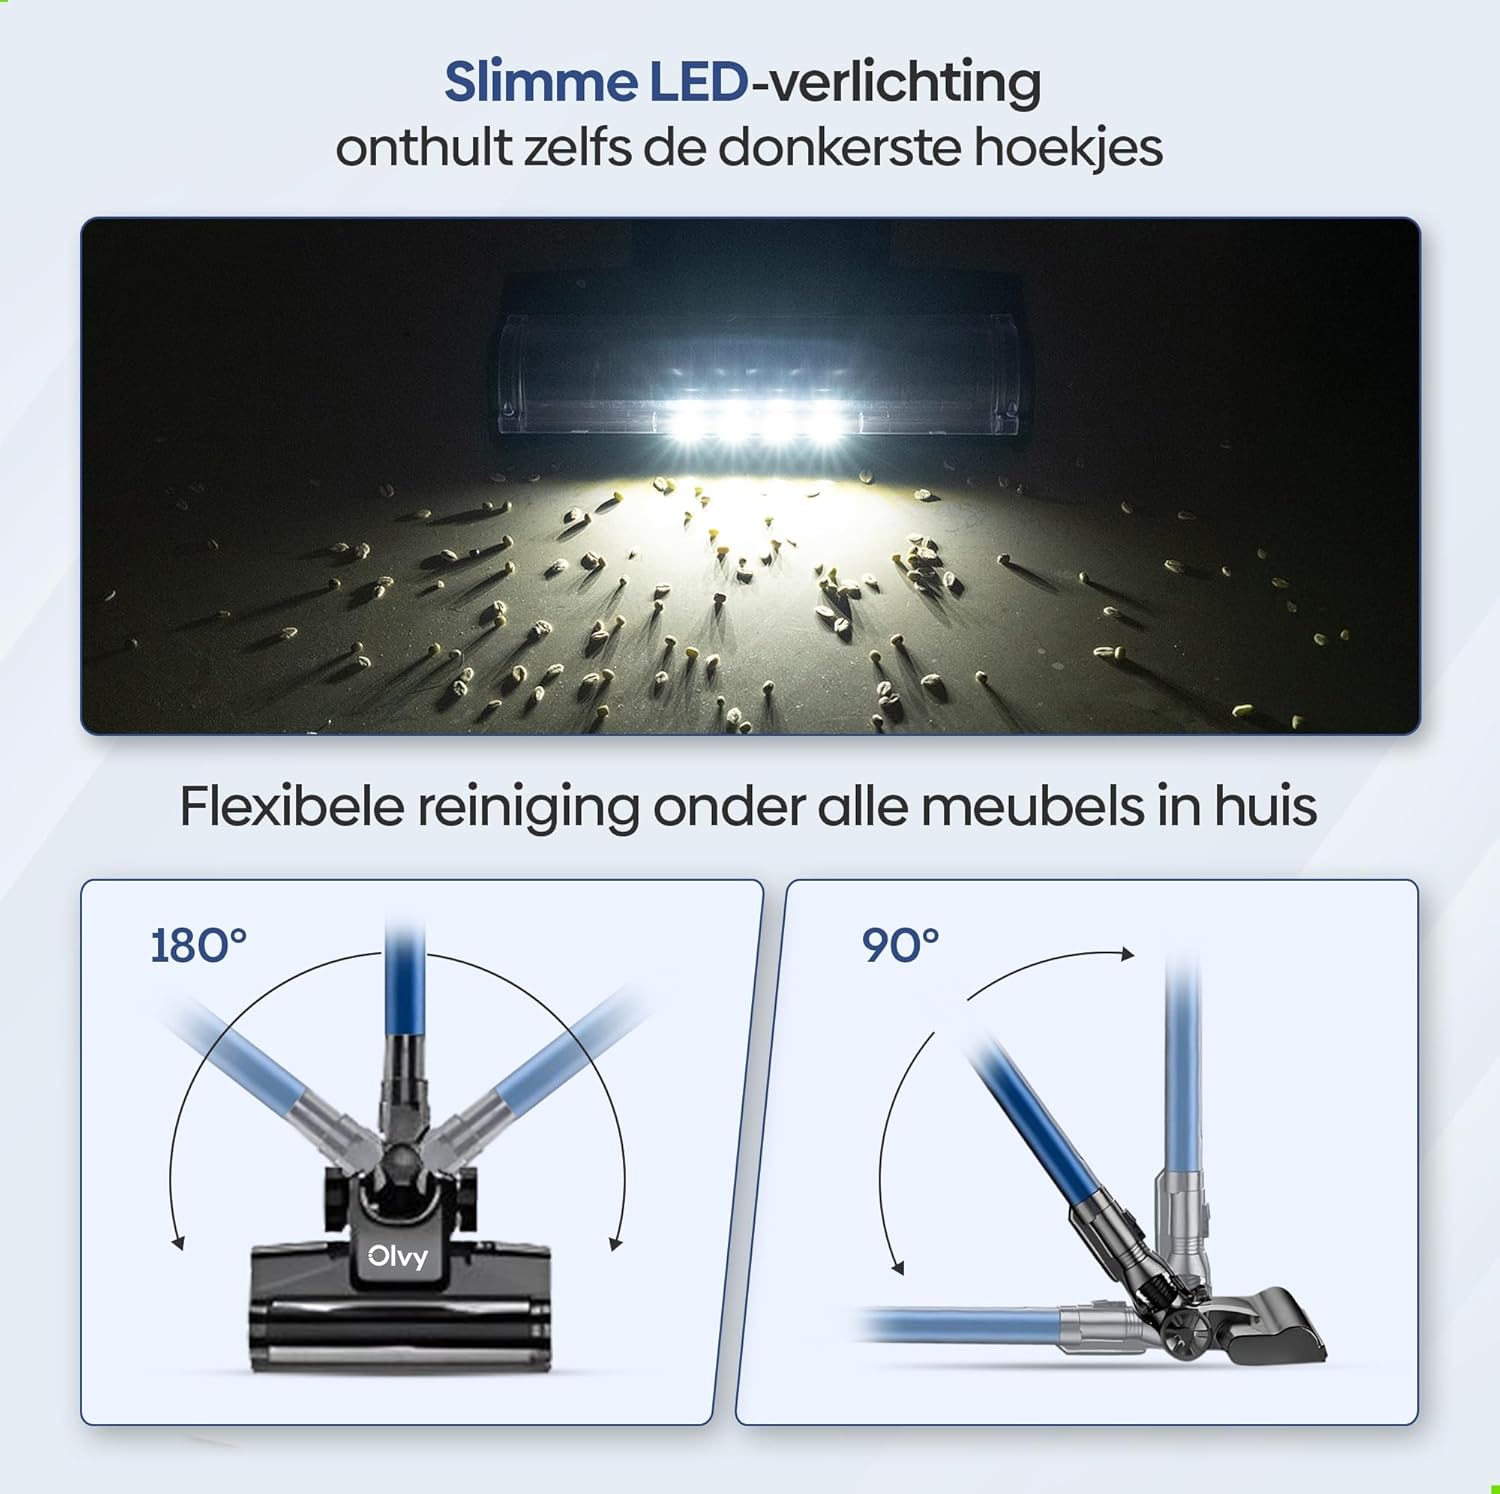
Image: The vacuum cleaner demonstrating both wall-mounted storage and self-standing capability.
6. Иштөө нускамалары
6.1 Негизги операция
- Күйгүзүү/өчүрүү: Чаң соргучту күйгүзүү же өчүрүү үчүн негизги блоктун кубат баскычын басыңыз.
- Соруу күчүн тууралоо: The vacuum offers 5 suction levels. Use the control panel on the LED display to cycle through the power modes (Low, Normal, High, Turbo).
- Авто режим: Activate the intelligent auto mode for automatic suction adjustment based on dirt detection. The LED display will show 'Auto' when this mode is active.
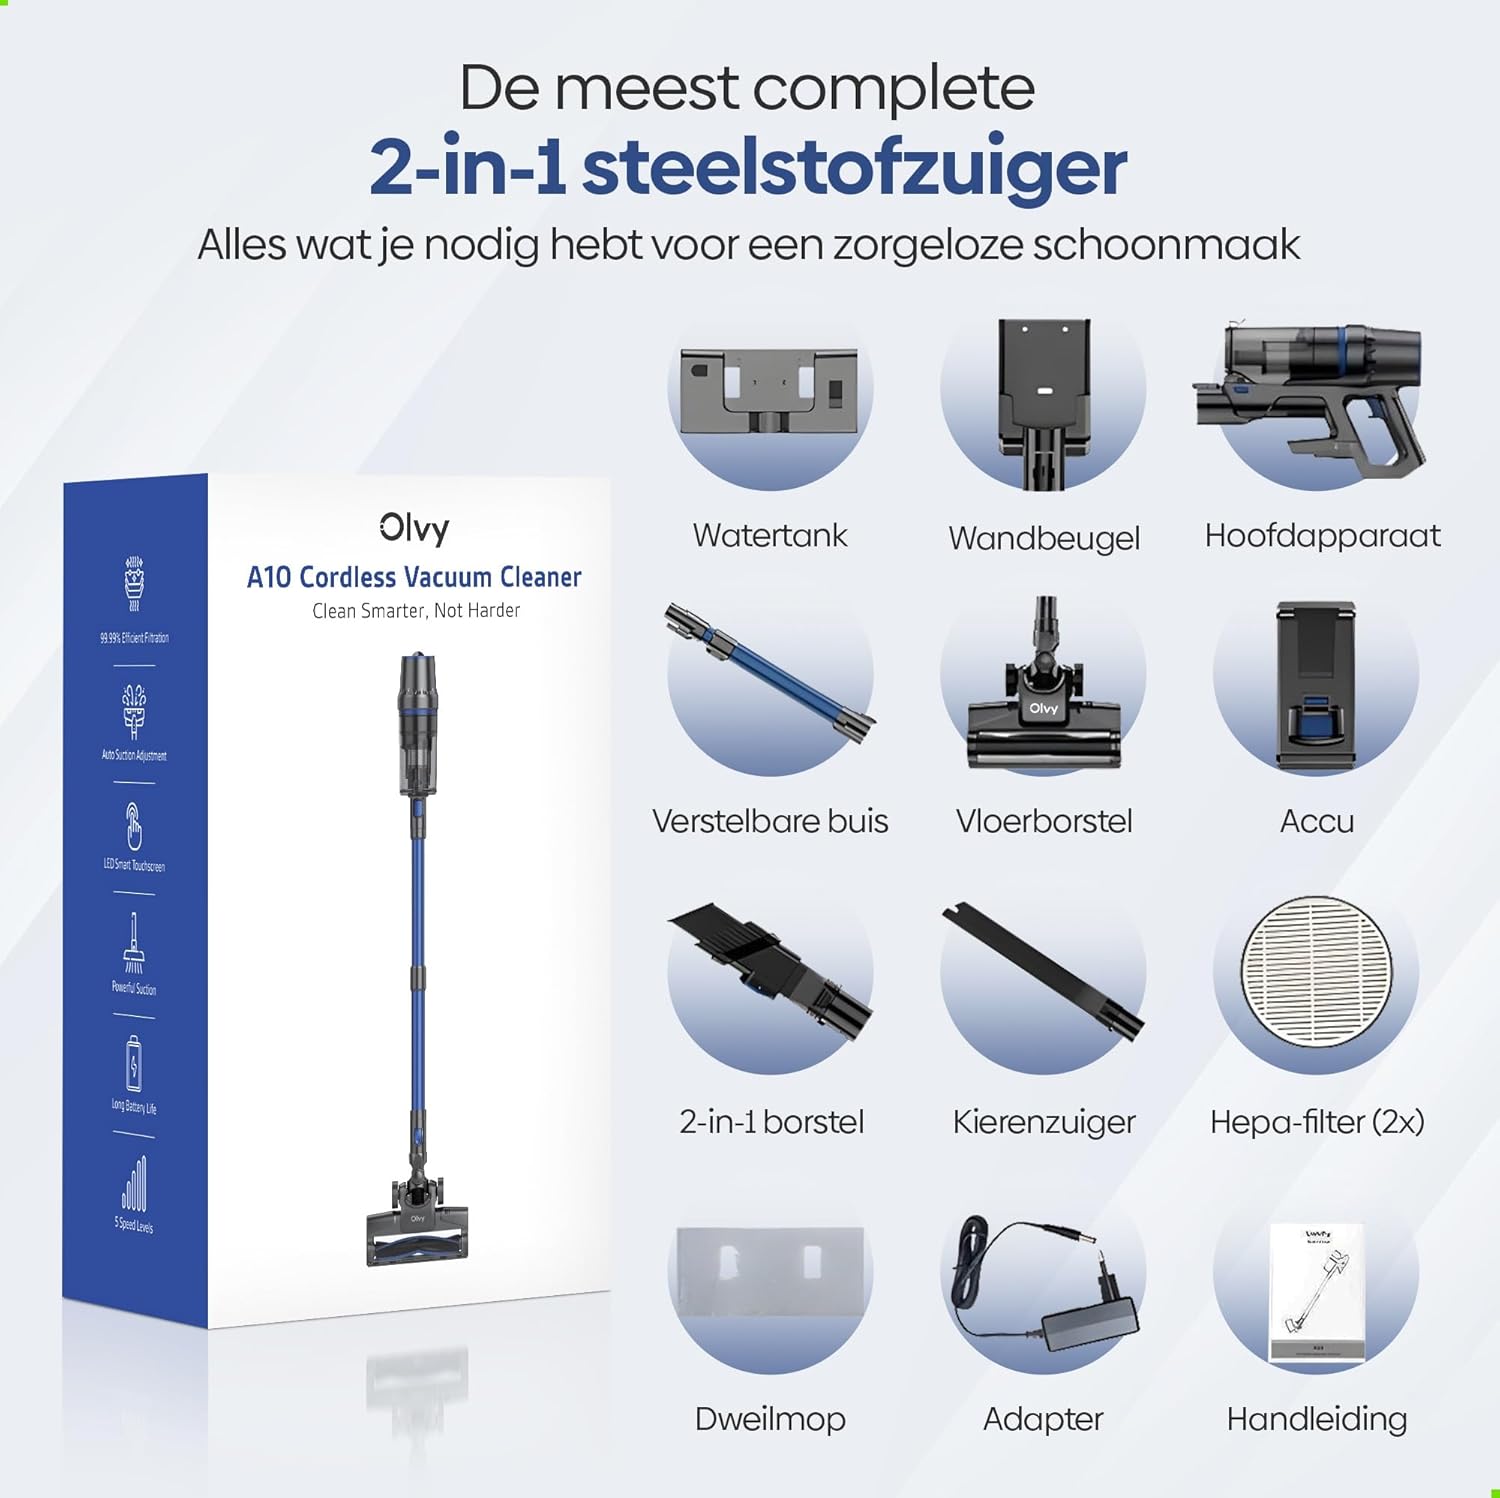
Image: The vacuum cleaner demonstrating its 4 suction levels (Low, Normal, High, Turbo) and intelligent auto mode, which adapts to dirt levels.
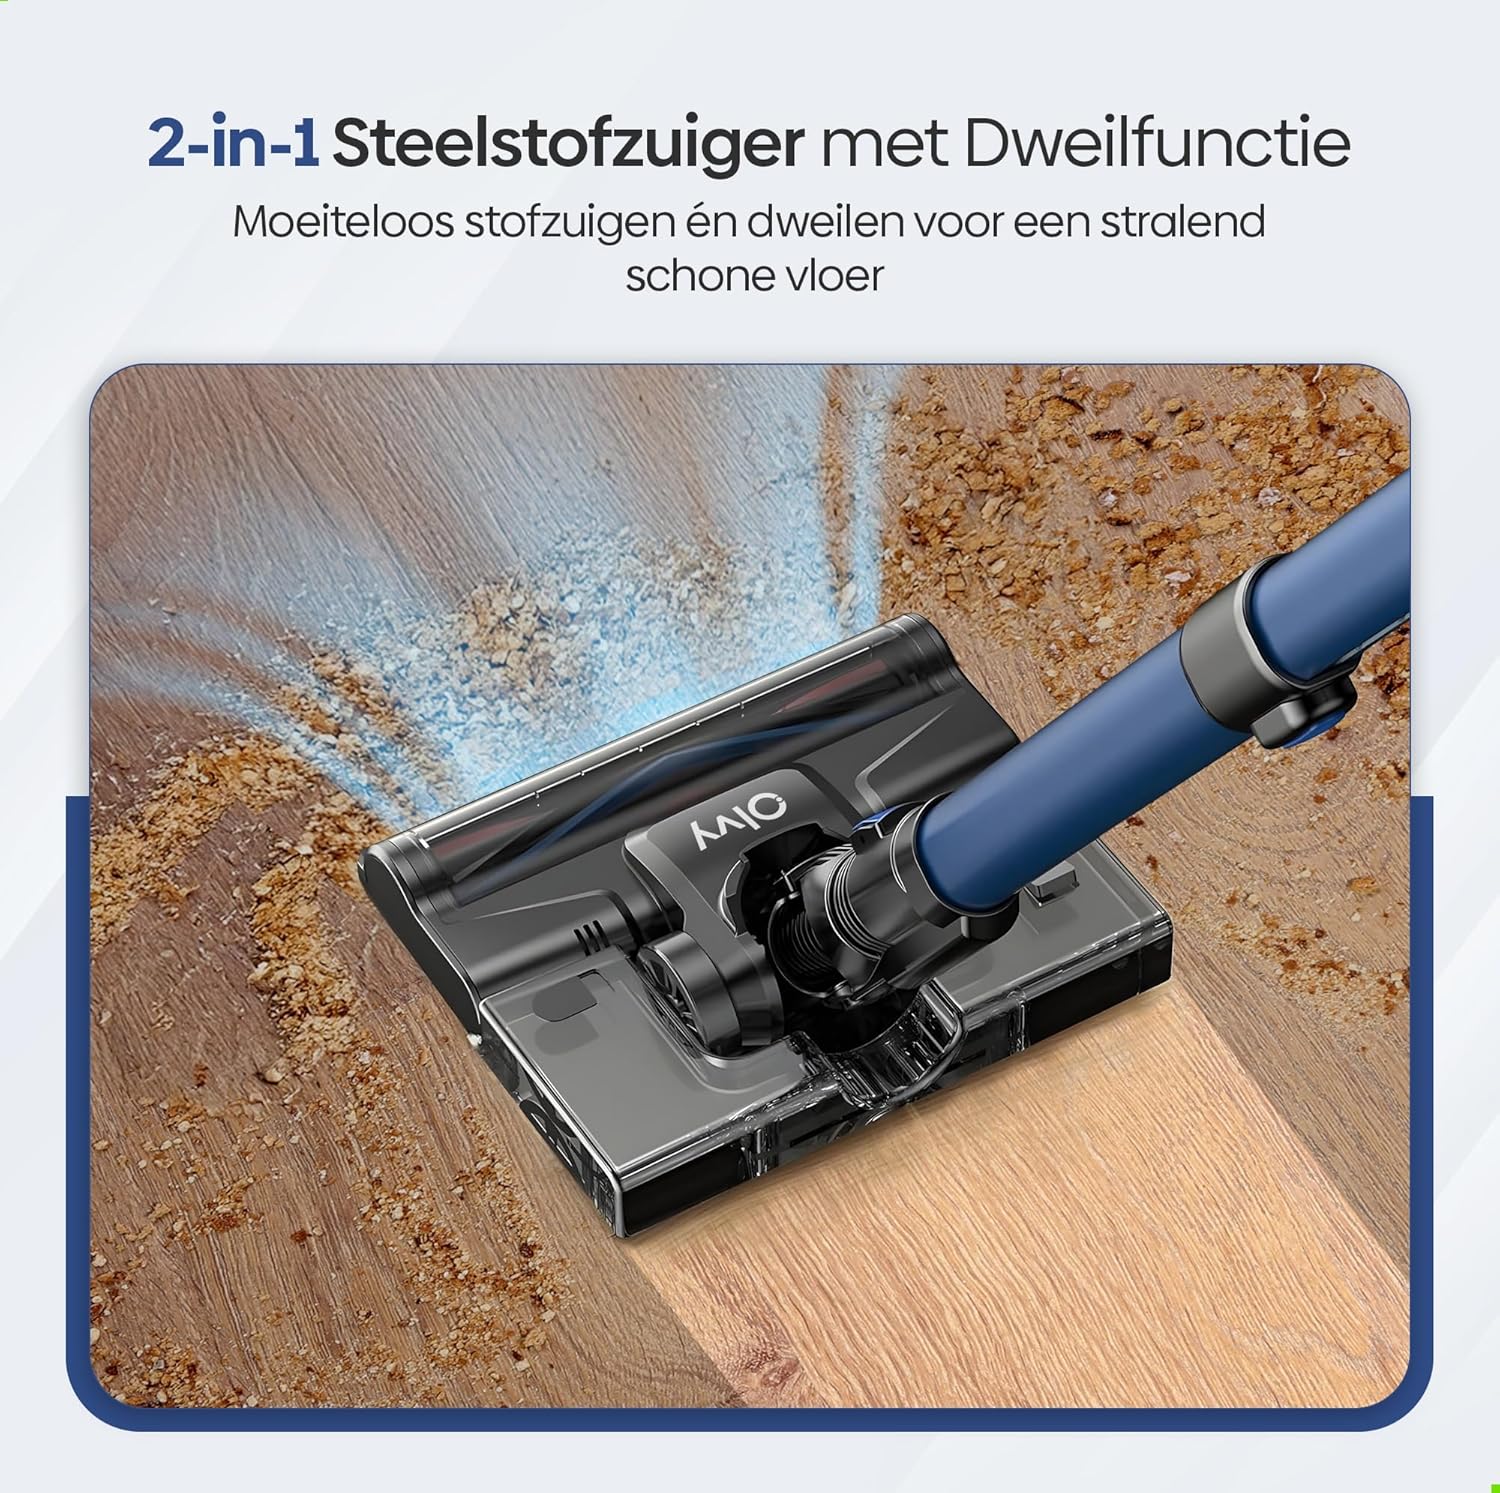
Image: A user operating the Olvy A10, showcasing its powerful 350W motor and 35,000 Pa suction for effective cleaning of various debris like hair, dust, crumbs, and sand.
6.2 Швабра функциясын колдонуу
The integrated mop function allows for simultaneous vacuuming and wet cleaning of hard floors.
- Сууну толтуруу: Detach the water tank from the floor brush head. Fill it with clean water. Do not use corrosive liquids or detergents that may damage the tank or floor.
- Attach Mop Pad: Securely attach the mop pad to the bottom of the water tank.
- Суу резервуарды кайра туташтыруу: Reinstall the filled water tank onto the floor brush head.
- Шыпырууну баштоо: Operate the vacuum cleaner as usual. The mop pad will dampen the floor as you vacuum, providing a streak-free clean.

Сүрөт: деталдуу view of the 2-in-1 stick vacuum with mop function, showing water being dispensed for simultaneous vacuuming and mopping on a hard floor.

Image: The mop function of the Olvy A10 actively cleaning a hard floor, demonstrating its effectiveness in removing dirt and leaving a clean surface.
6.3 Тиркемелерди колдонуу
- 2-in-1 Brush куралы: Ideal for cleaning upholstery, curtains, and delicate surfaces.
- Жарака куралы: Тар жерлерге, бурчтарга жана четтерге жетүү үчүн идеалдуу.
- To use, detach the extension tube and connect the desired attachment directly to the main unit.

Image: The Olvy A10 being used in different configurations, including as a stick vacuum for floors, a handheld for high areas, and for cleaning under furniture.

Image: The vacuum's LED lighting revealing hidden dust particles on the floor, and diagrams illustrating its 180° and 90° flexible head rotation for cleaning under furniture.
7. Техникалык тейлөө
Regular maintenance ensures optimal performance and extends the lifespan of your Olvy A10 vacuum cleaner.
7.1 Таштанды кутусун бошотуу
Empty the dustbin regularly, especially when the 'Dust Concn' indicator on the LED display shows high concentration.
- Вакуум өчүрүлгөнүн текшериңиз.
- Аны негизги блоктон ажыратуу үчүн чаң челекти чыгаруу баскычын басыңыз.
- Hold the dustbin over a trash can and press the bottom release latch to open the lid and empty the contents.
- Close the lid and reattach the dustbin to the main unit.

Image: The dustbin being emptied with a single click, demonstrating its large 0.8L capacity.

Image: A user washing the dustbin under running water, illustrating the washable components for easy cleaning.
7.2 Фильтрлерди тазалоо
The Olvy A10 uses a multi-stage filtration system, including an HEPA filter, which should be cleaned regularly.
- Таштанды салгычты алып салыңыз.
- Twist and pull out the filter assembly (HEPA filter, dust filter, stainless steel filter).
- Tap off loose dirt from each filter component.
- Rinse the filters under cold running water. Do not use hot water or detergents.
- Бардык чыпкалоочу компоненттерди кайра монтаждоодон мурун, жок эле дегенде, 24 саат толугу менен кургатууга уруксат бериңиз. Вакуумду нымдуу чыпкалар менен колдонбоңуз.
- Reassemble the filters and place them back into the dustbin, then reattach the dustbin to the main unit.

Image: A cutaway diagram illustrating the multi-stage HEPA filtration system, including the dustbin filter, stainless steel filter, dust filter, HEPA air filter, and air outlet filter.
7.3 Щетка түрмөгүн тазалоо
Щетканын рулонунда чаташкан чач же калдыктар бар-жогун мезгил-мезгили менен текшерип туруңуз.
- Чаң соргучту өчүрүңүз.
- Press the release tab on the side of the floor brush head to remove the brush roll cover.
- Theетка түрмөгүн көтөрүңүз.
- Чаташкан чачтарды же талчаларды кесип, алып салуу үчүн кайчыны же тазалоочу куралды колдонуңуз.
- Щетка түрмөгүн кайра салып, капкакты бекитиңиз.
7.4 Швабра төшөгүн тазалоо
After each use of the mop function, remove and clean the mop pad.
- Detach the mop pad from the water tank.
- Rinse the mop pad under running water or machine wash it with mild detergent.
- Allow the mop pad to air dry completely before storing or reusing.
8. Кыйынчылыктарды
If you encounter any issues with your Olvy A10, refer to the following common problems and solutions:
| Көйгөй | Мүмкүн себеп | Чечим |
|---|---|---|
| Вакуум күйбөйт | Батарея заряддалган эмес же туура орнотулган эмес. | Charge the battery fully. Ensure the battery is securely clicked into the main unit. |
| Соруу күчү төмөн | Dustbin is full. Filters are clogged. Brush roll is tangled. Obstruction in the nozzle or tube. | Empty the dustbin. Clean all filters thoroughly and ensure they are dry. Remove any hair or debris from the brush roll. Check for and remove any blockages. |
| Щетка түрмөгү айланбайт | Brush roll is tangled or jammed. | Turn off the vacuum. Remove the brush roll and clear any obstructions. |
| Mop function not working | Water tank is empty or not properly installed. Mop pad is dry. | Fill the water tank. Ensure the water tank is securely attached to the floor brush. Dampen the mop pad slightly before use if needed. |
| Кыска убакыт | Battery not fully charged. Using high suction mode continuously. Battery degradation. | Ensure battery is fully charged. Use lower suction modes for longer run time. If battery life significantly decreases, consider replacing the battery. |
9. Техникалык шарттар
| Өзгөчөлүк | Спецификация |
|---|---|
| Бренд | Olvy |
| Модель номери | A10 |
| Түс | Кара |
| Продукциянын өлчөмдөрү | 32 x 19 x 32 см |
| Салмагы | 5 кг |
| Мотор күчү | 350 Вт |
| Соруу күчү | 35,000 Па чейин |
| Ылдамдыктын саны | 5 (including Auto Mode) |
| Ызы-чуу деңгээли | 55 децибел |
| Run Time | Up to 1 hour (60 minutes) |
| Батарея сыйымдуулугу | 2200 мАч |
| Заряддоо убактысы | 4-5 саат |
| Чыпка түрү | HEPA 13 (жууга болот) |
| Таштанды кутусунун сыйымдуулугу | 0.8L |
| Power Source | Батарея |
| Сунушталган беттер | All floors (carpets, hard floors) |
| Өзгөчөлүктөр | 2-in-1 Vacuum & Mop, LED Display, Auto Mode, Pet-friendly, Lightweight |
10. Кепилдик жана колдоо
Olvy products are manufactured to high-quality standards. For warranty information, technical support, or service inquiries, please refer to the contact information provided with your purchase documentation or visit the official Olvy webсайт. Кепилдик дооматтары үчүн сатып алганыңыздын далилин сактап коюңуз.


