1. Киришүү
This manual provides detailed instructions for the setup, operation, and maintenance of your ANYQOO 3MP 2K Window Camera. Designed for both indoor and outdoor security, this camera offers 2K HD video, ChroMax AI Color Night Vision, person/motion detection, and dual-band Wi-Fi connectivity. Please read this manual thoroughly before using the product to ensure proper function and safety.
2. Кутуда эмне бар
Сиздин пакетте бардык компоненттер бар экенин текшериңиз:
- 1x ANYQOO 3MP 2K Window Camera
- 1x Instruction Manual
- 1x Charger (Power Adapter)
- 1x Data Cable (USB-C to USB-A)
- 1x Multi-function Stand (90° bracket)
- 1x Right Angle Bracket (45° bracket)
- 4x кабелдик клиптер
- 4x 3M Stickers (Adhesive Pads)

Figure 2.1: All components included in the ANYQOO 3MP 2K Window Camera package.
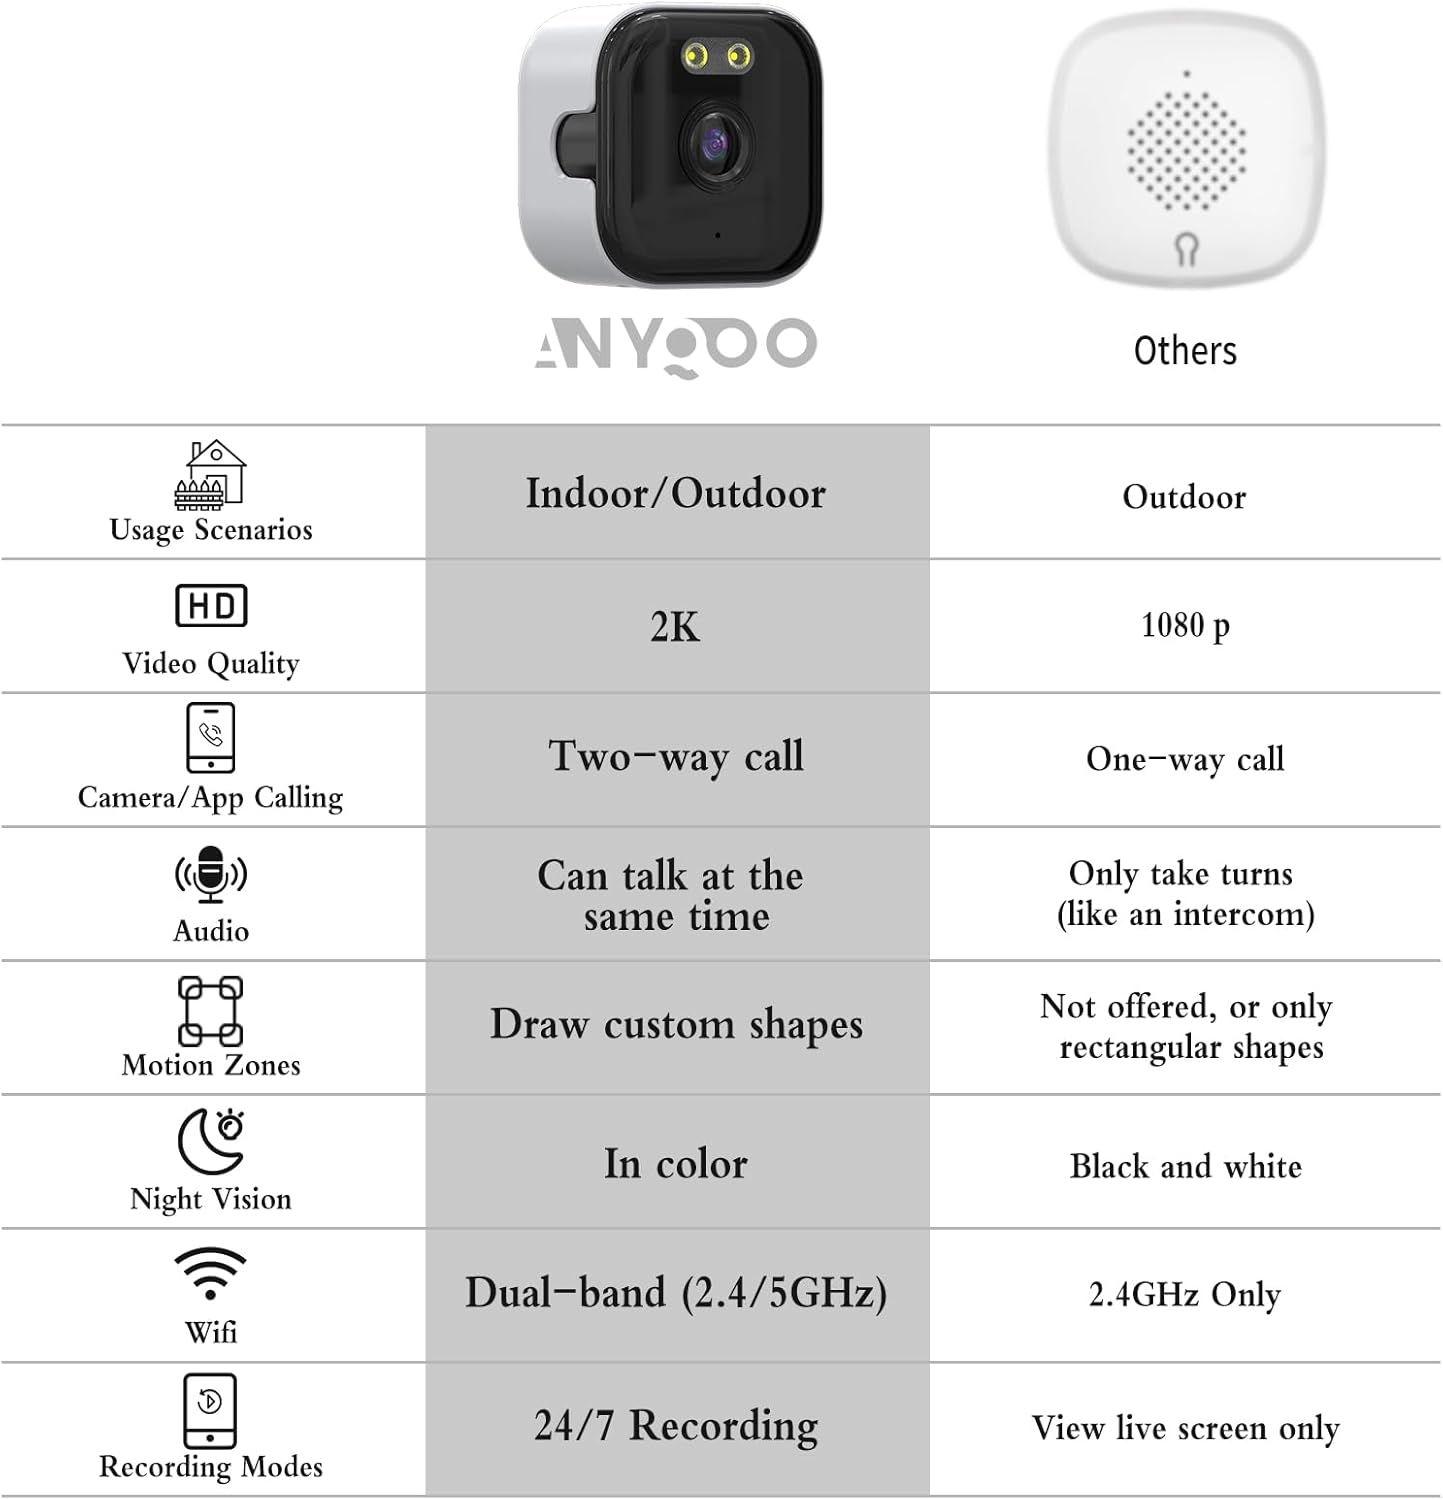
Figure 2.2: The ANYQOO 3MP 2K Window Camera and a comparison of its features.
3. Орнотуу колдонмосу
3.1 Физикалык орнотуу
- Жайгашкан жерди тандаңыз: Select a clean, smooth surface like a window or door. Ensure the camera has a clear view сиз көзөмөлдөгүңүз келген аймак.

Figure 3.1: The camera can be installed in various indoor and outdoor window locations, including fish tanks, pet/baby rooms, and general windows.
- Бетти тазалоо: Thoroughly clean the window or surface where the camera will be mounted to ensure optimal adhesion.
Video 3.1: Unboxing and initial setup steps, including cleaning the window surface. This video demonstrates the physical installation process.
- Монтаждык кронштейнди бекитиңиз:
- Peel off the protective film from one of the 3M adhesive stickers.
- Apply the sticker to the back of your chosen mounting bracket (either the multi-function stand for a 90° angle or the right-angle bracket for a 45° angle).
- Press the bracket firmly onto the cleaned window surface.
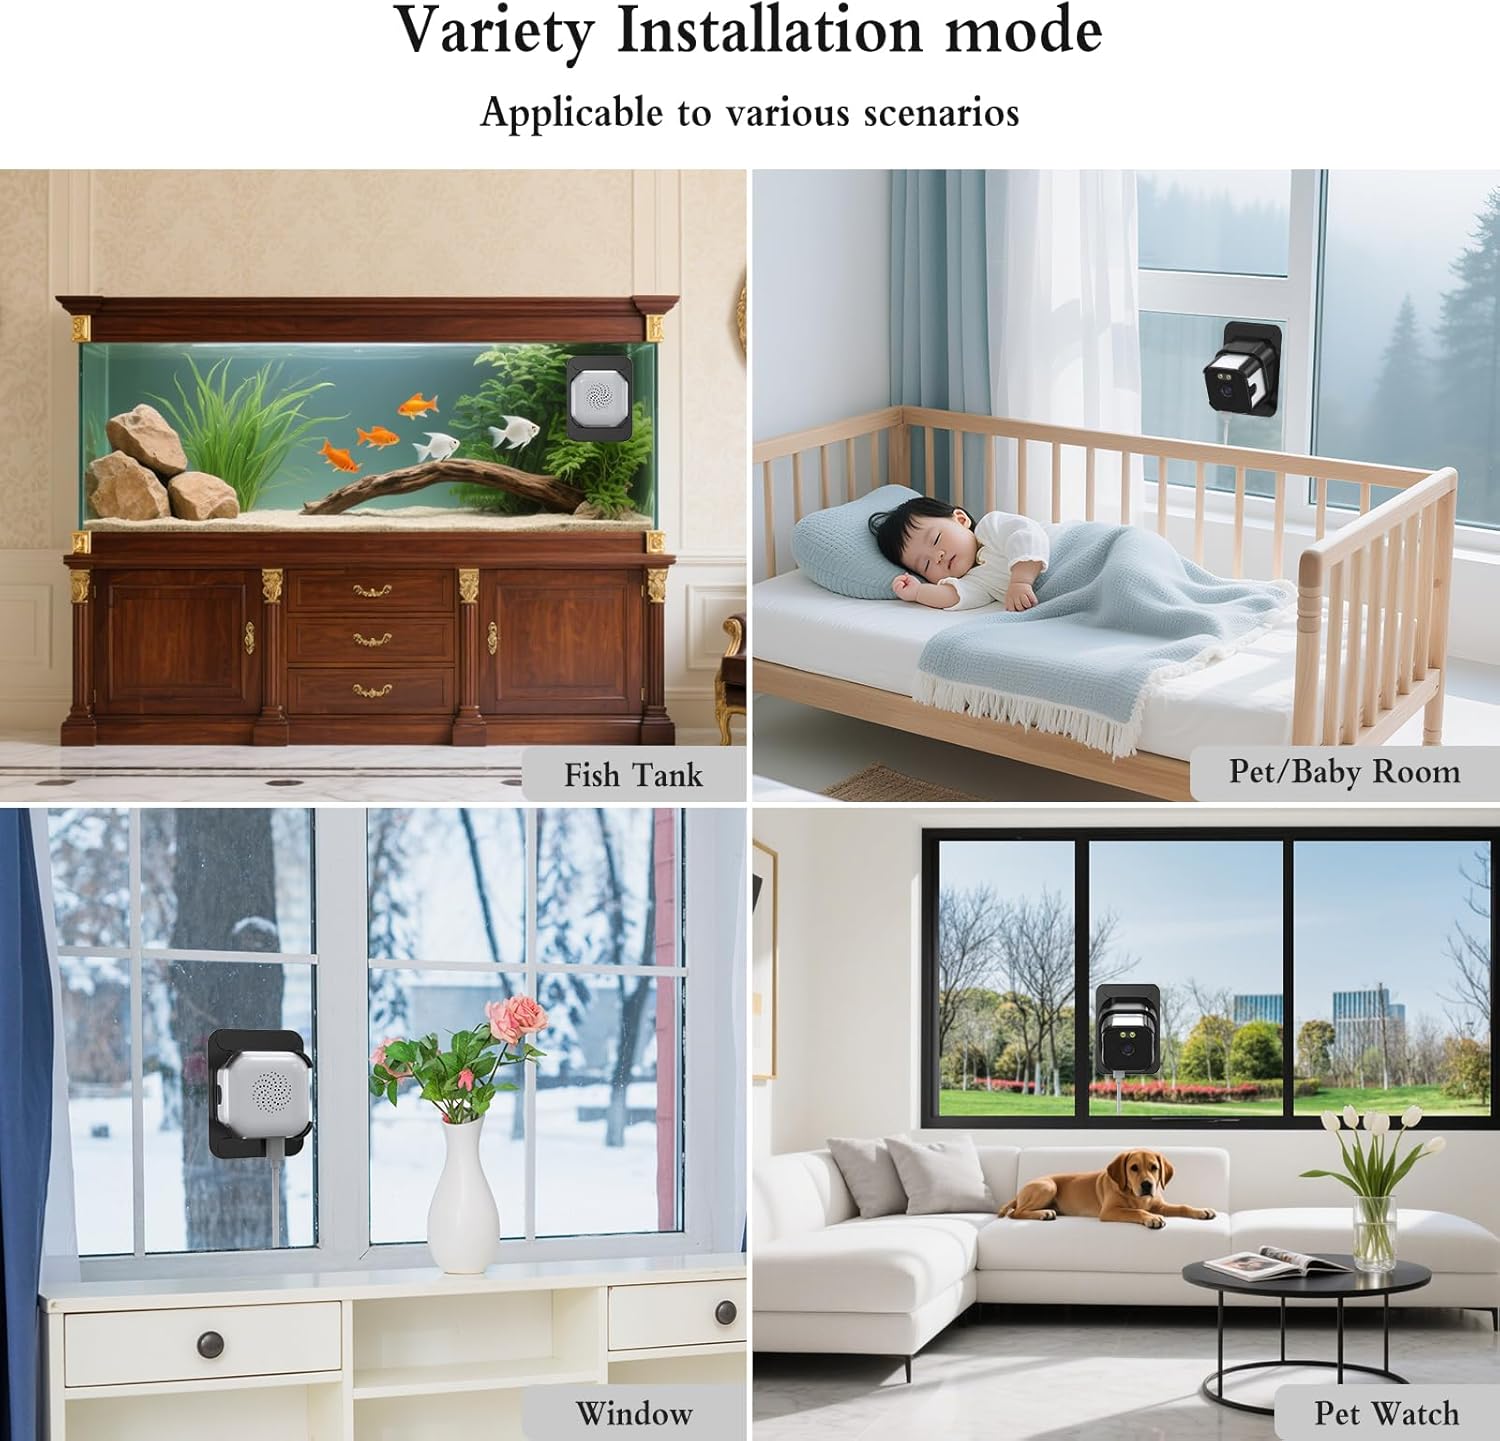
Figure 3.2: Step-by-step visual guide for attaching the adhesive sticker to the bracket and then to the window.
- Камераны салыңыз: Gently slide the ANYQOO camera into the mounted bracket. Ensure it is securely seated.

Figure 3.3: The camera securely mounted on a window, providing both indoor and outdoor surveillance.
- Камераны иштетүү: Connect the data cable to the camera's USB-C port and the charger. Plug the charger into a power outlet. The camera will power on automatically.
3.4-сүрөт: Детальдуу view of the camera's ports, including the USB-C power input and Micro SD card slot.
Video 3.2: Demonstrates connecting the power cable to the camera and plugging it into an outlet.
- Кабелдик башкаруу: Use the provided cable clips to neatly secure the power cord along the window frame or wall.

3.5-сүрөт: Мисample of using cable clips for tidy power cord management.
3.2 Колдонмону жүктөп алуу жана Wi-Fi туташуусу
- Колдонмону жүктөп алыңыз: Scan the QR code in the instruction manual or search for the "O-KAM Pro" app in your device's app store (available for Android and iOS).
- Катталуу/Кирүү: Жаңы каттоо эсебин түзүңүз же сизде мурунтан эле бар болсо кириңиз.
- Bluetooth жана Жайгашкан жерди аныктоо кызматтарын иштетүү: Ensure Bluetooth and location services are enabled on your smartphone for the app to detect the camera.
- Түзмөк кошуу: In the app, tap "Add Device." The app should automatically detect the camera via Bluetooth. Select the correct UID code and tap "Connect."
Video 3.6: Step-by-step guide on connecting the camera to Wi-Fi using the mobile application.
- Wi-Fi'га туташуу:
- Select your home Wi-Fi network (supports both 2.4 GHz and 5.0 GHz).
- Wi-Fi сырсөзүн киргизип, ырастаңыз.
- Wait for the camera to connect to the network. Once connected, you can name your device.
Note: The device must stay connected to Wi-Fi to function properly.

Figure 3.7: The camera supports both 2.4 GHz for wider coverage and 5 GHz for faster streaming.
4. Иштөө нускамалары
4.1 Live View жана Ойнотуу
- Open the O-KAM Pro app and select your connected camera to view жандуу видео каналы.
- Сенин колуңдан келет view up to four live feeds simultaneously if you have multiple cameras.
- Жазылган footage through the "Playback" option in the app.
4.2 Жасалма интеллект менен кыймылды аныктоо жана эскертүүлөр
- The camera features AI-powered person/motion detection to identify unusual activity.
- When motion is detected, instant alerts will be sent to your phone.
- Clips are automatically tagged for quick review окуялардын.

Figure 4.1: Smart motion detection focuses on human movement, reducing false alarms from wind or animals.
4.3 ChroMax AI Color Night Vision
- The camera utilizes ChroMax AI technology to deliver full-color video details even in very low light conditions.
- This provides enhanced clarity and detail compared to traditional black and white night vision.

Figure 4.2: Visual comparison demonstrating the superior color detail of ChroMax AI Color Night Vision in low light.
4.4 Эки тараптуу аудио
- The camera supports two-way audio communication, allowing you to speak and listen through the app.
4.5 Сактоо параметрлери
- TF карта сактоо: The camera supports local storage via a TF (Micro SD) card up to 256 GB (sold separately). This enables 24/7 continuous recording.
- Булуттагы сактагыч: Optional U.S. cloud storage is available (sold separately) for secure backup of your video recordings.

Figure 4.3: The camera offers flexible storage solutions, including local TF card and optional cloud storage.
4.6 Үй-бүлөлүк бөлүшүү
- Up to four users can be granted online access to view бир эле учурда түз эфирдеги ленталар.
- Share access with family members to monitor your home together.
5. Техникалык тейлөө
- Тазалоо: Regularly wipe the camera lens and the window surface with a soft, damp ачык сүрөт сапатын камсыз кылуу үчүн кездеме. Абразивдүү тазалагычтардан алыс болуңуз.
- Программалык камсыздоонун жаңыртуулары: Check the O-KAM Pro app periodically for firmware updates to ensure your camera has the latest features and security enhancements.
- Кубат туташуу: Ensure the power cable is securely connected and free from damage.
- Сактагычты башкаруу: If using a TF card, periodically review жана сакталган foo башкарууtage to prevent the card from becoming full.
6. Кыйынчылыктарды
| Көйгөй | Мүмкүн себеп | Чечим |
|---|---|---|
| Камера күйбөй жатат | Power cable loose or damaged; power outlet not working. | Check cable connections. Try a different power outlet. |
| Wi-Fi'га туташуу мүмкүн эмес | Incorrect Wi-Fi password; camera too far from router; Wi-Fi band incompatibility (e.g., trying to connect to 5GHz on an older router). | Verify password. Move camera closer to router. Ensure your router supports 2.4GHz or 5GHz as needed. Re-attempt connection. |
| Poor image quality / Glare | Dirty lens or window; camera not pressed firmly against glass (for window mounting). | Clean the camera lens and window. Ensure the camera is firmly pressed against the glass to minimize glare. |
| Motion detection not working or too many false alerts | Incorrect sensitivity settings; camera not positioned correctly. | Adjust motion detection sensitivity in the app. Ensure the camera's view is not obstructed by moving objects (e.g., tree branches). |
| App not detecting camera via Bluetooth | Bluetooth or location services disabled on phone; app permissions not granted. | Enable Bluetooth and location services. Grant necessary app permissions in your phone settings. |
7. Техникалык шарттар
- Модель аты: HF-K2W-W3A
- Бренд: ANYQOO
- Ички/тышкы колдонуу: Ички, сырткы
- Видео тартуу токтому: 3MP (2K, 1296p)
- Байланыш технологиясы: Wired (for power), Wireless (Bluetooth, Wi-Fi)
- Зымсыз байланыш: 2.4 GHz & 5.0 GHz Wi-Fi, Bluetooth
- Контроллердин түрү: Android, iOS (via O-KAM Pro App)
- Монтаж түрү: Window Mount (adhesive)
- Түнкү көрүнүш: ChroMax AI Color Night Vision (10 Meters range)
- Өзгөчөлүктөр: 2-Way Audio, 24/7 Recording, Person & Motion Detection, Anti-glare and Anti-reflection
- Сактагыч: Supports TF (Micro SD) card up to 256 GB (sold separately), Optional U.S. Cloud Storage
- Өлчөмдөрү: 1.97 x 1.97 x 1.18 дюйм
- Элемент Салмагы: 8.4 унция (0.24 килограмм)
- Материал: Пластик
- Түсү: Ак
- Кубат булагы: Электр зымдары
8. Кепилдик жана колдоо
For warranty information and technical support, please refer to the official ANYQOO website or contact their customer service directly. Contact details can typically be found on the product packaging or the manufacturer's webсайт.