1. Киришүү
This manual provides detailed instructions for the installation, operation, and maintenance of your BlackVue DR970X-2CH Plus II Dash Cam. Please read this manual thoroughly before using the product to ensure proper functionality and safety.
2. Пакеттин мазмуну
Продукцияңыздын таңгагында бардык элементтер бар экенин текшериңиз:
- BlackVue DR970X-2CH Plus II Front Dash Cam
- Арткы камера
- Car Mount (for front camera)
- USB-C кубат кабели
- Арткы камераны туташтыруу кабели
- MicroSD Card (size may vary based on purchase)
- MicroSD Card Reader
- Кабелдик клиптер
- Запастык монтаждоочу лента
- Pry куралы
- Quick Start Guide

Image: The BlackVue DR970X-2CH Plus II Dash Cam, including front and rear cameras, a microSD card, and a smartphone displaying the app interface.
3. Орнотуу жана орнотуу
3.1 MicroSD картасын киргизүү
- Камера өчүрүлгөнүн текшериңиз.
- Locate the microSD card slot on the side of the front camera.
- Insert the microSD card with the gold contacts facing away from the lens until it clicks into place.

Image: The BlackVue DR970X-2CH Plus II Dash Cam showing the microSD card slot and a microSD card, illustrating the large storage capacity up to 1TB.
3.2 Алдыңкы камераны орнотуу
- Choose a mounting location on your windshield, ideally behind the rearview күзгүгө тоскоолдук кылбасын view.
- Clean the windshield surface thoroughly.
- Attach the front camera mount to the windshield using the adhesive tape. Press firmly for at least 30 seconds.
- Slide the front camera onto the mount until it locks securely.
- Adjust the camera angle to ensure the road ahead is centered in the view.
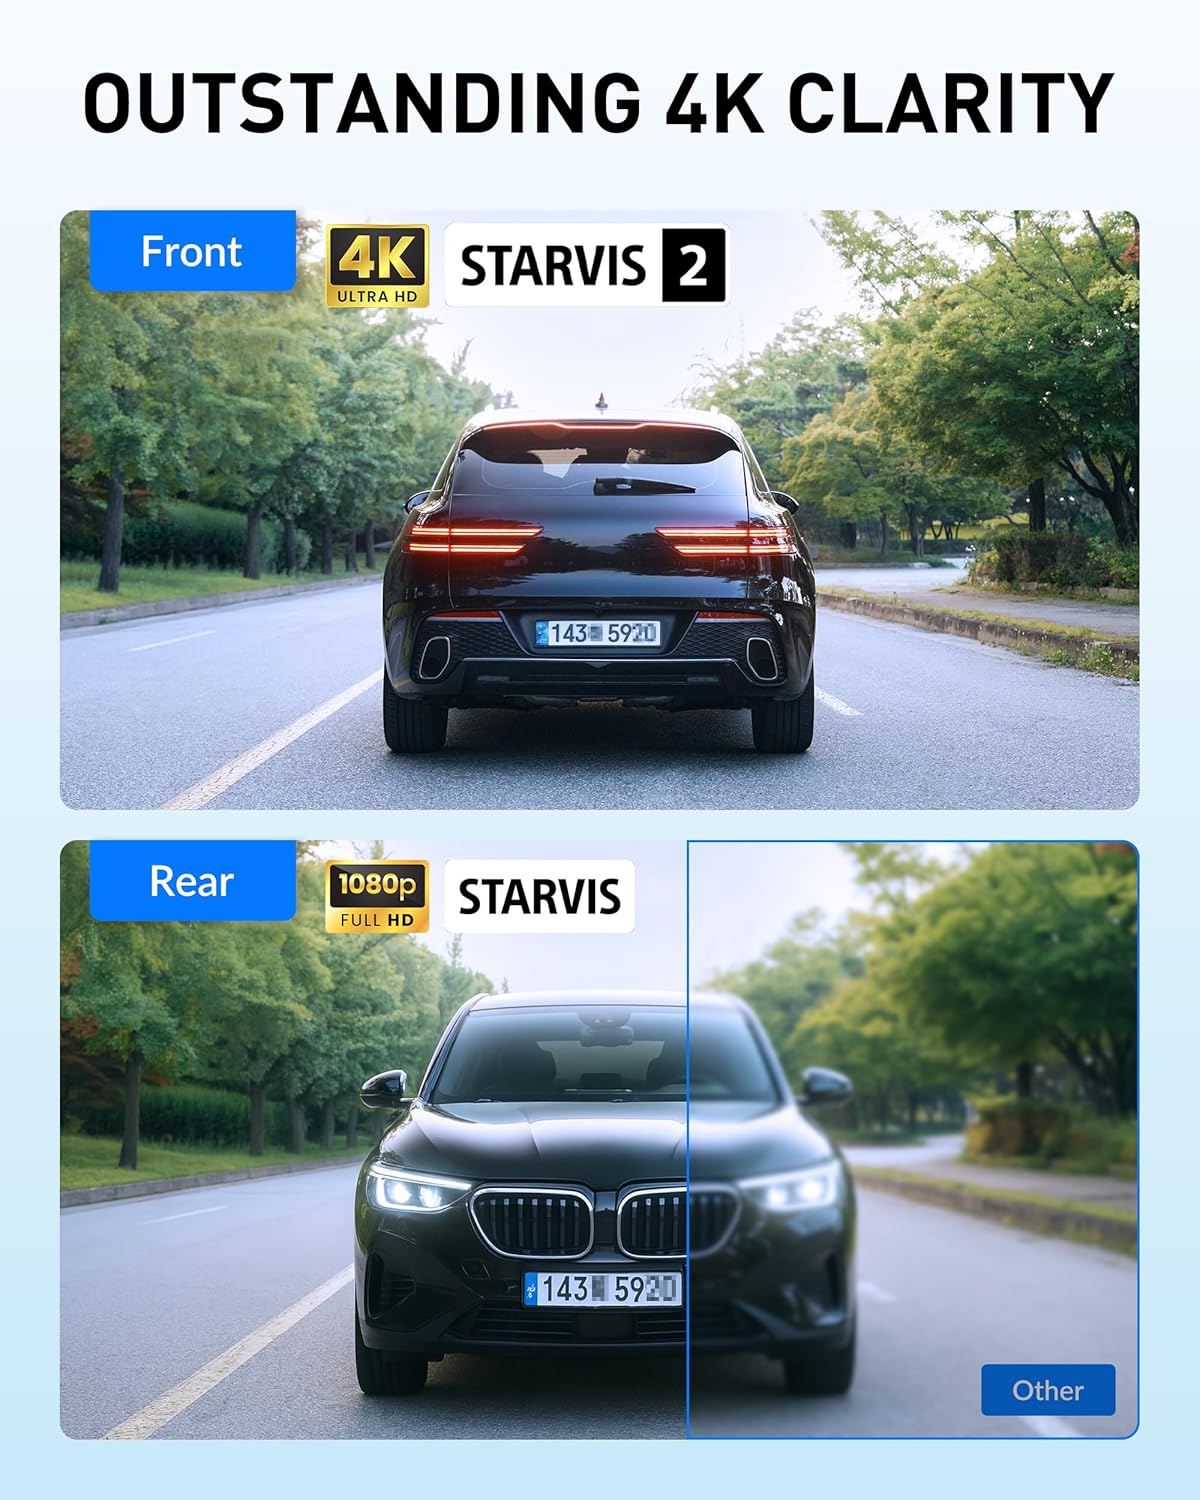
Image: The BlackVue DR970X-2CH Plus II front camera mounted discreetly behind a rearview mirror, showing its compact design.
3.3 Арткы камераны орнотуу
- Арткы камераны арткы алдыңкы бетке орнотуңуз, бул ачыктыкты камсыз кылат view артындагы жолдун.
- Connect the rear camera to the front camera using the provided coaxial cable. Route the cable neatly along the vehicle's headliner and pillars using the pry tool and cable clips.

Image: A diagram illustrating the routing of the rear camera cable from the front dash cam along the vehicle's interior to the rear camera.
3.4 Кубат туташтыруу
Connect the USB-C power cable to the front camera and then to your vehicle's cigarette lighter socket or a dedicated USB-C power port. For advanced features like Parking Mode, hardwiring is recommended (hardwiring kit sold separately).

Image: The BlackVue USB-C power cable and car charger, highlighting the easy installation process for the dash cam.
4. Иштөө нускамалары
4.1 Автоматтык жаздыруу
The dash cam automatically starts recording when the vehicle's ignition is turned on. Video files are saved in segments and overwrite the oldest files when the microSD card is full (loop recording).
4.2 Video Quality Features: 4K UHD, STARVIS 2, and HDR
The front camera records in 4K UHD (3840x2160) and features the STARVIS 2 sensor and High Dynamic Range (HDR) technology. These technologies work together to provide exceptional clarity, detail, and balanced exposure in various lighting conditions, from bright daylight to low-light environments. The rear camera records in Full HD (1920x1080).

Image: Comparison showing the enhanced clarity and detail provided by HDR and STARVIS 2 technology in the BlackVue DR970X-2CH Plus II, capturing license plates clearly in varying light.
4.3 Паркинг режими
When properly hardwired (with a hardwiring kit, sold separately), the dash cam enters Parking Mode when the ignition is turned off. It records motion and impacts, providing surveillance for your parked vehicle. Time-lapse recording is also available for efficient storage.

Image: Illustration of the Smart Parking Surveillance feature, showing the dash cam recording motion, impacts, and time-lapse footage while the vehicle is parked.
4.4 Окуяларды жаздыруу
The built-in G-sensor detects sudden impacts or changes in vehicle speed, triggering event recording. These files are protected from being overwritten by loop recording. The system includes 10 seconds of pre-buffering to capture events leading up to an incident.

Image: Visual representation of the Smart Event Recording feature, showing a collision scenario and how the dash cam captures critical footage before and during the event.
4.5 Wi-Fi жана булут байланышы
The dash cam features built-in Wi-Fi for direct connection to your smartphone via the BlackVue App. This allows for live view, video playback, and settings adjustments. For remote access, connect the dash cam to a mobile hotspot or the optional CM100G LTE module (sold separately) to utilize BlackVue Cloud features such as Live View, Remote Playback, Auto Backup, and real-time Push Notifications.

Image: A smartphone screen displaying the BlackVue app interface, showing live view and notifications from the dash cam, illustrating Wi-Fi and Cloud connectivity.
5. Техникалык тейлөө
5.1 MicroSD картасын башкаруу
Regularly format the microSD card (at least once a month) using the BlackVue App or Viewer software to maintain optimal performance and prevent errors. Use only BlackVue-branded microSD cards for guaranteed compatibility and reliability.
5.2 Микропрограмма жаңыртуулары
Keep your dash cam's firmware updated to ensure access to the latest features and improvements. Firmware updates can be performed via the BlackVue App or by manually loading the firmware onto the microSD card.
5.3 Тазалоо
Gently clean the camera lenses with a soft, lint-free cloth. Avoid using harsh chemicals or abrasive materials that could damage the lens coating.
6. Кыйынчылыктарды
- Dash Cam күйбөйт: Check the power cable connection to both the dash cam and the vehicle's power outlet. Ensure the vehicle's ignition is on if not hardwired.
- Жаздыруу маселелери: Ensure the microSD card is inserted correctly and is not full. Format the microSD card regularly. If issues persist, try a different BlackVue-branded microSD card.
- Wi-Fi туташуу көйгөйлөрү: Ensure Wi-Fi is enabled on the dash cam and your smartphone. Try restarting both devices.
- Видеонун сапаты начар: Ensure the lenses are clean. Check that the camera angle is correctly adjusted. Verify that the firmware is up to date.
- Dash Cam requires firmware update after initial setup: Some units may require a firmware update for optimal performance. Follow the instructions in the BlackVue App or on the BlackVue webпрограмманы жаңыртуу үчүн сайт.
7. Техникалык шарттар
| Өзгөчөлүк | Description |
|---|---|
| Модель аты | DR970X-2CH Plus II |
| Алдыңкы камеранын чечилиши | 4K UHD (3840x2160) |
| Арткы камеранын чечилиши | Толук HD (1920x1080) |
| Front Sensor | СТАРВИС 2 |
| Видеону коддоо | HEVC (H.265), AVC (H.264) |
| Байланыш | Wi-Fi, Cloud (via external module) |
| Өзгөчөлүктөр | HDR, Fast USB-C Boot, G-Sensor, Smart Parking Mode, Up to 1TB microSD support |
| Сактагыч | Supports up to 1TB microSD card (sold separately) |
| Продукциянын өлчөмдөрү | 7.8"D x 4.8"W x 4"H |
| Элемент Салмагы | 1.87 фунт |
| Өндүрүүчү | Питтасофт |
8. Кепилдик жана колдоо
BlackVue products are manufactured by Pittasoft. For warranty information, technical support, or service inquiries, please refer to the official BlackVue webсайтка же түздөн-түз кардарларды колдоо менен байланышыңыз. Кепилдик дооматтар үчүн сатып алганыңыздын далилин сактаңыз.
For additional resources and frequently asked questions, visit the official BlackVue support page.


