1. Киришүү
Thank you for choosing the COSTWAY 150 Pints Dehumidifier with Pump. This manual provides essential information for the safe and efficient operation, maintenance, and troubleshooting of your dehumidifier. Please read it thoroughly before use and retain it for future reference.

Image 1.1: The COSTWAY 150 Pints Dehumidifier operating in a home setting, highlighting its dehumidification capacity and coverage area.
2. Маанилүү коопсуздук нускамалары
Өрт, электр шок же жаракат алуу коркунучун азайтуу үчүн ар дайым төмөнкү негизги сактык чараларын аткарыңыз:
- Шайманды колдонуудан мурун бардык нускамаларды окуп чыгыңыз.
- кубат менен камсыз кылуу Voltage рейтинг белгисинде көрсөтүлгөн.
- Do not operate the dehumidifier with a damaged cord or plug. If the cord is damaged, it must be replaced by the manufacturer or a qualified service agent.
- Always place the unit on a firm, level surface.
- Allow the unit to stand upright for at least 4 hours before initial use to allow the refrigerant (R32) to stabilize.
- Аба кирүүчү же чыгуучу тешиктерди жаппаңыз. Түзмөктүн айланасында кеминде 20 см (8 дюйм) боштук калтырыңыз.
- Тазалоодон же техникалык тейлөө жүргүзүүдөн мурун нымдандыргычты сууруп алыңыз.
- Do not use the appliance near water or in excessively damp суу чачырап кетиши мүмкүн болгон чөйрөлөр.
- Бул шайман физикалык, сезүү же акыл-эс жөндөмү начар же тажрыйбасы жана билими жок адамдар (анын ичинде балдар) үчүн, эгерде алардын коопсуздугуна жооптуу адам тарабынан көзөмөлсүз же шайманды колдонуу боюнча көрсөтмө болбосо, колдонууга арналбайт.
- Балдарды шаймандан алыс кармаңыз.
3. Орнотуу жана орнотуу
3.1 Пакеттен чыгаруу
- Кургаткычты анын таңгагынан кылдаттык менен алып салыңыз.
- Бардык таңгактоочу материалдарды, скотчторду жана коргоочу пленкаларды алып салыңыз.
- Түзмөктү жеткирүү учурундагы кандайдыр бир бузулууларды текшериңиз. Эгерде бузулган болсо, иштетпеңиз жана кардарларды тейлөө кызматына кайрылыңыз.
3.2 Орнотуу
- Place the dehumidifier in a location where the humidity is highest, such as a basement, bathroom, or bedroom.
- Ensure the unit is placed on a stable, level surface to prevent vibration and noise.
- Аба агымынын жакшы болушу үчүн, түзмөктүн айланасында кеминде 20 см (8 дюйм) боштук калтырыңыз.
- Аппаратты жылуулук булактарынын жанына же тике күн нуруна коюудан алыс болуңуз.
3.3 Алгачкы даярдоо
Before plugging in the unit for the first time, or if it has been transported horizontally, allow it to stand upright for a minimum of 4 hours. This allows the refrigerant to settle, ensuring optimal performance and preventing damage to the compressor.
4. Иштөө нускамалары
4.1 Башкаруу панелинин үстүнөview

Image 4.1: The control panel with various function buttons.
The control panel features a digital display and several buttons for managing the dehumidifier's functions:
- Кубат баскычы: Агрегатты күйгүзөт же өчүрөт.
- Нымдуулукту жөндөө баскычтары (+/-): Adjusts the desired humidity level in Normal Mode.
- Желдетүүчү ылдамдык баскычы: Cycles through 3 fan speed settings (Low, Medium, High).
- Таймер баскычы: 24 сааттык күйгүзүү/өчүрүү таймерин орнотот.
- Балдардын кулпу баскычы: Activates or deactivates the child lock function (long press).
- Автоматтык түрдө эритүү индикатору: Illuminates when the auto defrost function is active.
4.2 Иштөө режимдери
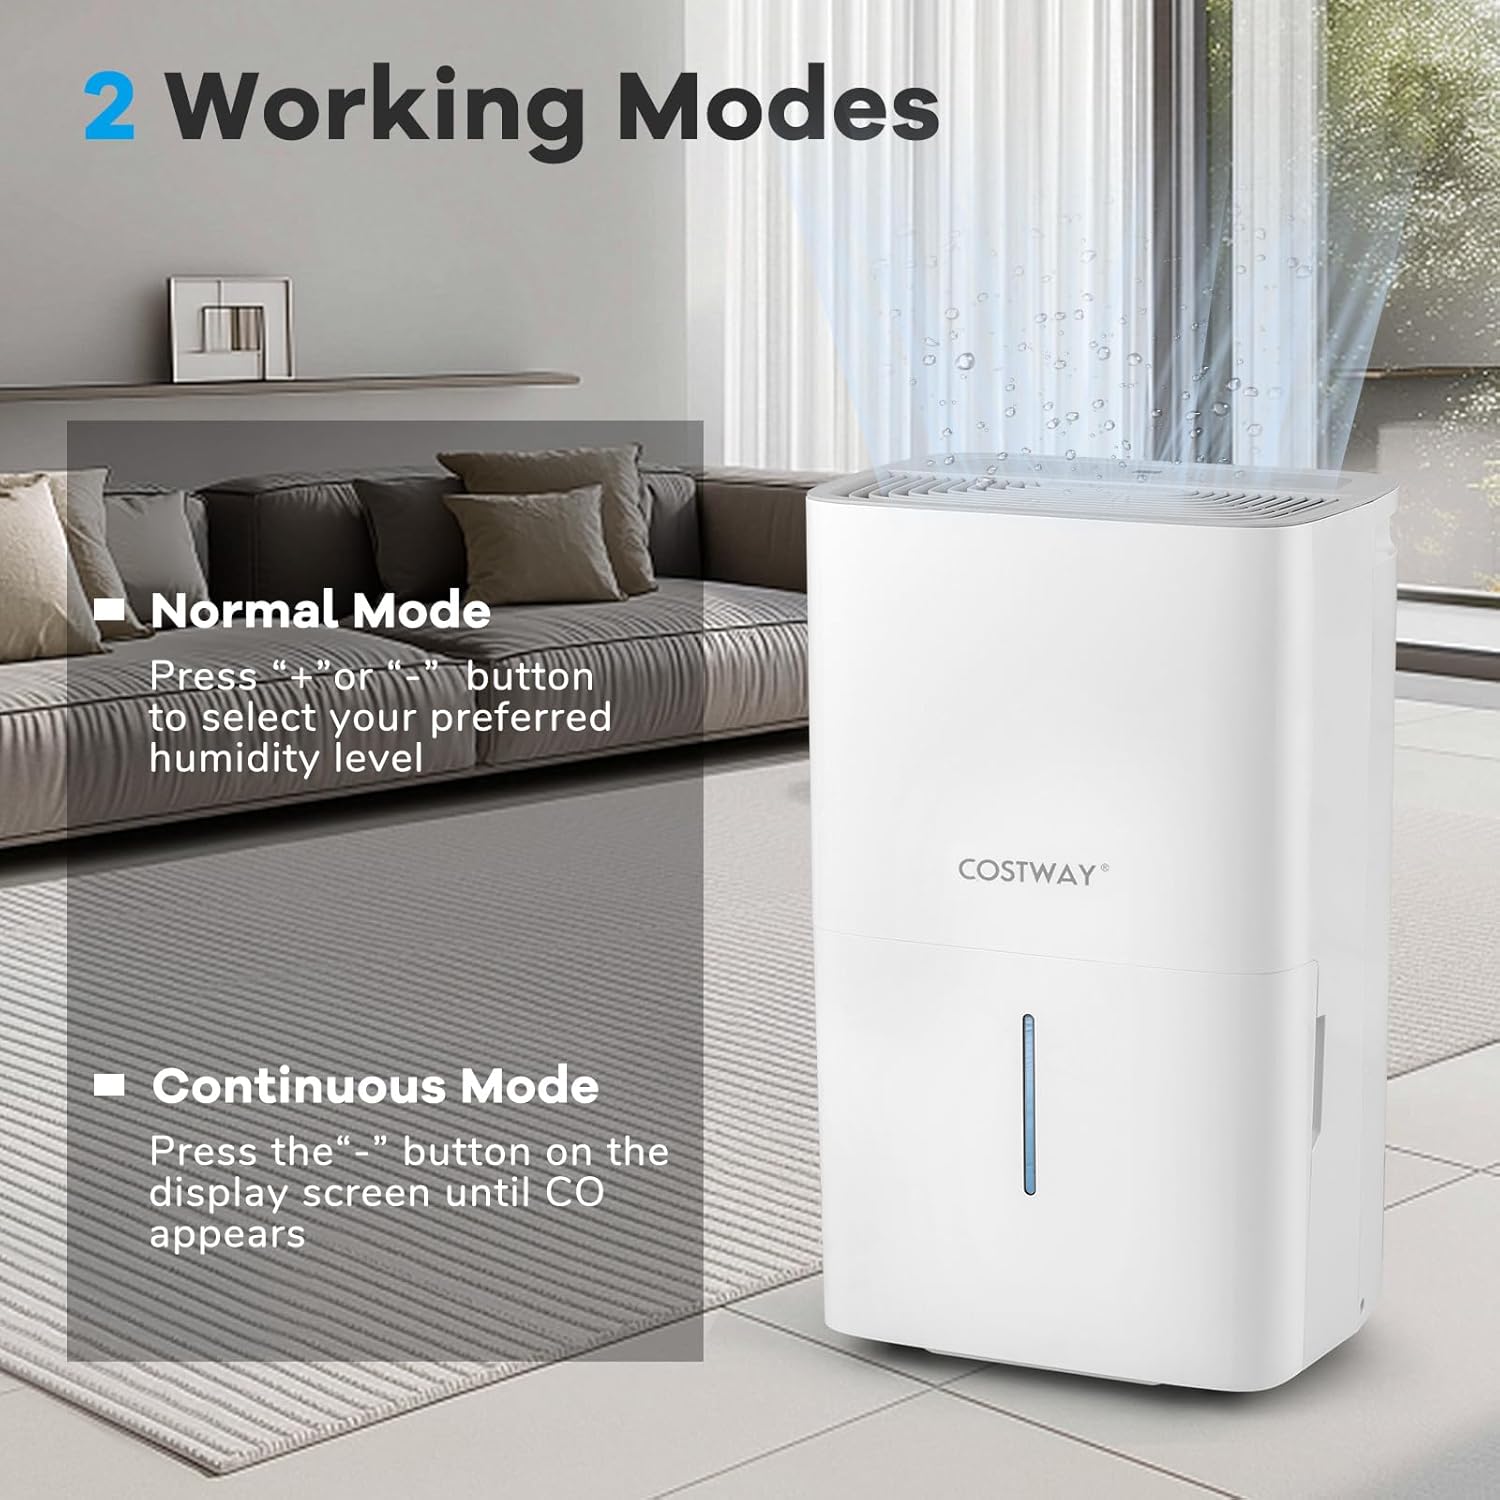
Image 4.2: Illustration of Normal and Continuous operating modes.
The dehumidifier offers two primary working modes:
- Кадимки режим: In this mode, you can set your preferred humidity level using the "+" or "-" buttons. The unit will operate until the set humidity is reached, then cycle on and off to maintain it.
- Үзгүлтүксүз режим: To activate continuous dehumidification, press the "-" button on the display screen until "CO" appears. In this mode, the unit will run continuously regardless of the ambient humidity level, ideal for very damp шарттар.
4.3 Башка функциялар
- 24 сааттык таймер: Use the timer function to program the unit to turn on or off automatically after a set period (1-24 hours).
- Балдар кулпусу: Press and hold the Child Lock button for a few seconds to lock the control panel, preventing accidental changes to settings. Repeat to unlock.
- Авто эритүү: Бул түзүлүш бууланткычтын катушкаларында үшүк пайда болгондо иштетилүүчү автоматтык эритүү функциясына ээ, бул салкын чөйрөдө натыйжалуу иштөөнү камсыз кылат.
- Эстутумду кайра иштетүү: Куч болгон учурда уtagд, кубат калыбына келгенден кийин, блок автоматтык түрдө акыркы орнотуулар менен кайра ишке кирет.
5. Дренаж жолдору

Сүрөт 5.1: Бүттүview of the three available drainage methods.
Your dehumidifier offers multiple ways to remove collected water:
5.1 Кол менен дренаж
- The unit is equipped with a 2.4-gallon water tank.
- When the tank is full, the unit will automatically shut off, and a water full alarm will sound. The waterline display provides a visual indication of the water level.
- Carefully pull out the water tank using its handle, empty the water, and reinsert the tank firmly until it clicks into place.
5.2 Pump Drainage
- For continuous drainage to a higher elevation or distant drain, use the included 16.4 ft pump drain hose.
- Connect one end of the pump drain hose to the pump drainage port on the unit.
- Route the other end of the hose to a suitable drain, ensuring there are no kinks or obstructions.
- Ensure the hose is securely connected to prevent leaks.
5.3 Gravity Drainage
- For continuous drainage to a lower elevation, use the included 23.5-inch drain hose for gravity drainage.
- Connect one end of the gravity drain hose to the gravity drainage port on the unit.
- Ensure the hose is sloped downwards to allow water to flow out by gravity to a suitable drain.
- Do not elevate the hose above the drainage port, as this will prevent water from draining.
6. Техникалык тейлөө
Үзгүлтүксүз тейлөө оптималдуу иштешин камсыз кылат жана нымдандыргычыңыздын иштөө мөөнөтүн узартат.
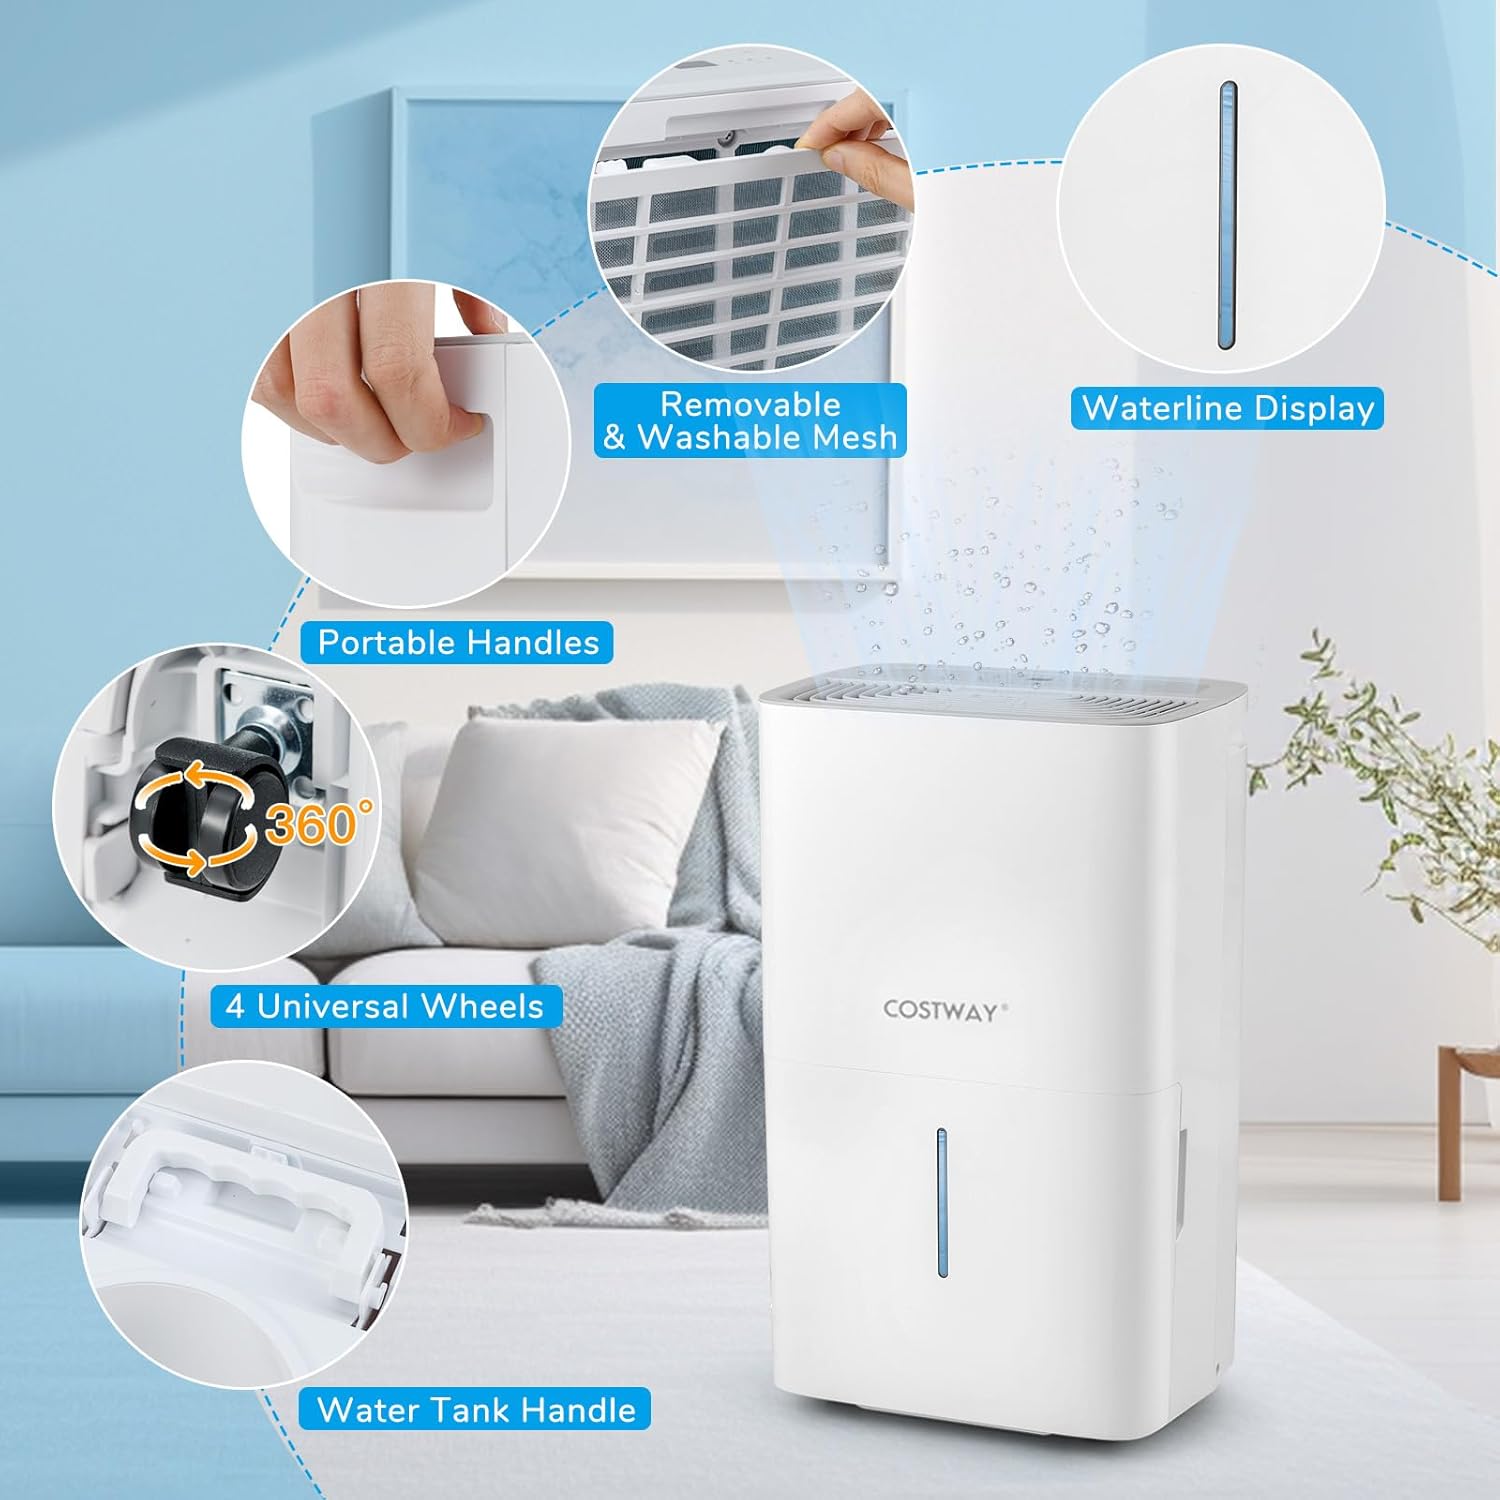
Image 6.1: Features enhancing convenience and maintenance, including the washable filter.
6.1 Аба чыпкасын тазалоо
The mesh air filter should be cleaned regularly (every 2-4 weeks, depending on usage) to prevent dust buildup and maintain efficiency.
- Кургаткычты розеткадан сууруп алыңыз.
- Remove the mesh filter from the back or side of the unit.
- Чыпканы жылуу, самындуу суу менен жууңуз. жакшылап чайкоо.
- Фильтрди бөлүккө кайра салуудан мурун аны толугу менен кургатуу үчүн күтүңүз. Кургаткычты же түз жылуулукту колдонбоңуз.
6.2 Агрегаттын сыртын тазалоо
- Кургаткычтын сыртын жумшак, г менен сүртүңүзamp кездеме.
- Катуу химиялык заттарды, абразивдүү тазалоочу каражаттарды же эриткичтерди колдонбоңуз, анткени алар бетке зыян келтириши мүмкүн.
6.3 Сактоо
- Агрегатты узак мөөнөткө сактасаңыз, суу резервуарынын бош жана таза экенине ынаныңыз.
- Аба чыпкасын тазалаңыз.
- Wrap the power cord neatly and secure it.
- Store the unit in an upright position in a cool, dry place, away from direct sunlight and extreme temperatures.
7. Кыйынчылыктарды
Кардарларды тейлөө кызматына кайрылуудан мурун, төмөнкү жалпы маселелерди жана чечимдерди караңыз:
| Көйгөй | Мүмкүн себеп | Чечим |
|---|---|---|
| Кургаткыч күйгүзбөйт. | Электр жок; Кубат шнуру сайылган эмес; Суу багы толуп калган же туура эмес орнотулган. | Check power outlet and plug; Empty and reinsert water tank correctly. |
| Unit not collecting water. | Air filter clogged; Room temperature too low; Humidity setting too high; Unit in Continuous Mode but drain hose is blocked. | Clean air filter; Ensure room temperature is above 41°F (5°C); Lower humidity setting; Check drain hose for kinks or blockages. |
| Агрегат ызы-чуу. | Агрегат түз жерде эмес; Аба чыпкасы бүтүп калган. | Агрегатты тегиз, туруктуу бетке кой; Таза аба чыпкасы. |
| Агрегаттан суу агып жатат. | Water tank not properly inserted; Drain hose connection loose or damaged. | Ensure water tank is fully inserted; Check drain hose connections and replace if damaged. |
| Pump drainage not working. | Pump hose kinked or blocked; Pump drainage port obstructed. | Inspect pump hose for kinks or blockages; Ensure pump drainage port is clear. |
8. Техникалык шарттар

Image 8.1: Product dimensions and dehumidification capacities.
| Өзгөчөлүк | Деталь |
|---|---|
| Бренд | ЖОЛ ЖОЛУ |
| Модель аты | ES10480US-WH |
| нымдуулуктун күч жөндөмдүүлүгү | Күнүнө 150 пинта (95°F температурада, 90% нымдуулукта) |
| Камтуу аймагы | 7000 кв.Фт |
| Суу резервуарынын көлөмү | 2.4 галлон |
| Продукциянын өлчөмдөрү (D x W x Y) | 9" x 13" x 19.5" |
| Элемент Салмагы | 30.5 фунт |
| Күйөрмандар ылдамдыгынын саны | 3 |
| Иштөө режимдери | Normal, Continuous |
| Өзгөчөлүктөр | Built-In Pump, Child Lock, Digital Display, Removable Tank, Washable Filter |
| Аба агымынын кубаттуулугу | Мүнөтүнө 230 куб фут (CFM) |
| Жогорку температура рейтинги | 95 градус Фаренгейт |
| Материал | Акрилонитрил бутадиен стирол (ABS) |
| Камтылган компоненттер | Drain hose, Instruction Manual |
9. Кепилдик жана колдоо
For warranty information, please refer to the warranty card included with your product or contact COSTWAY customer support directly. Keep your purchase receipt as proof of purchase.
If you encounter any issues not covered in the troubleshooting section, or require further assistance, please contact COSTWAY customer service through their official webсайт же продукт таңгагында көрсөтүлгөн байланыш маалыматы.


