1. Киришүү
This user manual provides essential information for the installation, configuration, and operation of your Jennov 4K 8MP Outdoor PTZ IP POE Camera, Model PS6006. This advanced security camera offers high-resolution surveillance with pan, tilt, and optical zoom capabilities, along with intelligent detection features. Please read this manual thoroughly before using the product to ensure proper functionality and safety.
2. Продукт бүтүп калдыview
Негизги өзгөчөлүктөрү
- Ultra 4K HD Resolution: 8MP (3840*2160 pixels) for clear, detailed images.
- 20X Optical Zoom & 10X Digital Zoom: Motorized lens (4.7~94mm) for detailed remote viewing without quality loss.
- Pan & Tilt функциясы: Wide coverage with pan and tilt control.
- Auto Tracking & Human Detection: Automatically tracks detected individuals and reduces false alarms.
- 320ft IR Night Vision: Enhanced night vision with 6 high-performance infrared LED lights for clear black-and-white images in darkness.
- Power Over Ethernet (POE): Single Ethernet cable for power and data connection.
- Эки тараптуу аудио: Реалдуу убакыт режиминде байланышуу үчүн орнотулган микрофон жана динамик.
- IP66 аба ырайы: Ар кандай аба ырайынын шарттарында сыртта колдонуу үчүн бышык дизайн.
- Efficient H.265 Coding: Saves bandwidth and storage space.
Пакеттин мазмуну
Пакетиңизде бардык буюмдар бар экенин текшериңиз:
- Jennov 4K 8MP Outdoor PTZ IP POE Camera (Model PS6006)
- Ethernet кабели
- Кубаттуу адаптер
- Монтаждоочу стенд
- User Manual
- Суу өткөрбөй турган капкак
- Эскертүү чаптамасы
- Монтаждоо бурамалар

Сүрөт: деталдуу view of the Jennov 4K POE Camera components and the items included in the packing list, such as the camera, Ethernet cable, power adapter, stand, user manual, waterproof cap, and screws.
3. Орнотуу нускамалары
3.1 Камераны орнотуу
- Choose a suitable outdoor location for mounting, ensuring a clear field of view and access to an Ethernet cable.
- Use the provided mounting stand and screws to securely attach the camera to a wall or ceiling.
- Ensure the camera is positioned to cover the desired surveillance area.
3.2 Power and Network Connection (POE)
The Jennov PS6006 camera supports Power Over Ethernet (POE), simplifying installation by using a single Ethernet cable for both power and data transmission. This camera is only compatible with POE NVRs that support the Onvif protocol.
- Ethernet кабелинин бир учун камеранын Ethernet портуна туташтырыңыз.
- Connect the other end of the Ethernet cable to a POE NVR or a POE switch.
- If using a POE switch, connect the POE switch to your router.
- Бардык байланыштар коопсуз экенин текшериңиз.
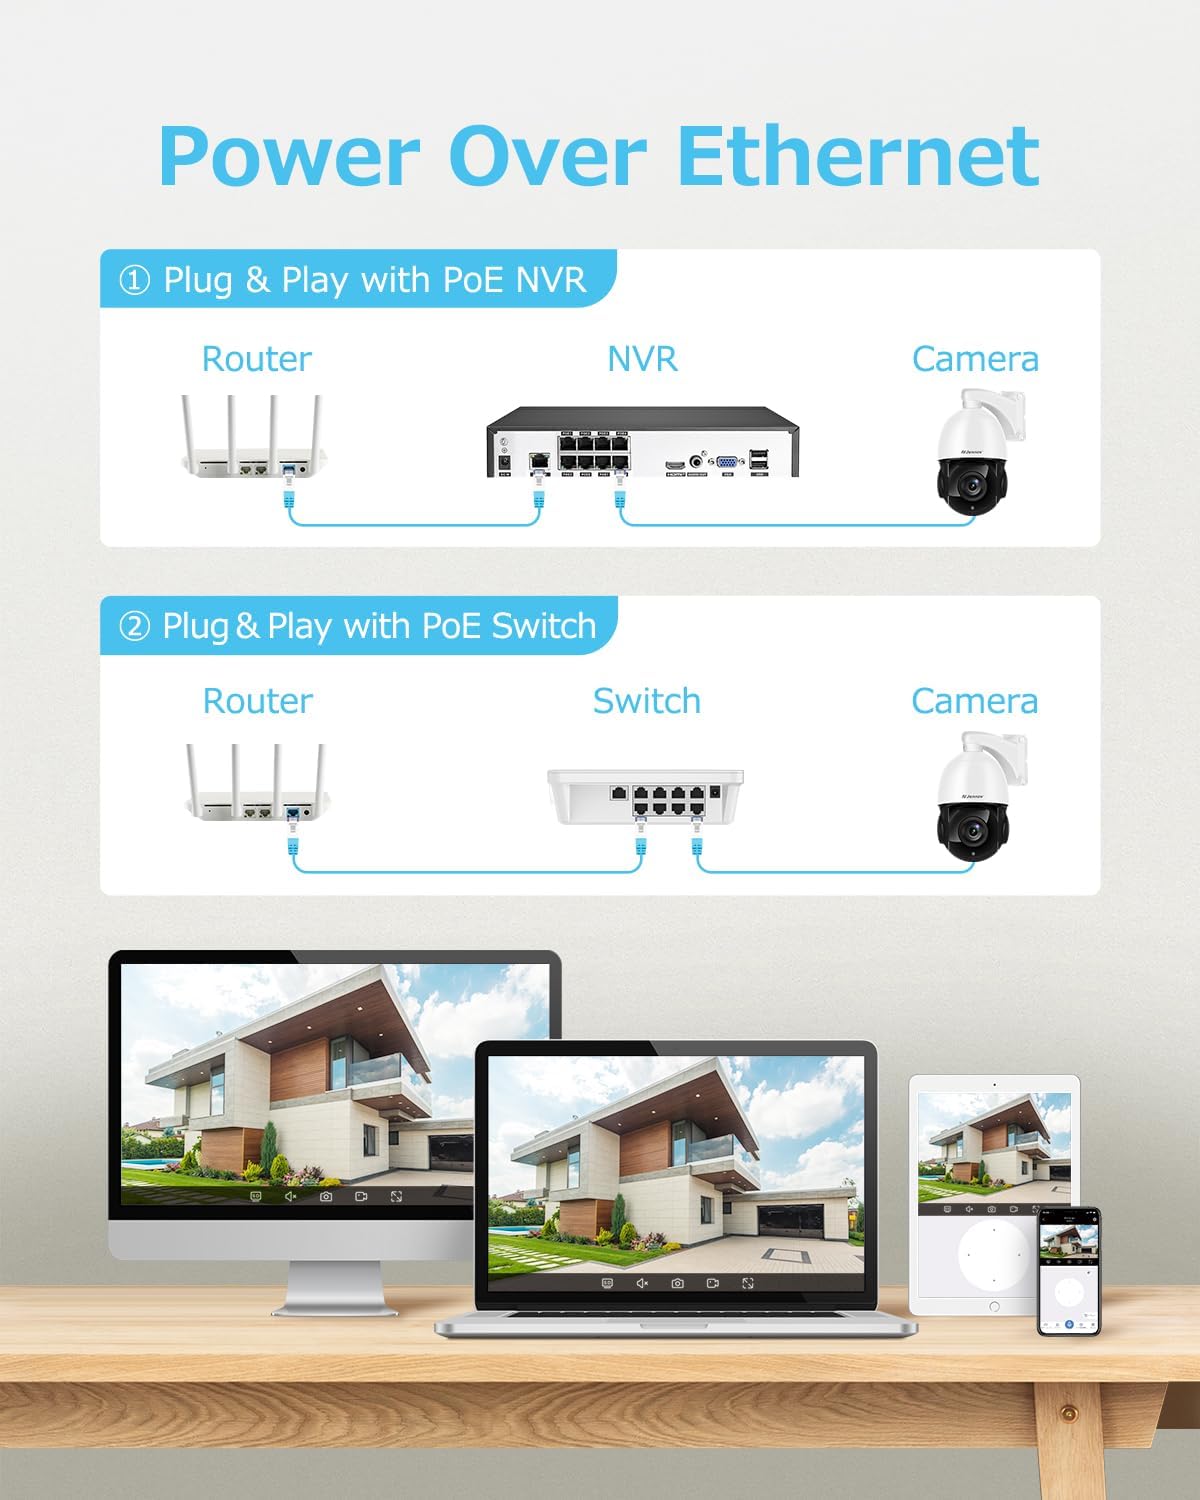
Image: Diagram illustrating two methods of Power Over Ethernet connection: directly to a POE NVR, or via a POE switch connected to a router, both providing power and data to the camera.
3.3 Баштапкы конфигурация
- Power up the camera by connecting it to a POE NVR or POE switch.
- Perform the initial setup through your POE NVR's user interface or by scanning the QR code via the VideoLink App on your mobile device.
- Follow the on-screen prompts to configure network settings, create user accounts, and set up recording preferences.
4. Иштөө нускамалары
4.1 Pan, Tilt, and Zoom Control
Control the camera's pan (horizontal rotation), tilt (vertical movement), and optical zoom remotely via the VideoLink app or your NVR interface.
- Пан: Rotate the camera horizontally to cover a wide area.
- Россия: Adjust the camera's vertical angle to view higher or lower areas.
- Оптикалык масштаб: Use the zoom function to magnify distant objects without compromising image clarity. The camera supports 20X optical zoom.
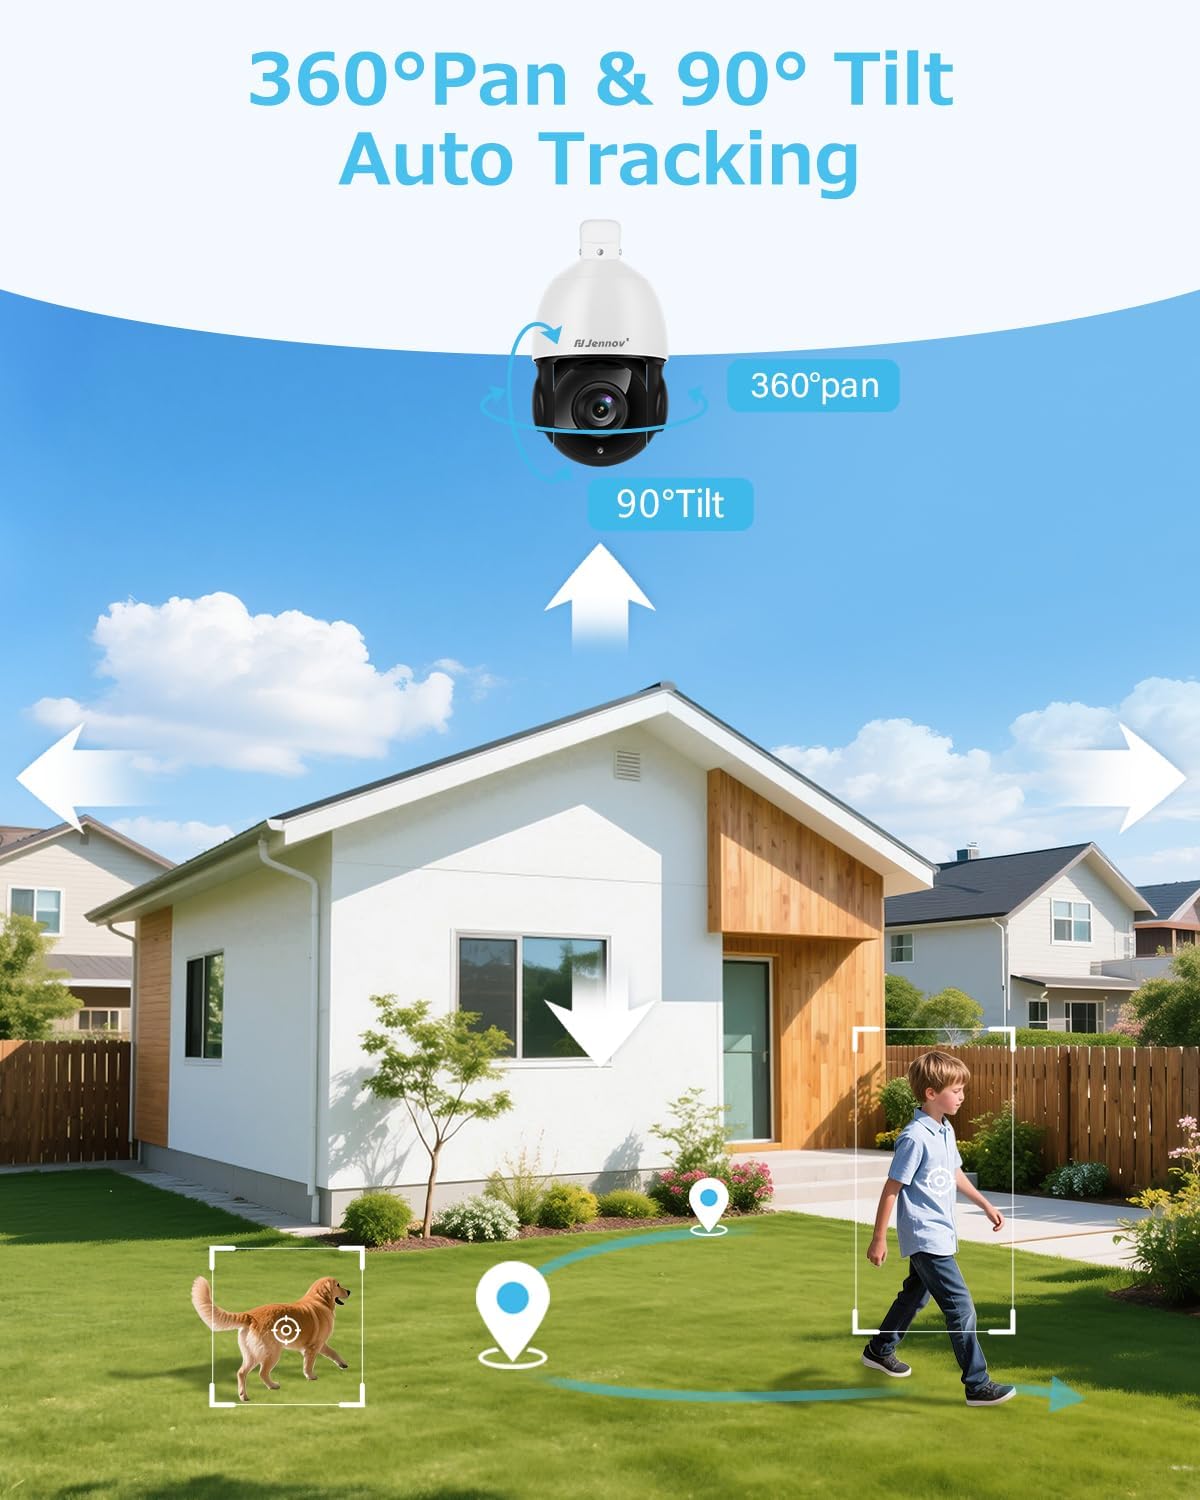
Image: An outdoor security camera mounted on a house, illustrating its 360-degree pan and 90-degree tilt capabilities, along with auto-tracking of a person and a dog in the yard.

Image: A landscape view demonstrating the camera's 20X optical zoom, showing how a distant object (like a wind turbine) becomes progressively clearer from 1X to 20X zoom.
4.2 Auto Tracking and Human Detection
The camera features intelligent auto-tracking and human detection to enhance security monitoring.
- Адамды аныктоо: Configure detection zones and sensitivity settings in the app to minimize false alarms caused by non-human movement.
- Автоматтык көз салуу: When a person is detected, the camera will automatically track their movement within its field of view. Note: The camera tracks one target at a time.
- Cruising Routes: Set up to 8 cruising routes, each with up to 16 preset positions, for cyclical patrol of specific areas.
- Эскертүүлөр: Receive real-time video or snapshot alerts on your mobile phone when human movement is detected.
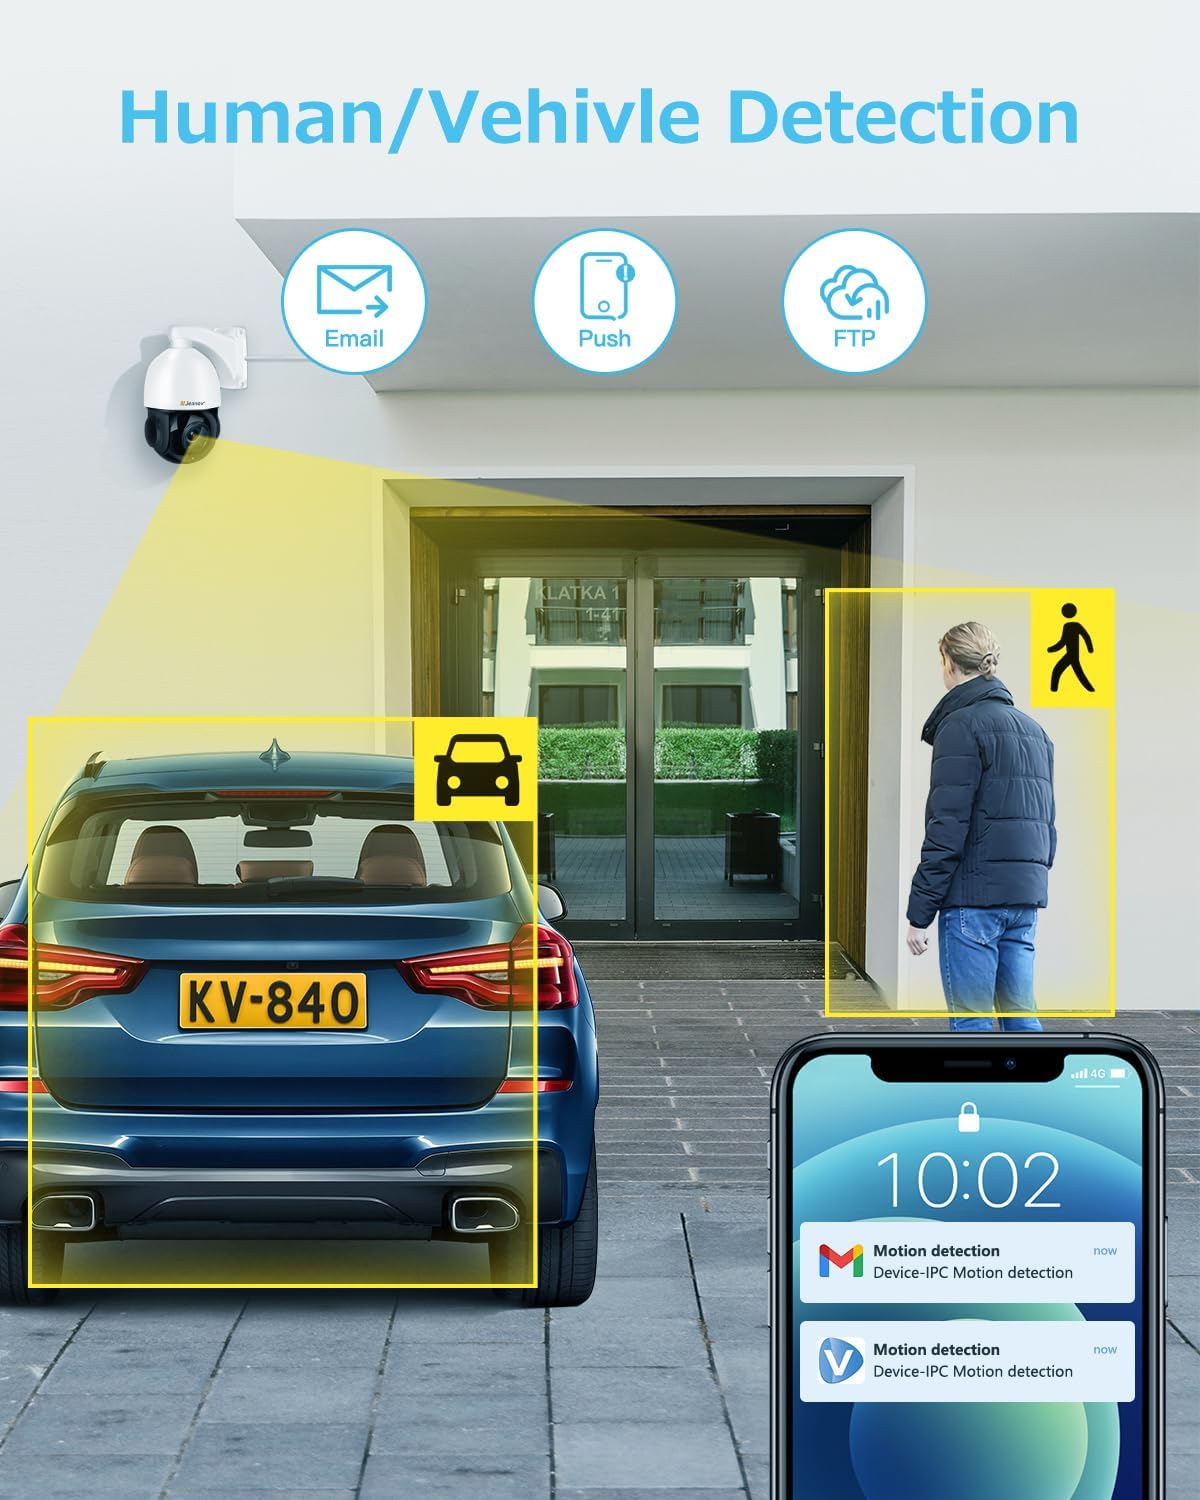
Image: An illustration showing the camera detecting both a human and a vehicle, with corresponding motion detection alerts displayed on a smartphone screen.
4.3 Түнкү көрүнүш
The camera is equipped with advanced IR night vision for clear surveillance in low-light or no-light conditions.
- IR-Cut: The camera automatically switches between day and night modes using its IR-cut filter.
- Инфракызыл диоддор: Six high-performance infrared LED lights provide a night vision range of up to 320 feet (approximately 97 meters).
- Black-and-White Mode: In dark conditions, the camera provides clear black-and-white images for accurate motion detection and monitoring.

Image: A split image demonstrating the camera's day and night vision capabilities, showing a clear color view during the day and a detailed black-and-white infrared view at night, both covering a residential area.
4.4 Эки тараптуу аудио
Communicate with visitors or deter intruders using the camera's built-in microphone and speaker.
- Access the two-way audio function through the VideoLink app.
- Speak into your mobile device's microphone to transmit audio through the camera's speaker.
- Listen to audio from the camera's location through your mobile device.
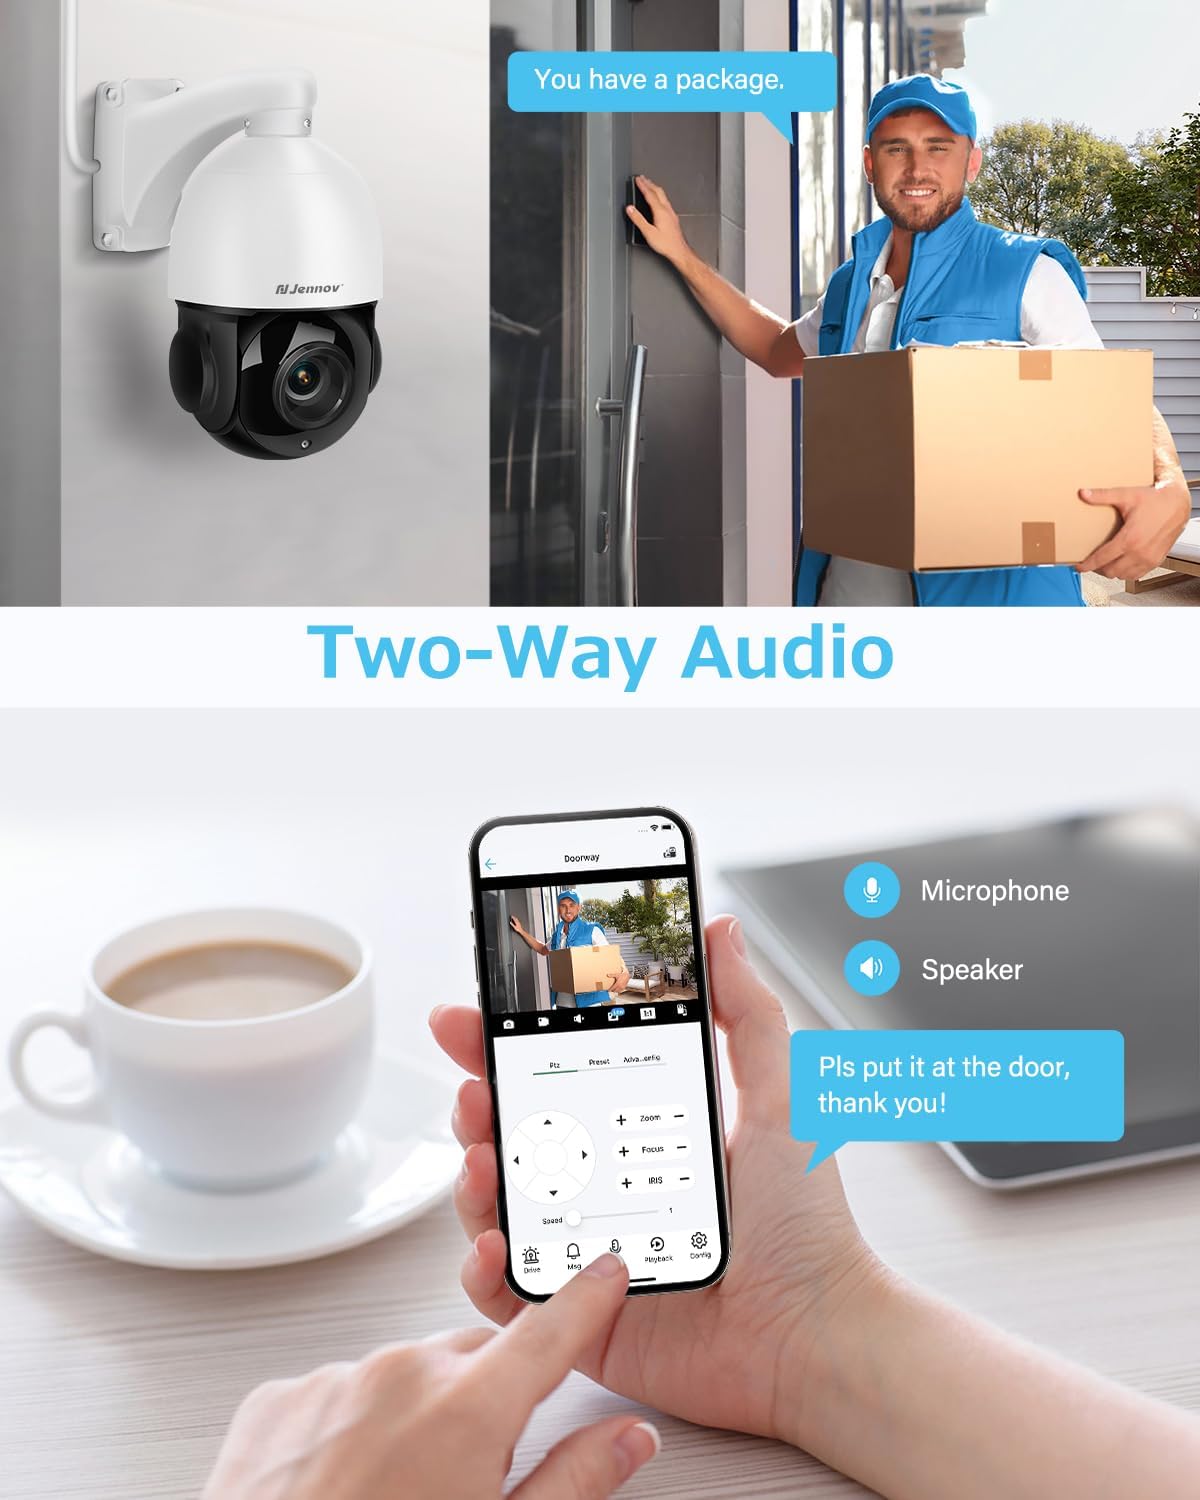
Image: A scene depicting a delivery person at a door, with a smartphone displaying the camera feed and controls for microphone and speaker, illustrating the two-way audio feature.
4.5 Remote Access and Storage
Access your camera feed and recordings from anywhere using the dedicated app.
- Мобилдик колдонмо: Download the VideoLink app to your smartphone (Android/iOS) for live viewing, playback, snapshots, and motion alerts.
- Иш такта кардары: A client is available for Windows operating systems. Mac users can access the camera via a web браузер.
- Сактагыч: The camera supports local storage via a Micro SD card (up to 256GB, not included) and continuous recording to a compatible Jennov NVR or FTP server.
5. Техникалык тейлөө
- Тазалоо: Regularly clean the camera lens with a soft, dry cloth to ensure optimal image clarity. Avoid abrasive cleaners.
- Программалык камсыздоонун жаңыртуулары: Өндүрүүчүнү текшериңиз website or app for available firmware updates to ensure your camera has the latest features and security enhancements.
- Кабелдик текшерүү: Periodically inspect the Ethernet cable and connections for any signs of wear or damage, especially in outdoor environments.
- Аба ырайын коргоо: While the camera is IP66 weatherproof, ensure proper installation to prevent water accumulation around connections.
6. Кыйынчылыктарды
Жалпы маселелер жана чечимдер
- No Image/Connection:
- Ensure the Ethernet cable is securely connected to both the camera and the POE NVR/switch.
- Verify that the POE NVR/switch is powered on and functioning correctly.
- Check network settings and IP address configuration.
- Сүрөттүн сапаты начар:
- Камера линзасын тазалаңыз.
- Ensure sufficient lighting for optimal performance, especially at night.
- Check your network environment; 4K cameras require stable network conditions.
- Жалган ойготкучтар:
- Adjust the detection area and sensitivity settings in the app to reduce triggers from environmental factors (e.g., moving branches, small animals).
- Camera Not Tracking:
- Ensure auto-tracking is enabled in the camera settings.
- Verify that human detection is functioning correctly.
- NVR шайкештиги:
- This camera is only compatible with POE NVRs that support the Onvif protocol. It cannot work with WiFi NVRs.
Камераны кантип калыбына келтирсе болот
If you encounter persistent issues, a factory reset may be necessary.
- Physical Reset Button: Open the cover on the back of the camera to locate the reset button, typically next to the SD card slot. Press and hold for several seconds until the camera resets.
- Software Reset (VideoLink App): Navigate to "Config" > "Factory Reset".
- Software Reset (LMS): Right-click the IP address of the camera and select "Restore".
- Software Reset (AjDevTools): Use the tool to search for the camera's IP address, tick the camera, and click "Batch Reset".
7. Техникалык шарттар
| Өзгөчөлүк | Спецификация |
|---|---|
| Модель аты | PS6006 |
| Видео тартуунун резолюциясы | 4K (3840x2160) |
| Натыйжалуу дагы эле чечим | 8 депутат |
| Оптикалык масштаб | 20X |
| Digital Zoom | 10X |
| Түнкү көрүү диапазону | 320 Фут |
| Frame Rate | секундасына 20 кадр |
| Байланыш технологиясы | Ethernet (POE) |
| Зымсыз байланыш технологиясы | Ethernet аркылуу кубаттоо |
| Ички/тышкы колдонуу | Сыртта |
| Сууга туруктуулук деңгээли | IP66 суу өткөрбөйт |
| Материал | Алюминий, Пластик |
| Элементтин өлчөмдөрү (L x W x Y) | 4.7 x 11.7 x 8.3 дюйм |
| Элемент Салмагы | 4.58 фунт |
| Шайкеш түзмөктөр | Smartphone, POE NVR (Onvif protocol) |
| Башкаруу ыкмасы | Колдонмо |
| Видеону коддоо | H.265 |
| Flash эс тутум түрү | Micro SD (256 ГБ чейин) |
8. Кепилдик жана колдоо
Jennov is committed to providing reliable products and excellent customer service.
- 30 күндүк акысыз кайтаруулар: 30 күндүк кайтаруу саясаты менен жан дүйнө тынчтыгынан ырахат алыңыз.
- 24/7 Онлайн колдоо: Access assistance anytime through online channels.
- Lifetime Tech Support: Benefit from ongoing technical support for the lifespan of your product.
- Uncomplicated Guarantee: Jennov stands behind its products with a straightforward guarantee.
Кошумча жардам алуу үчүн расмий кайрылыңыз Jennov Store же кардарларды тейлөө бөлүмүнө кайрылыңыз.

Image: Icons representing Jennov's customer support offerings: 30-day free returns, 24/7 online support, lifetime tech support, and an uncomplicated guarantee.


