1. Киришүү
The ANYCUBIC Kobra 3 Max Combo is a high-performance 3D printer designed for large-scale and multi-color printing. It features an impressive build volume of 420x420x500mm, enabling the creation of substantial models. With a maximum printing speed of 600mm/s and advanced G-sensor vibration compensation, it delivers precise and efficient results. The integrated ACE Pro system facilitates multi-color printing, expanding creative possibilities. This manual provides essential information for setup, operation, maintenance, and troubleshooting to ensure optimal use of your 3D printer.

Figure 1: The ANYCUBIC Kobra 3 Max Combo 3D Printer with its large build volume demonstrated by a printed cat house.
Видео 1: Бүттүview of the ANYCUBIC Kobra 3 Max Series 3D Printer, highlighting its large build volume and capabilities.
2. Коопсуздук нускамалары
- Принтерди ар дайым жакшы желдетилген жерде иштетиңиз.
- Принтерди тез күйүүчү материалдардан, жылуулук булактарынан жана суудан алыс кармаңыз.
- Do not touch the print nozzle or heated bed during operation, as they reach high temperatures.
- Колдорду жана кенен кийимдерди иштөө учурунда кыймылдуу бөлүктөрдөн алыс кармаңыз.
- Электр булагы туура туташтырылганын жана жерге туташтырылганын текшериңиз.
- Кандайдыр бир техникалык тейлөө же тазалоодон мурун принтерди сууруп алыңыз.
- Бул шайман чоңдордун көзөмөлүсүз балдар тарабынан колдонуу үчүн арналган эмес.
3. Пакеттин мазмуну
Before beginning assembly, please verify that all components listed below are present in your package. Refer to the unboxing video for a visual guide.
Video 2: Detailed unboxing and component identification for the ANYCUBIC Kobra 3 Max Combo.
- Printhead Module
- Сенсордук дисплей
- Катушка кармагыч
- Кабель кармагыч
- Screw Bags (No. 1-6, various sizes)
- U Disk (1pcs)
- Электр шнуры (2шт)
- Кабель организатору (5шт)
- Filament Tube (5шт)
- сигнал Cable
- Allen Keys (6.0/4.0/3.0/2.5/2.0/1.5)
- ачкыч
- Нозулдарды тазалагыч
- S жипчесиample
- Майлоо
- ACE Pro (for multi-color printing)
4. Орнотуу колдонмосу
Follow these steps carefully to assemble your ANYCUBIC Kobra 3 Max Combo 3D Printer.
4.1. Unlocking the Frame and Base
- Use an H3.0 Allen key to loosen the screws that secure the frame and base.
- Then use an H4.0 Allen key to unscrew the fixing screws of the frame and base from both sides.
4.2. Раманы орнотуу
- Push the build platform to the front of the printer.
- Place the gantry frame vertically on the base and then put the frame into the base.
- Take out the No. 1 bag of screws and use an H3.0 Allen key to install the four short screws that secure the gantries on both sides.
- Then use the H4.0 Allen key to install and secure the two long screws.
4.3. Support Rod Installation
Кеңеш: Pay attention to the left and right distinction of the support rod before installation.
- Take out the long screw from bag No. 2.
- Pass the screw through the support rod and then through the pad column.
- Use the H6.0 Allen key to fix the support rod to the printer base.
- Take the cornet screw and pass it through the support rod and use the H6.0 Allen key to fix it to the upper part of the frame.
- Follow the above steps to install the other support rod.
4.4. Z-axis Motor Cable Connection
- Connect the Z-axis motor cables on both sides to the corresponding Z-axis motor ports respectively.
4.5. Printhead Cable Connection
- Cut the zip ties securing the Z-axis belt.
- Pull the Z-axis belt to lower the X-axis height.
- Take out the printhead module and connect the printhead cable to the module cable interface.
- Take out the No. 3 bag screws and use an H1.5 Allen key to install the print head connection wire screws.
4.6. Printhead Installation
- Install the printhead module onto the X-axis.
- Take out the No. 4 bag screws and use an H2.5 Allen key to install and fix the print head module.
4.7. Экранды орнотуу
- Insert the screen into the limit hole.
- Take out the No. 5 screw from the bag and use an H2.5 Allen key to secure it.
4.8. X-axis Motor Cable Connection
- Мотор кабелин (кыска кызгылт сары 6 пин кабели) X огунун сол тарабындагы төмөнкү оюкка өйдө карай кыстарыңыз.
4.9. Cable Holder Installation
- Кабель кармагычты X огунун сол тарабындагы оюкка бекитүү үчүн басыңыз.
- Insert the print head cable into the cable holder.
4.10. Filament Tube Connection (Monochrome)
For monochrome printing, follow these steps. If you intend to perform multi-color printing, please refer to the ACE Pro installation section below.
- Insert one end of the filament tube into the hole above the print head and pass the other end through the wire clip.
- Филамент түтүгүн жана басып чыгаруу башынын кабелин кабелдик уюштуруучуга бекитиңиз.
4.11. Spool Holder Installation
- Take out the No. 6 bag screws.
- Цилиндр түрүндөгү тутканы катушка кармагычтын тешигине салып, аны бекитүү үчүн аны белгилүү бир бурчка айлантыңыз.
- Спулдун кармагычын ылдый басып, принтердин базасынын артындагы оюкка киргизиңиз.
- Use the H4.0 Allen key to install and fix the spool holder.
4.12. ACE Pro Installation (for Multi-Color Printing)
This section is for users utilizing the ACE Pro for multi-color printing.

Figure 2: The ANYCUBIC ACE Pro Multicolor Filament Box, designed for convenient storage and feeding of multiple filament spools.
- Insert the 4-pin end of the ACE Pro signal cable into the hole on the left side of the device's external interface on the printer base, making sure the buckle faces downward.
- Insert the 6-pin end of the cable into the hole on the left corner of ACE Pro. Note that the cable buckle faces outward.
- Бардык төрт жип түтүктөрүн басып чыгаруу башынын жип түйүнүнө салыңыз.
- Бардык төрт жип түтүктөрүн кабелдик кармагыч аркылуу өткөрүңүз.
- Use cable organizers to secure the cables.
- Remove the four blue retainers at the filament tube connection port of the ACE Pro.
- Insert all four filament tubes into the filament tube connection ports of the ACE Pro.
- Install the four blue retainers back to their original positions.
- Place filaments in ACE Pro. Please straighten the filaments or cut off the curved parts of the filaments before installing them to prevent the feed from getting stuck.
4.13. Power Connection
- Use the power cord to connect the printer and ACE Pro to the power socket respectively.
- Turn on the printer power button.
Эскертүү: After the installation is complete, turn on the machine and complete the machine boot options before you can start printing.
5. Иштөө нускамалары
5.1. Негизги басып чыгаруу
- Күйгүзүү: Ensure the printer is connected to power and turned on.
- Filament жүктөө: Load your chosen filament into the spool holder. If using ACE Pro, refer to section 4.12 for multi-color filament loading.
- Автоматтык тегиздөө: The printer features LeviQ3.0 Leveling System for hassle-free, fully-automatic precise leveling. Initiate auto-leveling via the touchscreen interface to ensure a perfect first layer.
- Моделди даярдоо: Use Anycubic Slicer Next or other compatible slicing software (STL, OBJ, 3MF, etc.) to prepare your 3D model.
- Transfer File: Кесилген G-кодду өткөрүп бериңиз file to the printer via USB or network.
- Басып чыгарууну баштоо: Сиздин тандаңыз file on the touchscreen and initiate the printing process.

Figure 3: The printer's auto-leveling system ensures optimal print bed calibration for consistent results.
5.2. Multi-Color Printing with ACE Pro
The ACE Pro supports standard 4-color printing. By pairing two ACE Pro units, you can achieve brilliant 8-color printing, expanding possibilities for more vibrant and colorful creative projects.
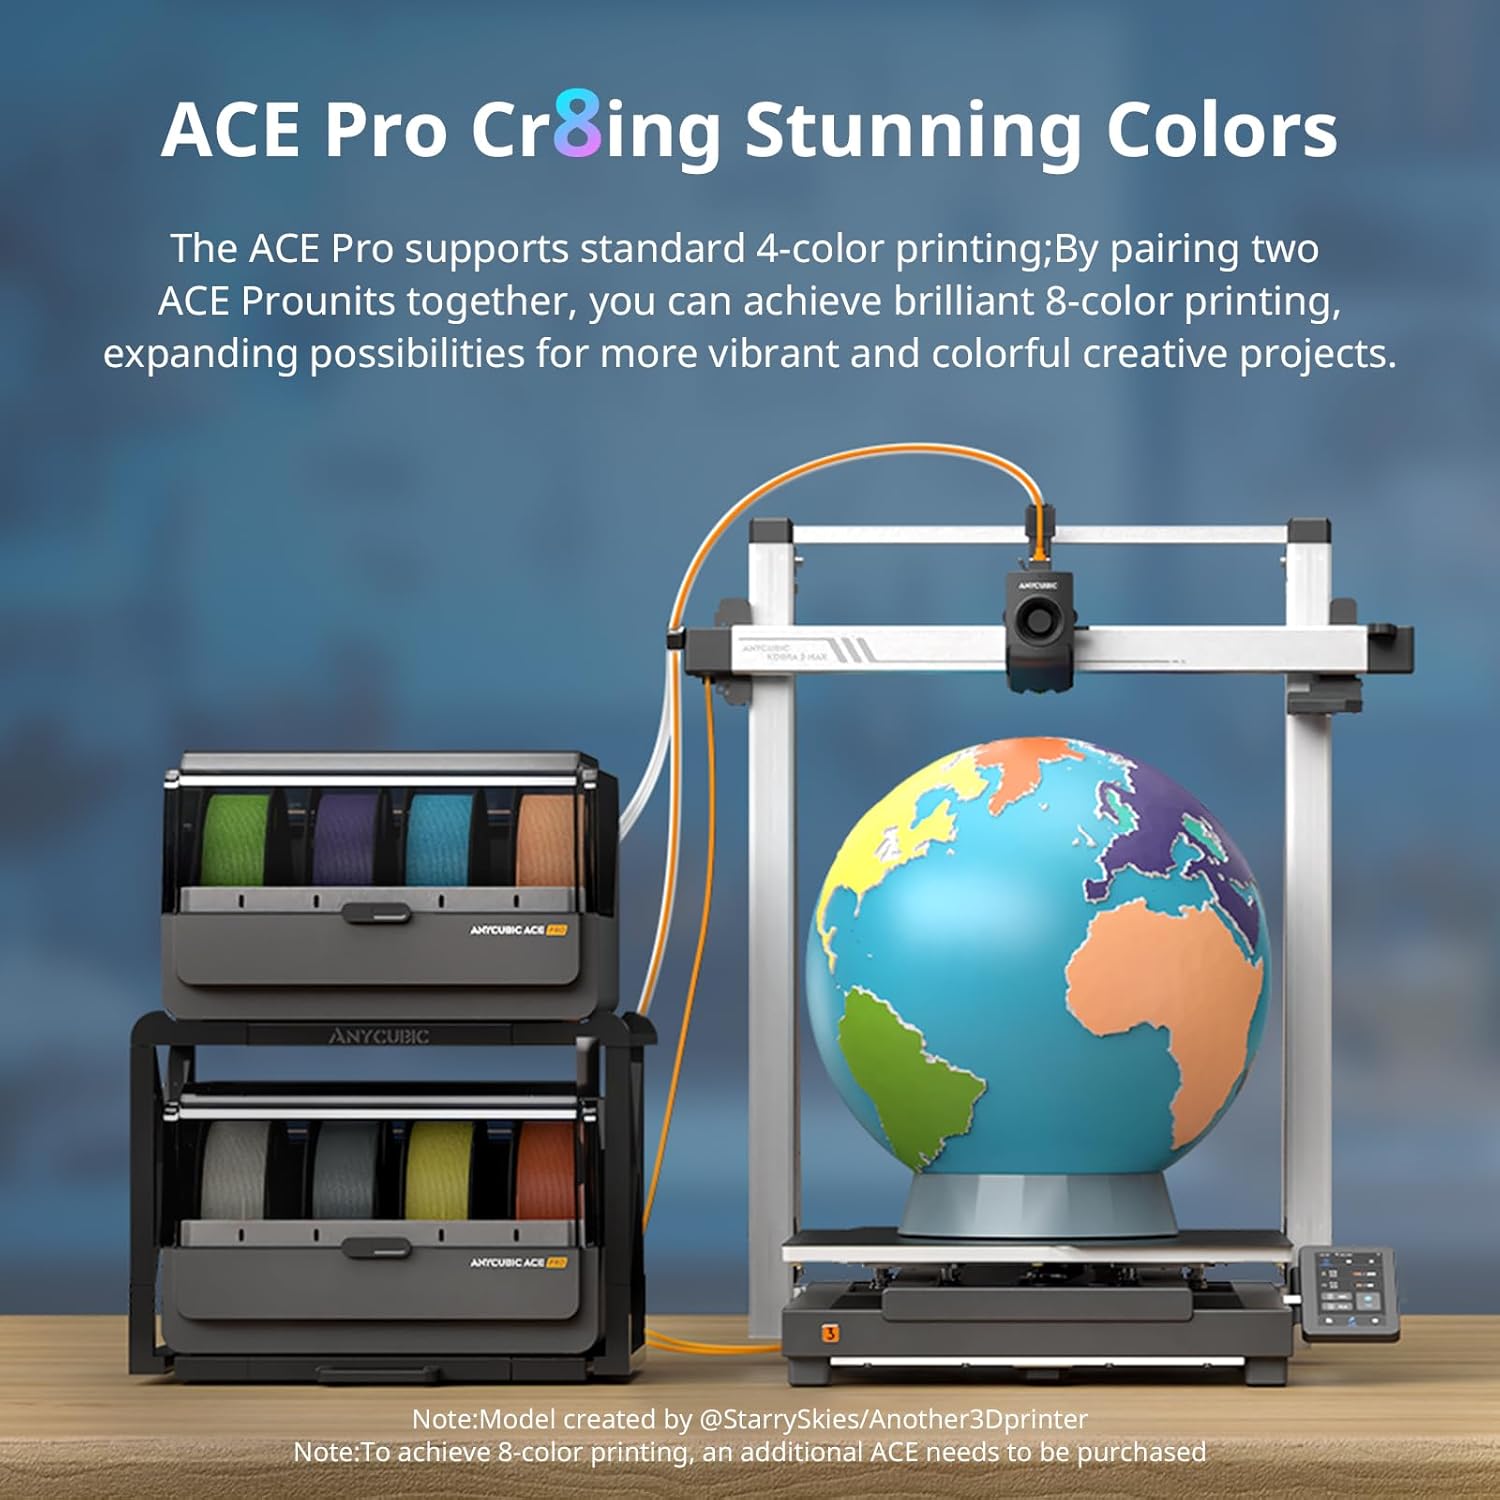
Figure 4: The ACE Pro enables stunning multi-color prints, as demonstrated by a printed globe model.
Video 3: A short demonstration of the ANYCUBIC Kobra 3 Max Combo's multi-color printing capabilities.
5.3. High-Speed Printing
Achieve professional-grade precision even at blazing 600mm/s speeds and 20,000mm/s² acceleration. Powered by G-sensor vibration compensation, the printer eliminates layer shifts on complex models, ensuring rapid and accurate prints.

Figure 5: The Kobra 3 Max Combo demonstrates its 600mm/s print speed by completing a Benchy print in 18 minutes.
5.4. Large Volume Printing
The industry-leading 420x420x500mm build volume allows you to print life-size prototypes, furniture components, or multiple parts simultaneously, making it ideal for various applications.

Figure 6: Visual representation of the Kobra 3 Max Combo's supersized 420x420x500mm³ print volume, equivalent to over two carry-on suitcases.
5.5. Акылдуу функциялар жана байланыш
- Жипченин агып кетүү сенсору: The machine pauses automatically when filament ends, preventing wasted prints.
- Offline Printing Mode: Built-in resume function handles power outages for 24/7 reliability.
- Intelligent Drying (ACE Pro): The ACE Pro is equipped with an active drying function that, when combined with preset parameters for PLA/PETG filaments, allows for one-click activation to enhance performance and quality. It also supports drying while printing, enabling users to start prints immediately and boost printing efficiency.
- Anycubic App: Smart control interconnection allows remote operation and initiation of printing tasks via cloud servers. Real-time remote monitoring of printing progress is available through the Anycubic App and slicing software.
- Anycubic Slicer Next: Offers one-click slicing with pre-set printing parameters, multi-plate printing support, and versatile file compatibility (3mf, stl, step, obj, amf, ply, svg).
- Makeronline: Access a vast repository of models from over 3000 global designers, engage in incentivized model sharing, and connect with 3D printing enthusiasts worldwide.

Figure 7: AI features like Spaghetti Detection, Auto-Resume Printing, and Skip Objects enhance print reliability. Note: Camera for AI features sold separately.
6. Техникалык тейлөө
6.1. Print Bed Care
- The printer features a dual-sided PEI spring steel plate for effortless print removal and reliable adhesion.
- Clean the print bed regularly with isopropyl alcohol to maintain optimal adhesion.
6.2. Соплолорду тейлөө
- The all-metal hotend (300°C) allows for instant nozzle swaps (0.4mm standard).
- Regularly inspect the nozzle for clogs or wear. Use the provided nozzle cleaner if necessary.
6.3. Belt Tensioning
- The printer includes semi-automatic belt tensioning for consistent performance. Ensure belts are properly tensioned to prevent print quality issues.
6.4. Жалпы тазалоо
- Keep the printer free from dust and debris. Use a soft cloth to wipe down surfaces.
- Regularly check and clean the filament path to prevent blockages.
7. Кыйынчылыктарды
7.1. Басып чыгаруу сапатынын маселелери
- Layer Misalignment: The upgraded dual Y-axis motor enhances robustness and stability, effectively reducing the occurrence of step loss and layer misalignment. Ensure all belts are properly tensioned.
- Rough Surface/Voids: Active Extrusion Flow Control effectively minimizes resonance patterns on printed models and reduces model corner spills and voids, enhancing printing precision. Ensure filament is dry and print settings are optimized.

Figure 8: Comparison illustrating the enhanced stability and reduced layer misalignment with the upgraded Dual Y-Axis Motor.
7.2. Printing Interruptions
- Filament Runout: The printer will automatically pause. Replace the filament and resume printing.
- Power Outage: The auto-resume printing function allows the printer to continue from where it left off after power is restored.
- AI Spaghetti Detection: This feature uses a camera (purchased separately) for real-time monitoring. It automatically pauses printing if spaghetti-like errors are detected, preventing material wastage.
- Skip Objects: This feature allows the printer to skip failed objects on the build plate, continuing to print the remaining models successfully.
8. Техникалык шарттар

Figure 9: ашыкview of the technical specifications for the Kobra 3 Max Combo.
| Өзгөчөлүк | Спецификация |
|---|---|
| Бренд | ANYCUBIC |
| Модел | Kobra 3 Max Combo |
| Build Volume | 420x420x500mm³ |
| Басып чыгаруу ылдамдыгы | Макс 600мм/сек |
| Ылдамдатуу | 20,000мм/с² |
| Сопло температурасы | Макс 300°C |
| Температура | Макс 90°C |
| Шайкеш материалдар | PLA, PLA+, ABS, ASA, PETG, TPU |
| Нивелирлөө системасы | LeviQ3.0 Auto-Leveling |
| Байланыш | USB, Wi-Fi (via Anycubic App) |
| Колдоого алынган File Форматтар | STL, OBJ, 3MF, AMF, PLY, SVG |
| Өзгөчөлүктөр | Multi-color printing (with ACE Pro), Filament Runout Sensor, Offline Printing Mode, AI Spaghetti Detection (optional camera), Skip Objects, Dual Y-Axis Motor, Active Extrusion Flow Control, Quick-Swap Nozzle |
| Машинанын салмагы | 22.5 кг |
| Электр камсыздоо | 300 Вт |
9. Кепилдик жана колдоо
For warranty information, technical support, and service inquiries, please refer to the official ANYCUBIC webсайтка же түздөн-түз кардарларды тейлөөгө кайрылыңыз. Сатып алуу квитанциясын кепилдик дооматтары үчүн сатып алуунун далили катары сактаңыз.
Онлайн ресурстар:
- ANYCUBIC расмий дүкөнү: Дүкөнгө кириңиз
- Продукт Барагы: View Продукт


