1. Киришүү
This manual provides detailed instructions for the installation, operation, and maintenance of the OOYCYOO 60A MPPT Solar Charge Controller, Model EC60A. This device is designed to efficiently manage power flow from solar panels to various battery types, including 12V, 24V, 36V, and 48V systems.
Туура иштешин жана коопсуздугун камсыз кылуу үчүн орнотуудан жана иштетүүдөн мурун бул колдонмону кылдат окуп чыгыңыз.
2. Негизги өзгөчөлүктөрү
- 60A MPPT Charging: Utilizes Maximum Power Point Tracking technology for efficient solar energy conversion.
- Мульти-Сtage Заряддоо: 4-сек өзгөчөлүктөрүtage battery charging algorithm (Bulk Charge, Boost Charge, Float Charge, Equalization) for optimal battery health.
- Wide Voltage Колдоо: Automatically detects and supports 12V, 24V, 36V, and 48V battery systems.
- High PV Input: Supports solar panel open circuit voltage up to 160VDC and input power up to 2800W (for 48V systems).
- Батарея шайкештиги: Compatible with various battery types including AGM, Gel, Flooded, and Lithium (LFP), with pre-set and user-defined charging parameters.
- Жогорку натыйжалуулугу: Tracking efficiency not less than 98.1% and peak conversion efficiency up to 98%.
- Өркүндөтүлгөн коргоо: Includes PV over current/power, PV short circuit, PV reverse polarity, night reverse charging, battery reverse polarity, over voltage, over discharge, overheating, lithium battery low temperature, load short circuit, load overload, and TVS high voltagд өткөөл.
- LCD дисплей: Integrated blacklight LCD for monitoring system status, including KWH charge amount.
- Натыйжалуу муздатуу: Die-cast aluminum construction with built-in cooling fan for effective heat dissipation.
3. Коопсуздук нускамалары
Please observe the following safety precautions during installation and operation:
- Ensure all connections are correct and secure before applying power.
- Always connect the battery first, then the solar panel, and finally the load. Disconnect in reverse order.
- Контроллерди өз алдынча бөлбөңүз же оңдоого аракет кылбаңыз. Тейлөө үчүн квалификациялуу кызматкерлерге кайрылыңыз.
- Контроллерди күйүүчү материалдардан жана тике күндүн нурунан алыс, жакшы желдетилген жерге орнотуңуз.
- Электр системалары менен иштөөдө тиешелүү жеке коргонуу шаймандарын (ЖКК) кийиңиз.
- Системанын томун камсыз кылууtage does not exceed the controller's maximum input voltage (160VDC).
4. Продукт бүтүп калдыview
The OOYCYOO 60A MPPT Solar Charge Controller features a robust design with an intuitive LCD display and clearly labeled terminals for easy connection.

Сүрөт 4.1: Алдыңкы view of the OOYCYOO 60A MPPT Solar Charge Controller, showing the LCD display, control buttons, and terminal connections.

4.2-сүрөт: Детальдуу view of the controller highlighting the LCD display, control buttons (SET, A, B, C, D), 5-second reset function, and clearly marked Solar Panel, Battery, and Load terminals.
4.1. Components and Interface
- LCD дисплей: Shows real-time system parameters such as PV input voltagд, батарея томtage, load output, and charging status.
- Control Buttons (A, B, C, D, SET): Used for navigating menus, adjusting settings, and confirming selections.
- Solar Panel Terminals: Connect positive and negative leads from the solar array.
- Батарея терминалдары: Connect positive and negative leads to the battery bank.
- Load Terminals: Connect positive and negative leads to DC loads.
5. Орнотуу жана орнотуу
5.1. Контроллерди орнотуу
Mount the controller vertically on a wall or a stable surface in a dry, well-ventilated indoor location. Ensure adequate clearance around the unit for proper airflow and heat dissipation. Avoid direct sunlight, high temperatures, and humid environments.
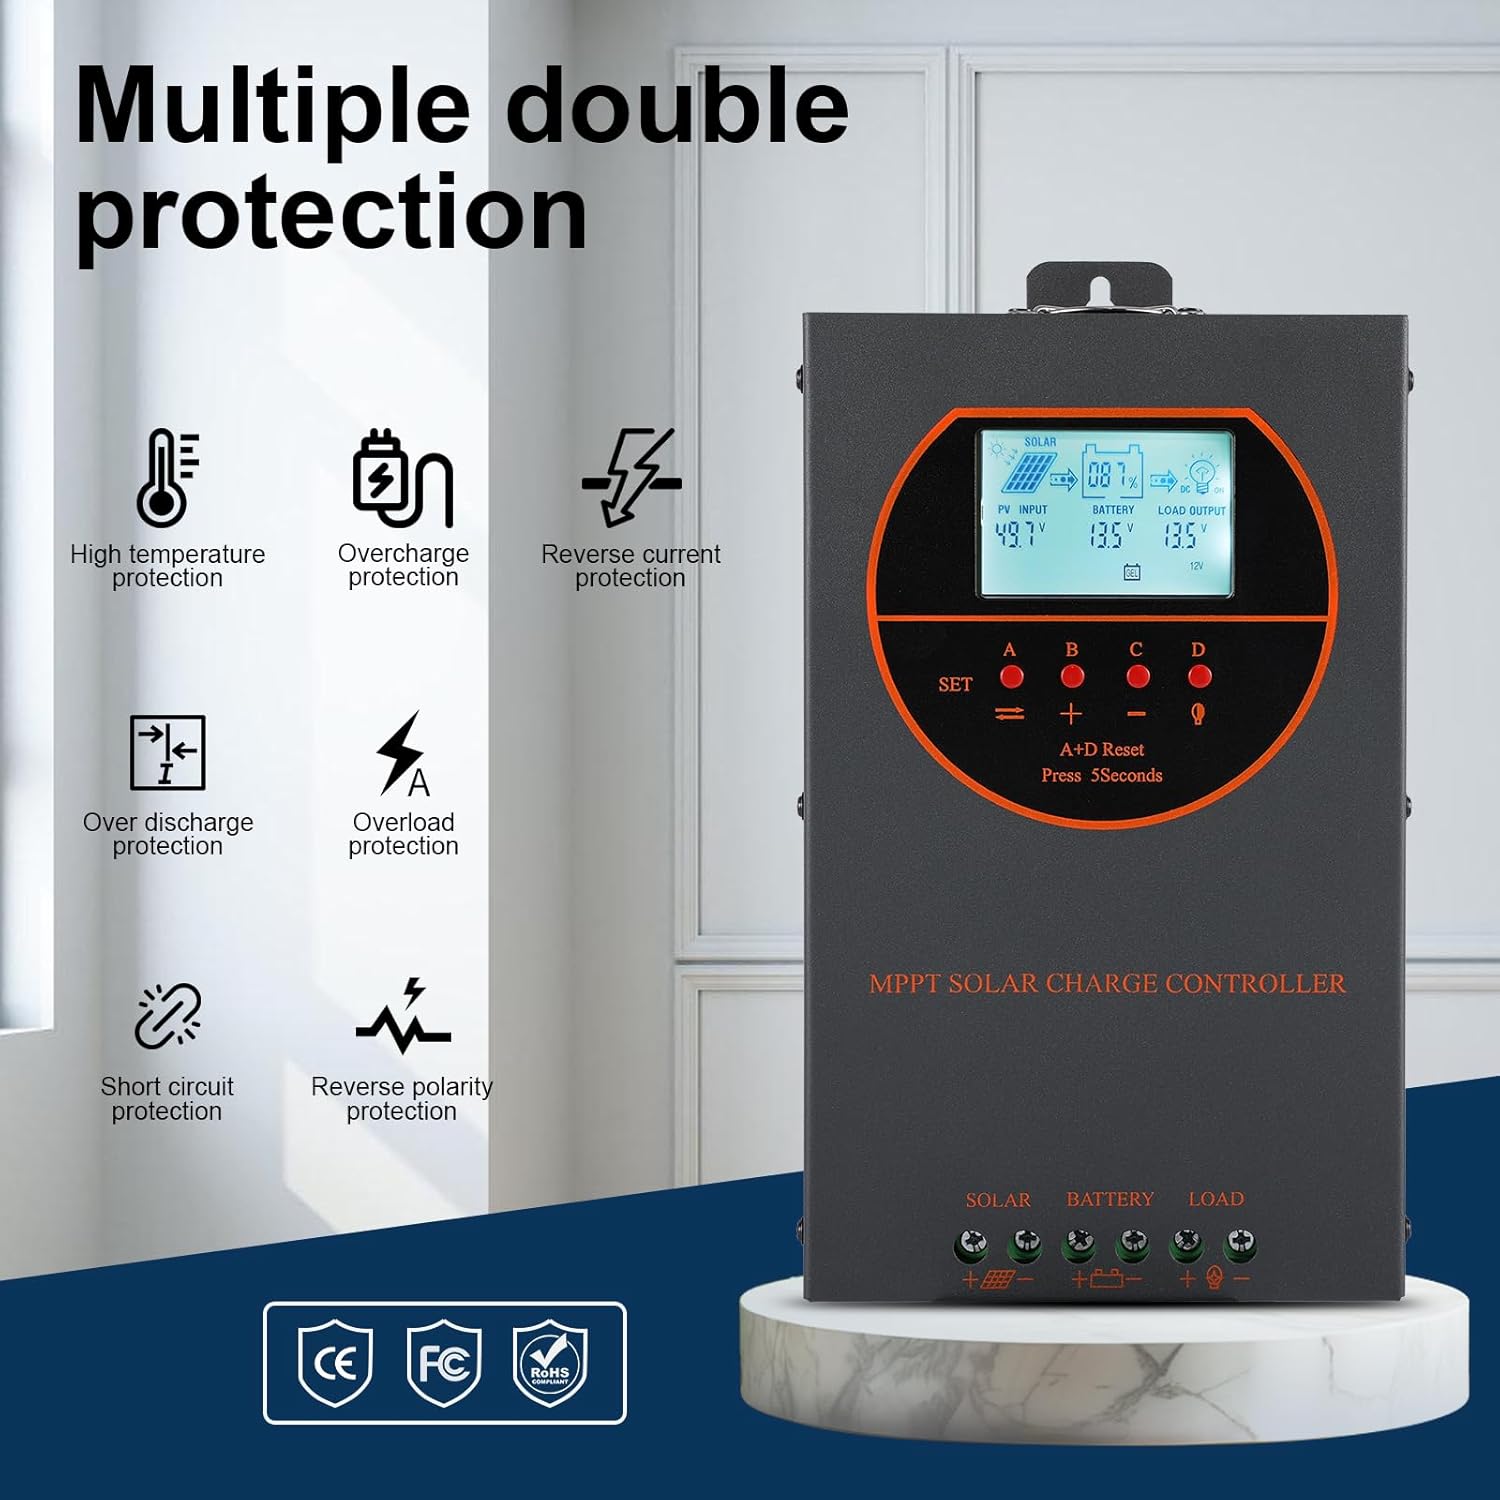
Figure 5.1: Dimensions of the OOYCYOO 60A MPPT Solar Charge Controller, showing approximate measurements of 14cm (5.5in) width, 5.5cm (2.2in) depth, and 23cm (9.1in) length.
5.2. Wiring Sequence
Follow this wiring sequence carefully to prevent damage to the controller or other components:
- Батареяны туташтыруу: Connect the positive and negative terminals of the battery to the corresponding battery terminals on the controller. Ensure correct polarity. The controller will automatically detect the battery voltage (12V/24V/36V/48V).
- Күн панелин туташтыруу: Connect the positive and negative leads from the solar panel array to the corresponding PV input terminals on the controller. Ensure correct polarity.
- Connect the DC Load (Optional): Connect the positive and negative leads of your DC load to the corresponding load terminals on the controller.
Маанилүү: Always connect the battery first and disconnect the solar panel first when disassembling the system.

Figure 5.2: Illustrative wiring diagram showing connections from solar panels to the controller, then to the battery, and finally to DC and AC loads via an inverter. This diagram also shows the possibility of connecting two 60A controllers in parallel for increased capacity.
5.3. System Voltage and Power Configuration
The controller automatically identifies the battery system voltage. Ensure your solar panel array's open circuit voltage (Voc) and maximum input power are within the specified limits for your battery system:
| Батарея тутуму | Макс. PV Open Circuit Voltage (Vc) | Макс. PV киргизүү күчү |
|---|---|---|
| 12V | ≤72V | 720 Вт |
| 24V | ≤108V | 1440 Вт |
| 36V | ≤144V | 2100 Вт |
| 48V | ≤160V | 2800 Вт |

Figure 5.3: Diagram illustrating the connection of multiple PV modules in series to the controller, with a table detailing recommended system parameters for 12V, 24V, and 48V systems, including battery float voltage, томдун астындаtage коргоо, калыбына келтирүү тtage, and maximum input power.
6. Операция
6.1. LCD Display and Indicators
The LCD display provides real-time information about the solar charging system. Key indicators include:
- PV киргизүү: Учурдагы томду көрсөтөтtage and power from the solar panels.
- Батарея: Учурдагы батареянын кубатын көрсөтөтtage жана заряддоо абалы.
- Жүктөө чыгаруу: Indicates the status of the DC load output.
- KWH: Displays the total accumulated charge in kilowatt-hours.
6.2. Батареянын түрүн тандоо
The controller is compatible with various battery types. You can select the appropriate battery type through the controller's settings menu to ensure optimal charging. Supported types include:
- GEL
- АГМ
- USER (user-defined parameters)
- SEL (Sealed)
- FLD (Суу каптаган)
- LI (литий)
- LiFePO4

Figure 6.1: Diagram illustrating the controller's strong adaptability to various battery types (GEL, AGM, USER, SEL, FLD, LI, LiFePO4) and a graph showing the 4-stage charging process: Bulk Charge, Constant Charging (Boost), and Float Charge.
6.3. Charging Algorithm
Контроллер 4-с иштейтtage charging algorithm to maximize battery life and performance:
- Жапырт акы: Delivers maximum current to rapidly charge the battery to approximately 80% capacity.
- Тездетет акысыз: Charges the battery at a higher voltage to ensure full charge and equalization.
- Float акысы: Батареянын кубатын коопсуз абалда сактайтtage to prevent self-discharge and overcharging.
- Теңдөө: Periodically overcharges flooded batteries to balance cell voltages and prevent sulfation. (Applicable to flooded batteries only, if enabled).
7. Техникалык тейлөө
Regular maintenance ensures the longevity and optimal performance of your solar charge controller:
- Байланыштарды текшерүү: Мезгил-мезгили менен бардык зымдарды туташтыргычтын бекемдигин жана коррозиясын текшерип туруңуз.
- Clean Controller: Keep the controller clean and free from dust. Use a dry cloth to wipe the exterior. Ensure ventilation openings are not obstructed.
- Монитор аткаруу: Regularly check the LCD display for normal operating parameters. Note any unusual readings.
- Батареяны текшерүү: Inspect batteries for any signs of damage, leakage, or corrosion. Clean battery terminals as needed.
8. Кыйынчылыктарды
This section addresses common issues you might encounter with the OOYCYOO 60A MPPT Solar Charge Controller.
8.1. Жалпы маселелер жана чечүү жолдору
| Көйгөй | Мүмкүн себеп | Чечим |
|---|---|---|
| No display/Controller not powering on | Батарея туташкан эмес же кубаты азtagд; тескери полярдуулук. | Батарея байланыштарын жана тtagд. Туура полярдуулукту камсыз кылыңыз. Батареяны заряддаңыз, эгерде томtage өтө төмөн. |
| Күн заряды жок | Solar panel not connected; reverse polarity; low sunlight; PV over-voltagе/ток. | Check solar panel connections and polarity. Ensure sufficient sunlight. Verify PV voltage and current are within limits. |
| Жүк иштебейт | Load not connected; load short circuit; overload; battery low voltage. | Check load connections. Inspect for short circuits or overloads. Ensure battery has sufficient charge. |
| Контроллердин ысып кетиши | Poor ventilation; excessive load/PV input. | Ensure adequate airflow around the controller. Reduce load or PV input if consistently overheating. |
8.2. Коргоо функциялары
The controller includes multiple protection features to safeguard the system:
- PV Ашыкча ток/кубат
- PV кыска туташуусу
- PV тескери полярдуулук
- Түнкү тескери заряддоо
- Батареянын тескери полярдуулугу
- Батарея Voltage
- Батареянын ашыкча заряды
- Battery Overheating, Controller Overheating
- Литий Батарея Төмөн Температура
- Кыска туташууну жүктөө
- Ашыкча жүктөө
- TVS High Voltage Transients

Figure 8.3: Visual representation of the multiple protection features integrated into the controller, including low voltage, overheat, short circuit, reverse protection, overload, and overcurrent protection.

8.4-сүрөт: Ички view of the controller, highlighting key components such as copper coil transformers and capacitors, which contribute to its robust performance and protection features.
9. Техникалык шарттар
| Параметр | Спецификация |
|---|---|
| Номиналдуу заряд ток | 60A |
| Системанын номиналдык томуtage | 12V/24V/36V/48V DC Auto Identifying |
| Батарея Voltage Диапазон | 9V~55V |
| Макс. PV Open Circuit Voltage | 160VDC |
| Максималдуу фотоэлектрдик киргизүү кубаттуулугу (12V системасы) | 720 Вт |
| Максималдуу фотоэлектрдик киргизүү кубаттуулугу (24V системасы) | 1440 Вт |
| Максималдуу фотоэлектрдик киргизүү кубаттуулугу (36V системасы) | 2100 Вт |
| Максималдуу фотоэлектрдик киргизүү кубаттуулугу (48V системасы) | 2800 Вт |
| Кубат Терминалы | 6-12 AWG |
| Өлчөмдөрү (L*W*H) | 11 x 6 x 2.5 дюйм (болжол менен 27.9 x 15.2 x 6.3 см) |
| Салмагы | 4.07 фунт (болжол менен 1.8 кг) |
| Tracking Efficiency | ≥98.1% |
| Peak Conversion Efficiency | 98% чейин |
| Муздатуу | Die-cast aluminum housing, built-in cooling fan |
| Батареянын түрлөрү колдоого алынат | AGM, Gel, Flooded, Lithium (LFP), Sealed, User-defined |
| Материал | Алюминий |
| Элемент моделинин номери | EC60A |
| UPC | 750864834470 |
10. Колдоо жана байланыш
For technical support, warranty claims, or further assistance, please contact OOYCYOO customer service through the retailer where the product was purchased or visit the official OOYCYOO store on Amazon:

