Introduction
This manual provides detailed instructions for the setup, operation, maintenance, and troubleshooting of your Pisichen 24-inch Touchscreen Monitor with Built-in Webcam (Model 238TS-CMR). This monitor features a 2K QHD (2560x1440) resolution display with a 100Hz refresh rate, 10-point multi-touch functionality, and an integrated pop-up webcam, designed to enhance your productivity and interactive experience.
Коопсуздук маалыматы
- Кокусунан кулап кетпеши үчүн мониторду ар дайым туруктуу, тегиз бетке коюңуз.
- Мониторду жамгырдын, нымдуулуктун же экстремалдык температуранын таасирине тийгизбеңиз.
- Ашыкча ысып кетүүнүн алдын алуу үчүн вентиляция тешиктерин жабуудан качыңыз.
- Монитор менен кошо берилген кубат адаптерин гана колдонуңуз.
- Disconnect the power cable from the outlet before cleaning or if the monitor will be unused for an extended period.
- Мониторду өзүңүз чечүүгө же оңдоого аракет кылбаңыз. Бардык тейлөөлөрдү квалификациялуу кызматкерлерге тапшырыңыз.
Пакеттин мазмуну
Пакетиңизде бардык буюмдар бар экенин текшериңиз:
- Pisichen 24-inch Touchscreen Monitor (Model 238TS-CMR)
- Монитор стенд (негизги жана кол)
- Кубаттуу адаптер жана кабель
- HDMI кабели
- USB-C - USB-C кабели
- USB-A to USB-B Cable (for touch functionality with non-USB-C devices)
- Колдонуучунун Колдонмосу (бул документ)
Жайгашуу
1. Стенд жыйыны
- Мониторду таңгагынан кылдаттык менен алып чыгып, чийилбеш үчүн аны жумшак, таза бетке ылдый каратып коюңуз.
- Attach the stand arm to the back of the monitor using the provided screws.
- Connect the stand base to the stand arm and secure it with the designated screw.
- Once assembled, carefully lift the monitor and place it upright on your desk.

Figure 1: Monitor stand assembly and adjustment capabilities.
2. Түзмөгүңүзгө туташуу
The monitor supports multiple connection types. Choose the appropriate cable for your device.
- Кубат туташуу: Connect the power adapter to the monitor's DC power port and then plug it into a power outlet.
- USB-C Connection (Recommended for full functionality): If your device has a USB-C port that supports DisplayPort Alternate Mode, connect the monitor using the provided USB-C to USB-C cable. This single cable can transmit video, audio, and touch signals, and may also provide power delivery to your laptop.
- HDMI or DisplayPort Connection: Connect an HDMI or DisplayPort cable from your device to the corresponding port on the monitor for video and audio. For touch functionality, you must also connect the USB-A to USB-B cable from your device's USB port to the monitor's USB-B upstream port.
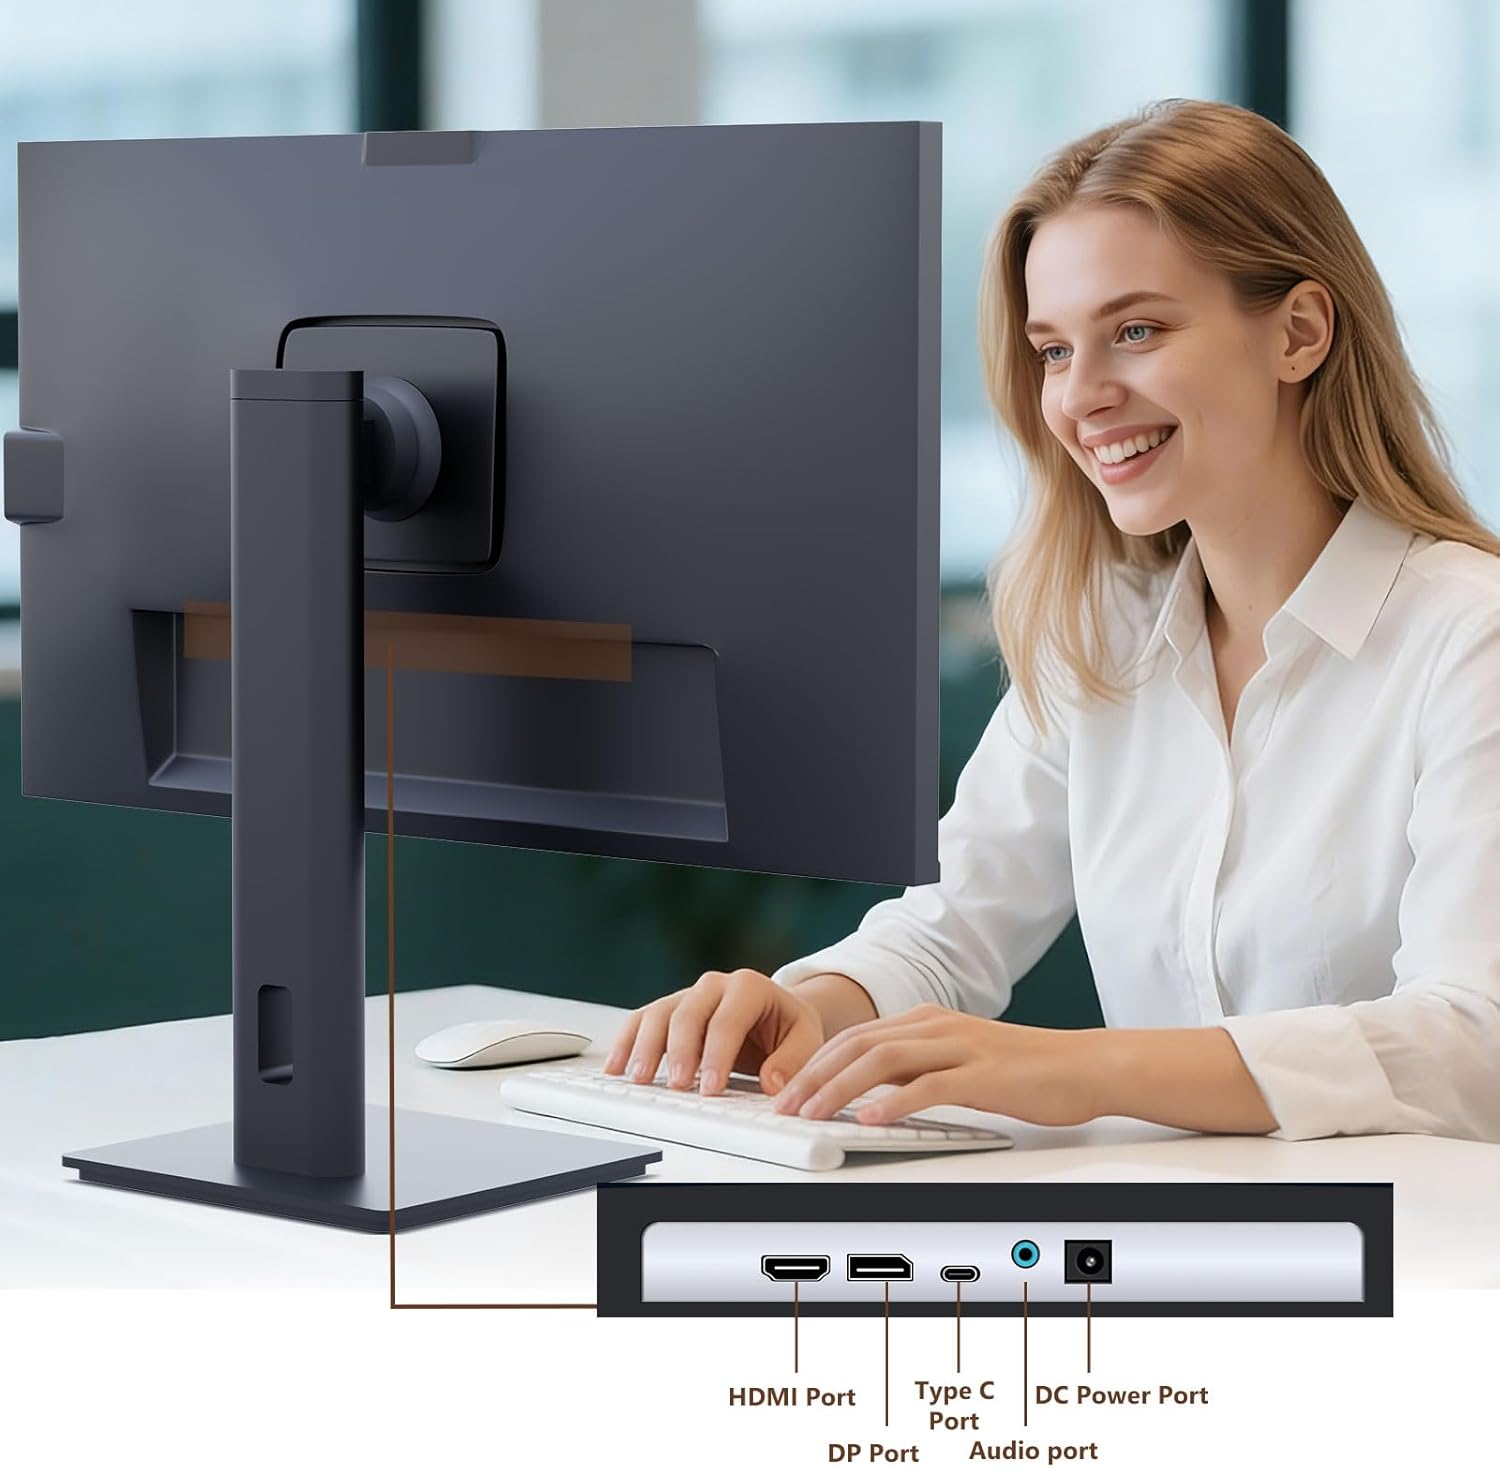
Figure 2: Available ports on the Pisichen monitor.

Figure 3: USB-C one-cable connection for simplified setup.

Figure 4: Connection options for desktop and laptop devices.
3. Баштапкы күйгүзүү
Press the power button located on the monitor to turn it on. The monitor will automatically detect the active input source. If multiple sources are connected, you may need to select the correct input via the On-Screen Display (OSD) menu.
Иштөө нускамалары
1. Сенсордук экрандын функциялары
The monitor supports 10-point multi-touch. Ensure the USB-C cable is connected (for full functionality) or the USB-A to USB-B cable is connected in addition to your video cable for touch input to work. Touch gestures are similar to those used on tablets or smartphones.
- таптаңыз: Single touch for selection or activation.
- Сүйрөө: Touch and hold, then move your finger to move items.
- Чымчым/жайуу: Чоңойтуу же кичирейтүү үчүн эки манжаңызды колдонуңуз.
- Серпүү: Move your finger across the screen to scroll or navigate.

Figure 5: Demonstrating intuitive touch interaction.

Figure 6: Collaborative use of the multi-touch display.
2. Built-in Webкамераны колдонуу
The monitor features a pop-up webcam for privacy and convenience. To use the webcam, gently press the top center of the monitor frame where the webcam is located. It will pop up. To retract it, gently press it down until it clicks into place.
Ensure your operating system and video conferencing software recognize the webcam. No additional drivers are typically required for basic functionality.

Figure 7: The monitor with its built-in pop-up webвидеоконференция учурунда колдонулган камера.

Figure 8: High-definition video calls using the integrated webкамера
3. Экрандагы дисплей (OSD) менюсу
The OSD menu allows you to adjust various monitor settings. Use the buttons on the back or bottom of the monitor to navigate and select options.
- Жарыктык/Контраст: Дисплейдин жарыктыгын жана контрастын тууралаңыз.
- Түс жөндөөлөрү: Modify color temperature, gamma, and other color-related parameters.
- Киргизүү булагы: Manually select between HDMI, DisplayPort, or USB-C inputs.
- Аудио: Камтылган динамиктер же туташкан гарнитуралар үчүн үнүн тууралаңыз.
- Сүрөт режими: Алдын ала коюлган дисплей режимдерин тандаңыз (мисалы, Стандарттык, Оюн, Кино).
- HDR: Enable or disable High Dynamic Range settings for improved dark detail optimization.

Figure 9: HDR feature for enhanced visual detail.
4. Эргономикалык тууралоо
Монитор стендиңизди оптималдаштыруу үчүн ар кандай тууралоолорду жүргүзүүгө мүмкүндүк берет viewсооронуч:
- Бийиктигин тууралоо: Мониторду акырын өйдө же ылдый түртүңүз же тартыңыз.
- Россия: Tilt the screen forward or backward to find the ideal angle.
- Айлануучу: Мониторду анын негизинде солго же оңго айлантыңыз.
- Пивот: Портрет режими үчүн экранды 90 градуска буруңуз viewing.
Figure 10: Ergonomic adjustments for optimal viewing.
Техникалык тейлөө
- Экранды тазалоо: Экранды жумшак, түксүз чүпүрөк менен акырын сүртүңүз. өжөр белгилер үчүн, гampчүпүрөккө бир аз суу же абразивдүү эмес экран тазалагыч. Суюктукту экранга түз чачпаңыз.
- Денени тазалоо: Мониторду сүртүү үчүн жумшак, кургак чүпүрөктү колдонуңуз casinг. Күчтүү жуугучтарды же абразивдүү тазалагычтарды колдонуудан алыс болуңуз.
- Сактагыч: Мониторду узак убакытка сактасаңыз, бардык кабелдерди ажыратып, аны салкын, кургак жерде, эң жакшысы баштапкы таңгагында сактаңыз.
Проблемаларды чечүү
Күч жок
- Кубат кабели мониторго да, розеткага да бекем туташтырылганын текшериңиз.
- Башка аспапка сайып, розетка иштеп жатканын текшериңиз.
- Check if the power adapter is correctly connected to the monitor.
Сигнал жок / Бош экран
- Confirm the video cable (HDMI, DP, or USB-C) is securely connected to both the monitor and your device.
- Монитордун OSD менюсунда туура киргизүү булагы тандалганын текшериңиз.
- Check your computer's display settings to ensure the monitor is detected and enabled.
- Башка видео кабелин же мүмкүн болсо, портту колдонуп көрүңүз.
Touch Functionality Not Working
- If using HDMI or DisplayPort, ensure the USB-A to USB-B cable is connected from your device to the monitor.
- If using USB-C, ensure your device's USB-C port supports DisplayPort Alternate Mode and touch data transmission.
- Check your operating system's touch settings.
- Note that some devices, such as game consoles (PS3/4/5, Xbox, Steam Deck, Fire TV Cube) and certain Apple products (iPhone, iPad, Switch), do not support touch functionality with this monitor.

Figure 11: Touch compatibility chart for various devices.
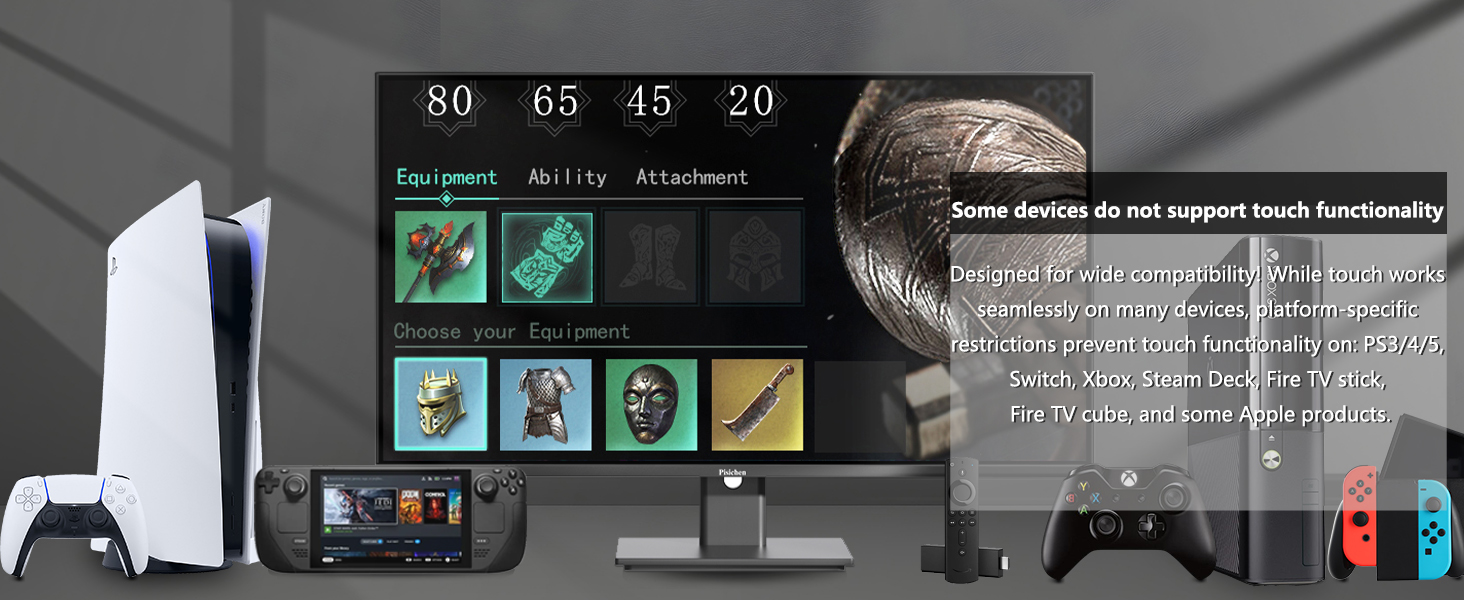
Figure 12: Devices that do not support touch functionality.
WebКамера аныкталган жок
- камсыз кылуу webcam is fully popped up.
- Verify that the USB connection (either USB-C or USB-A to USB-B) is properly established.
- Колдонмолорго камерага кирүү мүмкүнчүлүгү берилгенин текшерүү үчүн операциялык тутумуңуздун купуялык жөндөөлөрүн текшериңиз.
- Компьютериңизди өчүрүп күйгүзүңүз.
Техникалык шарттар
| Өзгөчөлүк | Description |
|---|---|
| Модель номери | 238TS-CMR |
| Screen Size | 23.8 дюйм |
| Резолюция | 2560 x 1440 (QHD Wide 1440p) |
| Жаңыртуу ылдамдыгы | 100Hz |
| Жарыктык | 400 Кандела (нитс) |
| Контраст катышы | 3000:1 |
| Touch Technology | 10-пункттуу көп тийүү |
| Webcam | Built-in Pop-up Camera |
| Байланыш | HDMI, DisplayPort (DP), USB Type-C, USB-B (upstream), Audio Out, DC Power |
| Аспект катышы | 16:9 |
| Screen Surface | Жылтырак |
| Продукциянын өлчөмдөрү | 1.97 x 21.26 x 12.6 дюйм |
| Элемент Салмагы | 11.53 фунт |
| Өндүрүүчү | Шэньчжэнь Конова Электроника Ко., ЖЧК |
Кепилдик жана колдоо
Your Pisichen monitor is covered by a limited warranty. Please refer to the warranty card included in your package for specific terms and conditions, including the warranty period and coverage details.
For technical support, troubleshooting assistance, or warranty claims, please contact Pisichen customer service. Contact information can typically be found on the manufacturer's webсайтында же кепилдик картасында.
When contacting support, please have your monitor's model number (238TS-CMR) and purchase information readily available.


