башталган HOBO MX1101 Bluetooth нымдуулук жана температура маалыматтары
Маанилүү маалымат
Камтылган заттар:
- Command™ тилкеси
- Эки тараптуу лента
- Илмек жана илмек кайыш
- Эки ААА 1.5 В щелочтуу батареялар
Керектүү буюмдар:
- HOBOmobile колдонмосу
- iPhone, iPod touch, or iPad with iOS 7.1 or later and Bluetooth 4.0 or later
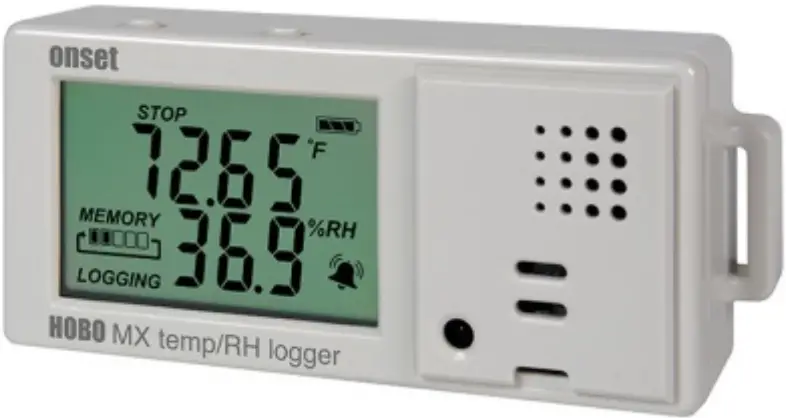
The HOBO MX Temp/RH data logger records and transmits temperature and relative humidity (RH) in indoor environments with its integrated sensors. This Bluetooth® Smart-enabled logger is designed for wireless communication with an iPhone®, iPod touch®, or iPad®. Using the HOBOmobile™ app for iOS, you can easily configure the logger, read it out, and view data on your mobile device, or export the data for further analysis. The logger can calculate minimum, maximum, average, and standard deviation statistics and be configured to trip audible or visual alarms at thresholds you specify. The logger also supports burst logging in which data is logged at a different interval when sensor readings are above or below certain limits. This compact data logger also has a built-in LCD screen to display the current temperature, relative humidity, logging status, battery use, memory consumption, and more.
Техникалык шарттар
| Температура сенсору | |
| Диапазон | -20°тан 70°Cге чейин (-4°тан 158°Fге чейин) |
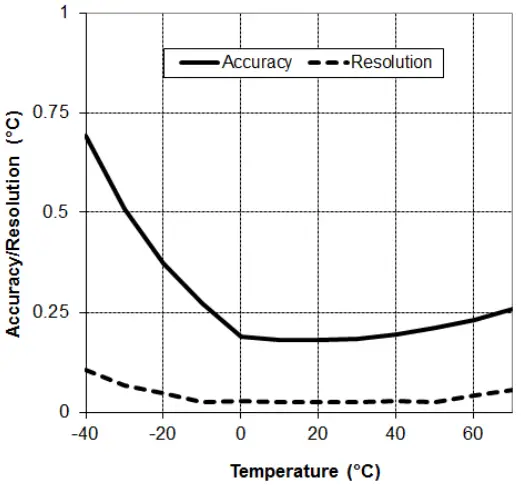
| Тактык | ± 0.21 ° C 0 ° дан 50 ° C чейин (± 0.38 ° F 32 ° дан 122 ° F), А участогун караңыз |
| Резолюция | 0.024 ° Cде 25 ° C (0.04 ° Fде 77 ° F), А участогун караңыз |
| Дрейф | <0.1 ° C (0.18 ° F) жылына |
| RH сенсору | |
| Диапазон | 1% - 90% |
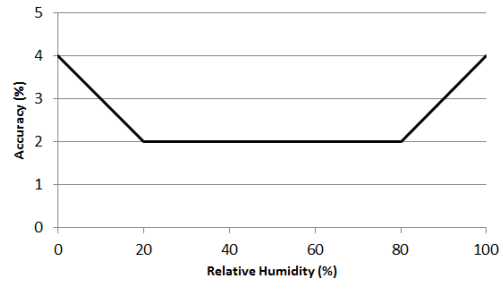
| Тактык | ±2% from 20% to 80% typical at 25°C (77°F), see Plot B |
| Гистерезис | ±2% RH |
| Резолюция | 0.01°Cде (25°F) 77% |
| Дрейф | Жылына <1% типтүү |
| Жооп убактысы | |
| Температура | 7:30 minutes in air moving 1 m/s (2.2 mph) |
| RH | Аба агымында 20 секунддан 90% га чейин 1 м/с (2.2 миль) |
| Каттагыч | |
| Radio Power | 1 мВт (0 дБм) |
| Берүүнүн диапазону | Болжол менен 30.5 м (100 фут) көрүү тилкеси |
| Зымсыз маалымат стандарты | Bluetooth Smart (Bluetooth Low Energy, Bluetooth 4.0) |
| Logger иштөө диапазону | -20° to 70°C (-4° to 158°F); 0 to 95% RH (non-condensing) |
| Каттоо журналы | 1 секунддан 18 саатка чейин |
| Кирүү режимдери | Туруктуу интервал (нормалдуу, статистика) же жарылуу |
| Эс тутум режимдери | Толгон кезде ороп, же ток болгондо токтотуңуз |
| Баштоо режимдери | Дароо, баскычты, датаны жана убакытты же кийинки интервалды басыңыз |
| Stop режимдери | Эстутум толгондо, баскычты, күндү жана убакытты басыңыз же белгиленген журналга жазуу мезгилинен кийин |
| Кайра баштоо режими | Баскыч |
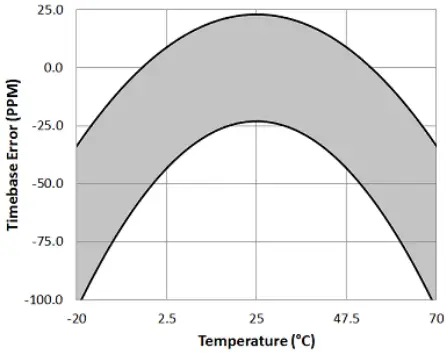
| Убакыттын тактыгы | ±1 minute per month at 25°C (77°F), see Plot C |
| Батареянын иштөө мөөнөтү | 1 жыл, 1 мүнөттүк жазуу аралыгы менен мүнөздүү. Тезирээк каттоо жана/же статистика сampling intervals, entering burst logging mode, and remaining connected with HOBOmobile will impact battery life. Excessive readouts, checking of Full Status Details, audible alarms, and paging all impact battery life. Visual alarms and other events can have a marginal impact on battery life. |
| Батарея түрү | Two AAA 1.5 V alkaline batteries, user replaceable |
| Эс | 128 KB (84,650 өлчөө, максимум) |
| Толук эстутумду жүктөө убактысы | Болжол менен 60 секунд; аппарат логгерден канчалык алыс болсо, ошончолук көп убакыт талап кылынышы мүмкүн |
| LCD | ЖК 0 ° дан 50 ° С чейин көрүнөт (32 ° - 122 ° F); ЖК бул диапазондон тышкаркы температурада акырын реакция кылышы же бош болушу мүмкүн |
| Өлчөмү | 3.66 x 8.48 x 2.29 см (1.44 x 3.34 x 0.9 дюйм) |
| Салмагы | 56 г (1.98 унция) |
| Экологиялык рейтинг | IP50 |
 |
CE белгиси бул продуктунун Европа Бирлигинин (ЕБ) бардык тиешелүү директиваларына ылайык келерин аныктайт. |
| Акыркы баракты караңыз | |
Plot A: Температуранын тактыгы жана чечилиши
Plot B: Typical RH Accuracy
Plot C: Убакыттын тактыгы
Logger Components And Operation
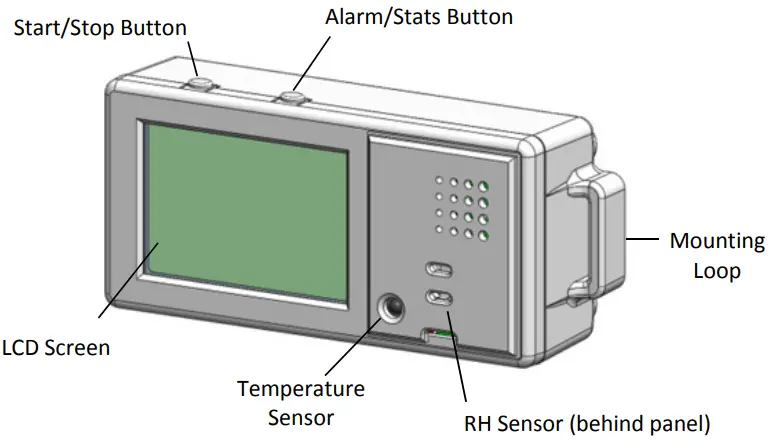
Баштоо/токтотуу баскычы: Press this button for 3 seconds to start or stop logging data, or to resume logging on the next even logging interval. This requires configuring the logger in HOBOmobile with a push button start or stop, and with Allow Button Restart selected (see Setting up the Logger). You can also press this button for 1 second to record an internal event (see Recording Internal Logger Events), to silence a beeping alarm (see Setting up Alarms), or to turn the LCD screen on if the option to turn off the LCD has been enabled (see Setting up the Logger).
Каттоочунун сырсөзүн баштапкы абалга келтирүү үчүн Start/Stop баскычын жана Ойготкуч/Статс баскычын бир эле учурда 3 секунд басыңыз.
Сигнал/Статистика баскычы: Press this button for 1 second to switch between statistics, alarm readings, and the current sensor readings as applicable or to silence a beeping alarm. Press this button for 3 seconds to clear a visual alarm if the logger was configured in HOBOmobile to maintain the visual alarm until
the alarm button was pressed (see Setting up Alarms).
Монтаждык циклдар: Логгерди илгич боо менен орнотуу үчүн эки монтаждык илмекти (диаграммада бирөө гана көрүнүп турат) колдонуңуз (Кароггерди монтаждоону караңыз).
Температура сенсору: This sensor is located in the lower left corner of the raised panel to the right of the LCD screen.
RH сенсору: This sensor is located behind the vented panel in the logger case to the right of the LCD screen and the temperature sensor.
LCD экран: Бул каттоочу учурдагы абал жөнүндө маалыматтарды көрсөтүүчү ЖК экран менен жабдылган. Бул эксample кийинки беттеги таблицада ар бир символдун аныктамаларынан кийин ЖК экранында жарыктанган бардык символдорду көрсөтөт.
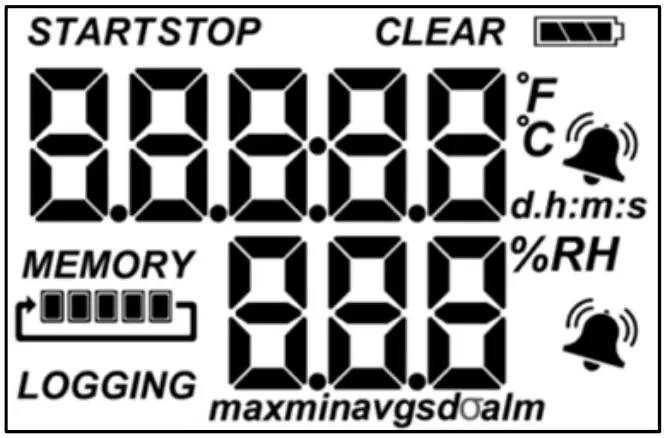
| LCD символу | Description |
| The logger is waiting to be started or restarted. Press and hold the Start/Stop button for 3 seconds to start the logger. |
|
| The logger has been started with push button stop enabled; press and hold the Start/Stop button for 3 seconds to stop the logger. | |
| Батарея көрсөткүчү болжолдуу калган батарея кубатын көрсөтөт. | |
 |
The logger has been configured to stop logging when memory fills. The memory bar indicates the approximate space remaining in the logger to record data. When first started, all five segments in the bar will be empty. In this exampле, журналдын эс тутуму дээрлик толгон (эс тутумунда бир гана сегмент бош). |
 |
The logger has been configured to never stop logging (wrapping). The logger will continue recording data indefinitely, with newest data overwriting the oldest data until the batteries die or the logger is reconfigured. When first launched, all five segments in the memory bar will be empty. Бул эксampле, эс толук (беш сегмент тең толтурулат) жана жаңы маалыматтар азыр эң эски маалыматтардын үстүнө жазылып жатат. Бул токойчу токтоп калганга же батареясы түгөнгөнгө чейин уланат. |
| Учурда каттоочу журналга кирүүдө. | |
 |
A sensor reading is above or below the high or low alarm limit that you configured. Press and release the Alarm/Stats button until the “alm” symbol (described below) is displayed on the screen. This symbol at left will clear depending on how visual alarms were configured in HOBOmobile. If the visual alarm was set to clear when the logger is reconfigured, this symbol will remain on the LCD until the next time new configure settings are loaded onto the logger (see Setting up the Logger). Otherwise, it will clear when the sensor reading is back within the alarm limits or by pressing the Alarm/Stats button for 3 seconds. |
| A visual alarm is ready to be cleared. This will only appear if HOBOmobile was configured to maintain the visual alarm until the alarm button is pressed. Press the Alarm/Stats button for 3 seconds to clear the visual alarm. Note that an audible alarm can be silenced by pressing the Start/Stop button or Alarm/Stats button for 1 second. |
|
 |
These symbols show the maximum, minimum, average, and standard deviation values most recently calculated by the logger (if the logging mode has been set to Fixed Interval in HOBOmobile and each statistic has been selected; see Statistics Logging). Press the Alarm/Stats button for 1 second to cycle through the available statistics and then back to the current sensor reading (or to the alarm value if applicable). |
| This is the farthest out-of-range sample displayed during the logger deployment. Press the Alarm/Stats button to view бул окуу. Сигнал/Статистика баскычын кайра басып, кандайдыр бир статистиканы (жогоруда аныкталган) айлантып, акыры кайра учурдагы сенсордун окуусуна кайтыңыз. | |
 |
Бул эксampтемпературанын көрсөткүчү. Temperature units are determined by the settings in HOBOmobile. To switch between Celsius and Fahrenheit, change the units in the HOBOmobile Settings (the logger must be reconfigured for units changes to take effect). |
 |
Бул эксampRH окуусу. |
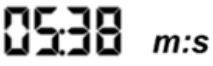 |
Каттоочу белгилүү бир датага/убакытка кирүүнү баштоо үчүн конфигурацияланган. Жазуу башталганга чейин дисплей күндөр, сааттар, мүнөттөр жана секунддар менен эсептелет. Бул мурункуampКирүү башталгыча 5 мүнөт 38 секунд калды. |
| The configure settings are being loaded onto the logger from HOBOmobile. | |
 |
An error occurred while loading the configure settings onto the logger from HOBOmobile. Try reconfiguring the logger. |
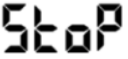 |
The logger has been stopped with HOBOmobile or because the memory is full. |
Эскертүүлөр:
- Каттоодо сиз ЖК экранды өчүрө аласыз. Кийинки бөлүмдө сүрөттөлгөндөй, логгерди орнотуп жатканда “ЖК көрсөтүүнү” тандоодон чыгарыңыз. Бул параметр өчүрүлгөндө, сиз дагы эле убактылуу иштей аласыз view LCD экраны Start/Stop баскычын 1 секундга басып. ЖК андан кийин 10 мүнөт күйүп турат.
- The LCD screen refreshes every 15 seconds regardless of the logging interval selected in HOBOmobile. If you choose a logging interval less than 15 seconds, the data will be recorded at the faster interval, but the sensor readings will only be updated on the screen every 15 seconds.
- When the logger has stopped logging, the LCD screen will remain on with “STOP” displayed until the logger is offloaded to your mobile device (unless the logger was configured with the “Show LCD” option disabled). Once the logger has been offloaded, the LCD will turn off automatically after 2 hours. The LCD will turn back on the next time the logger connects with your device through HOBOmobile.
- The LCD screen flashes “HELLO” when you page the logger from HOBOmobile (see Downloading HOBOmobile and Connecting to a Logger).
- ЖК экраны үн сигналы өчүрүлгөндө “CHIRP OFF” жарк этет.
Downloading HOBOmobile And Connecting To A Logger
Логерге туташуу жана аны менен иштөө үчүн HOBOmobile колдонмосун орнотуңуз.
- Download HOBOmobile. Go to the App Store and download HOBOmobile to your iPhone, iPod touch, or iPad.
- Батарейкаларды орнотуңуз. Open the battery door on the back of the logger and insert two AAA batteries observing polarity (see Battery Information). Reinsert the battery door and snap it back into place.
- HOBOmobile ачыңыз. Enable Bluetooth in your device settings if prompted (go to Settings > Bluetooth and make sure it is marked as “On”).
- Каттоочуга туташыңыз. таптаңыз
 . The logger should appear in the Recently Seen/In Range list as shown here.

Tap the row in the list to connect to the logger. If it does not appear in the list, make sure the logger is within range of your mobile device. Note that current sensor readings are always visible in this list even if the logger is not logging.
Tips for connecting:
- Логер мобилдик түзмөгүңүздүн диапазонунда экенин текшериңиз. Ийгиликтүү зымсыз байланыш диапазону болжол менен 30.5 м (100 фут) жана толук көрүнүшү менен.
- Эгер түзмөгүңүз логгерге мезгил-мезгили менен туташа алса же байланышы үзүлсө, мүмкүн болсо, логгерге жакыныраак жылыңыз.
- If the logger appears in the Recently Seen/In Range list, but you cannot connect to it, close HOBOmobile and power cycle the mobile device. This forces the previous Bluetooth connection to close.
Каттоочуга туташкандан кийин, төмөнкү аракеттердин бирин тандай аласыз:
- Конфигурациялоо. Select logger settings and load them onto the logger to start logging. See Setting up the Logger.
- Readout. Offload logger data. See Reading Out the Logger.
- Full Status Details. Check the battery level and view учурда каттоочу үчүн тандалган конфигурация орнотуулары.
- Start Logging or Restart Logging. These options appear depending on the Start Logging and Stop Logging settings selected in the next section.
- Жазууну токтотуу. Stop the logger from recording data (this overrides any Stop Logging settings described in Setting up the Logger).
- Барак. Press and hold the Page icon and the logger will beep to help you locate a deployed logger (tap the Page icon if you only want the logger to beep once). “HELLO” also appears on the LCD when the logger is paged.
- Clear Audible Alarm. If audible alarms are enabled as described in Setting up Alarms, use this to clear a beeping alarm on the logger.
- Logger Password. Select this to create a password for the logger that will be required if another mobile device attempts to connect to it. To reset a password, simultaneously press both the Start/Stop button and the Alarm/Stats button on the top of the logger for 3 seconds or tap Reset to Factory Default in the Set Logger Password screen.
- Программаны жаңыртуу. When new logger firmware is available, this action appears in the list. Select it and follow the instructions on the screen. Note that if there is a communication failure during the firmware update process, the logger will revert to the previous firmware.
- Force Offload. This may appear if an error was encountered when loading configure settings. Select this to offload all the data on the logger before reconfiguring the logger.
Setting Up The Logger
Use HOBOmobile to set up the logger, including setting alarms, selecting the options to start and stop logging, and choosing a logging mode. These steps provide an overview of setting up the logger. For complete details, see the HOBOmobile User’s Guide.
- таптаңыз and select a logger in the Recently Seen/In Range list to connect to it.
- Туташкандан кийин Конфигурациялоону таптаңыз.

- Tap Label and type a name for the logger up to 20 characters (optional). Tap Done.
- Каттоочуну Сүйүктүүлөр тобуна, учурдагы ыңгайлаштырылган топко кошуу үчүн Топту таптаңыз же 20 белгиге чейин (милдеттүү эмес) жаңы топтун атын түзүңүз. Бүттү.
- Журналды баштоону таптап, журнал качан башталаарын тандаңыз:
- Азыр. Каттоо Конфигурациялоо экранында Start баскычын таптагандан кийин дароо башталат.
- Кийинки Журнал Аралыгы. Журналдар тандоо журналы аралыгы менен аныкталгандай кийинки жуп аралыкта башталат.
- On Button Push. Logging will begin once you press the Start/Stop logging button on the logger for 3 seconds.
- Күнү / убактысы боюнча. Logging will begin at a date and time you specify. Select the Date and time Tap Done.
- Жазууну токтотууну таптап, журнал качан аяктай турган параметрлерди тандаңыз.
a. Эки эстутум вариантынын бирин тандаңыз:- Эстутум толгондо. Каттоочу эстутум толгонго чейин маалыматтарды жазууну улантат.
- Эч качан (Толгон кезде ороп). Каттоочу маалыматтарды жазууну чексиз улантат, эң жаңы маалыматтар эң эскинин үстүнө жазылат. Каттоо режими Burst деп коюлса, бул параметр жеткиликтүү эмес (Караңыз: Burst Logging).
b. Select On Button Push if you want to be able to stop logging by pushing the Start/Stop button on the logger for 3 seconds. Note that if you also choose On Button Push for the Start Logging option, then you will not be able to stop logging until 30 seconds after logging begins.
If you select On Button Push for the Stop Logging option, then you also have the option to select Allow Button Restart. This allows you to stop and then resume logging during the deployment by pushing the Start/Stop button on the logger for 3 seconds.
Маанилүү: When Allow Button Restart is selected and you use the Start/Stop button to stop and restart logging, logging will restart on the next even logging interval, not at the time the button was pushed. For example, a logger started logging at 7:00 AM with a logging interval set to 1 hour. If you press the Start/Stop button to stop the logger at 8:45 AM and then press the button again at 10:15 AM, logging will not begin immediately at 10:15 AM. Instead, logging will begin again at 11:00 AM, which is the next even interval time based on your 1-hour logging interval.
Therefore, depending on the logging interval, the gap between the time you press the button to resume logging and the time actual logging begins could be significant. The faster the logging interval, the less time will elapse before logging resumes.
c. Журналды качан токтотууну билүү үчүн төмөнкү убакыт параметрлеринин бирин тандаңыз: - Эч качан. Эгер сиз журналдын алдын ала белгиленген убакыт алкагында токтошун каалабасаңыз, муну тандаңыз.
- Күнү / убактысы боюнча. Select this if you want the logger to stop logging on a specific date and time. Select the date and time and then tap Done.
- Кийин. Select this if you want to control how long the logger should continue logging once it starts. Choose the amount of time you want the logger to log data and then tap Done. For example, эгер сиз журналга жазуу башталгандан кийин 30 күндүк маалыматтарды журналга киргизгиси келсе, 30 күндү тандаңыз.
d. Бүттү.
- Катталуучу сенсордун өлчөө түрлөрүн тандаңыз.
By default, both the temperature and RH sensors are enabled. Both sensors are required to calculate dew point, which is an additional data series available for plotting after reading out the logger. You can also set up alarms to trip when a sensor reading rises above or falls below a specified value. See Setting up Alarms for details on enabling sensor alarms and selecting the associated audible and visual alarm settings. - Tap Logging Mode. Select either fixed interval logging or burst logging. With fixed interval logging, the logger records data for all enabled sensors and/or selected statistics at the logging interval selected (see Statistics Logging for details on choosing statistics options). In burst mode, logging occurs at a different interval when a specified condition is met. See Burst Logging for more information. Tap Done.
- Enable or disable Show LCD, which controls whether the LCD on the logger will remain illuminated while the logger is logging. If you disable Show LCD, the LCD on the logger will not show the current reading, status, or other information while the logger is logging. You will, however, be able to
temporarily turn the LCD screen on by pressing the Start/Stop button on the logger for 1 second. In addition, you can always view логгердин ЖК жөндөөсүнө карабастан мобилдик түзмөгүңүздөгү ар кандай диапазондогу логгердин статусу (мүмкүн болушунча каттоочу сырсөз талап кылынышы мүмкүн). - Tap Start in the upper right corner of the Configure screen to load the settings onto the logger if you are ready to start.

Logging will begin based on the settings you selected.
Deploy the logger using the mounting materials (see Mounting the Logger). After logging begins, you can read out the logger at any time (see Reading Out the Logger for details).
Setting Up Alarms
Датчиктин көрсөткүчү белгиленген көрсөткүчтөн жогорулаганда же төмөн түшкөндө, журналды басып калуу үчүн коңгуроону койсоңуз болот. Бул сизге көйгөйлөр жөнүндө кабар берип, оңдоочу чараларды көрүшүңүз мүмкүн. Сигнал орнотуу үчүн:
- таптаңыз and select a logger in the Recently Seen/In Range list to connect to it.
- Туташкандан кийин Конфигурациялоону таптаңыз.
- In Sensor & Alarm Setup, tap an enabled sensor.
- Enable the High Alarm if you want an alarm to trip when the sensor reading rises above the high alarm value. Drag the slider to the reading that will trip the alarm or tap the value field and type a specific reading. In this example, температура 85°F жогору көтөрүлгөндө ойготкуч иштейт.
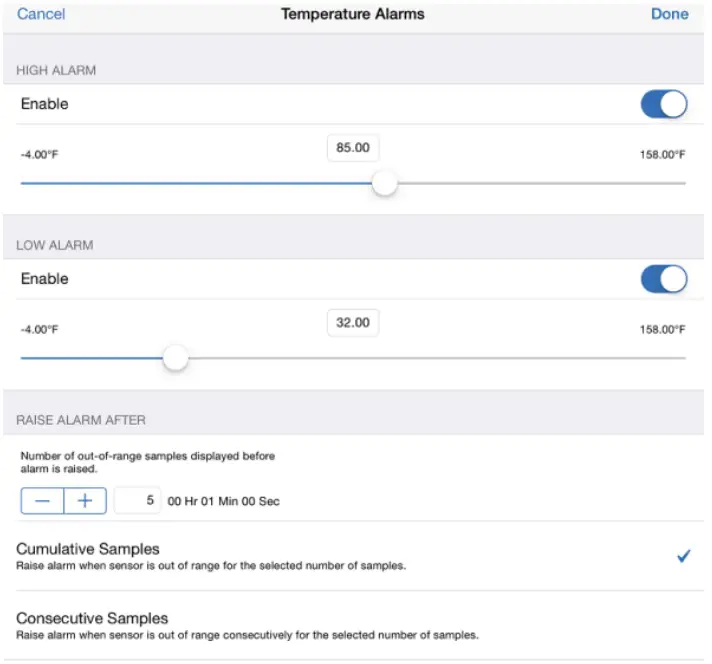
- Эгер сенсордун көрсөткүчү төмөнкү сигналдын маанисинен төмөн түшкөндө сигнализациянын иштебей калышын кааласаңыз, Төмөн ойготкучту иштетиңиз. Ойготкучту өчүрө турган окууга сыдырманы сүйрөңүз же маани талаасын таптап, белгилүү бир окууну териңиз. мурдагыample, ойготкуч температура 32°F дан төмөн түшкөндө иштебей тургандай конфигурацияланган.
Эскертүү: Жогорку жана төмөнкү сигнал чектеринин чыныгы маанилери логгер тарабынан колдоого алынган эң жакын мааниге коюлат. - Under Raise Alarm After, select how many out-of-range samples are needed to trigger the alarm. For example, if Raise Alarm After is set to 5 as shown above, then there needs to be 5 sensor readings above 85°F or below 32°F before the alarm will trip. The time displayed next to the sample number indicates how long it would take for the alarm to trip based on the number of samples you entered and the fixed 15-second LCD refresh interval.
- Select either Cumulative Samples or Consecutive Samples. Эгер сиз Кумулятивдик S тандасаңызamples, then the alarm will trip after a specific number of samples are outside the limits at any point during logging. If you select Consecutive Samples, then the alarm will trip after a specific number of samples outside the limits are displayed in a row. For example, if there are 5 readings in a row above 85°F, then an alarm will trip. However, if Cumulative Samples was selected instead, then the 5 readings could have taken place at any time during the deployment for the alarm to trip.
- "Бүттү" баскычын таптап, башка сенсор үчүн 3–8-кадамдарды кайталаңыз.
- Back in the Configure screen, enable Audible Alarms if you want a beep to sound on the logger every 30 seconds when the sensor alarm trips. The beeping will continue until the alarm is cleared from HOBOmobile, either button on the top of the logger is pressed, or 7 days have passed. Battery life will be slightly reduced when this setting is enabled. It is recommended that you only enable this feature if you have regular access to the logger so that you can easily turn off the beeping.
- Also in the Configure screen, select one of the following options to determine how long the alarm icon will remain illuminated on the logger LCD screen after an alarm trips:
- Logger Reconfigured. The alarm icon will remain visible on the LCD until the next time the logger is reconfigured.
- Чектеги сенсор. The alarm icon will remain visible on the LCD until the sensor reading returns to the normal range between any configured high and low alarm limits.
- Alarm Button Pressed. The alarm icon will remain visible until you press the Alarm/Stats button on the logger.
- Tap Start in the Configure screen to load the alarm settings onto the logger if you are ready to start.
Эскертүүлөр:
- The alarm icon will be illuminated on the logger LCD when the alarm trips. You can also press the Alarms/Stats button on the logger to view the farthest out-of-range value during the deployment. Alarm limits are checked when the logger’s LCD screen refreshes every 15 seconds.
- Сигналдын жогорку жана төмөнкү чектери үчүн чыныгы баалуулуктар логер тарабынан колдоого алынган эң жакын мааниге коюлат. Мисалыample, the closest value to 85°F that the logger can record is 84.990°F and the closest value to 32°F is 32.043°F. In addition, alarms can trip or clear when the sensor reading is within the logger specifications of 0.02°C resolution. This means the value that triggers the alarm may differ slightly than the value entered. For exampле, эгер Жогорку Ойготкуч 75.999 ° F деп коюлса, сенсор 75.994 ° F (0.02 ° C чечилишинде) болгондо сигнал иштей алат.
- Каттоочуну окуп чыкканда, сигнализация окуялары сюжетте же маалыматтарда көрсөтүлүшү мүмкүн file. See Recording Internal Logger Events.
- Once cleared, an audible alarm will start beeping again if the sensor values go out of the normal range. Even if an audible alarm is cleared, a visual alarm may remain on the logger LCD and in HOBOmobile depending on the settings selected for maintaining visual alarms or because the alarm condition may still be in effect. In addition, an audible alarm will continue beeping when the sensor values have returned to the normal range until it is cleared as described in step 9.
- Although an audible alarm and a visual alarm can occur at the same time when a sensor alarm is tripped, they are cleared in different ways. The audible alarm can be cleared as described in step 9. Meanwhile, a visual alarm is cleared as determined by the setting selected for Maintain Visual Alarm Until in the Configure screen. This means you could clear a beeping audible alarm and the visual alarm will remain on the LCD and in HOBOmobile until the logger is reconfigured, the sensor is in limits, or the alarm button is pressed–whichever setting you selected.
- If the logger was configured to stop logging with a button push, any tripped alarms will be cleared automatically when logging is stopped and no Alarm Cleared event will be logged in the data file. This ensures that the logger will start checking for alarm conditions when logging resumes (if the logger was configured with Allow Button Restart selected).
Burst Logging
urst logging is a logging mode that allows you to set up more frequent logging when a specified condition is met. For example, a logger is recording data at a 5-minute logging interval and burst logging is configured to log every 30 seconds when the temperature rises above 85°F (the high limit) or falls below 32°F (the low limit). This means the logger will record data every 5 minutes as long as the temperature remains between 85°F and 32°F. Once the temperature rises above 85°F, the logger will switch to the faster logging rate and record data every 30 seconds until the temperature falls back to 85°F.
Ошол убакта, журналга жазуу андан кийин кадимки журналга алуу интервалында ар 5 мүнөт сайын уланат. Ошо сыяктуу эле, эгерде температура 32°Fтан төмөн түшсө, анда логгер кайра жарылып жазуу режимине өтүп, ар бир 30 секунд сайын маалыматтарды жазып турат. Температура кайра 32°F чейин көтөрүлгөндөн кийин, каттоочу кадимки режимге кайтып, ар бир 5 мүнөт сайын каттайт.
Эскертүү: Сенсор ойготкучтары, статистика жана "Толук болгондо ороо" журналын жазууну токтотуу опциясы жарылып жазуу режиминде жеткиликтүү эмес.
Жардыруу журналын орнотуу үчүн:
- таптаңыз and select a logger in the Recently Seen/In Range list to connect to it.
- Туташкандан кийин Конфигурациялоону таптаңыз.
- Каттоо режимин таптап, андан кийин жарылып жазууну таптаңыз.
- Burst Sensor Limits астындагы сенсорду таптаңыз.
- Эгер сенсордун көрсөткүчү белгилүү бир көрсөткүчтөн жогору болгондо жарылуу журналынын болушун кааласаңыз, Жогорку чекти иштетиңиз. Слайдерди жарылып жазууга түрткү берүүчү окууга сүйрөңүз же маани талаасын таптап, белгилүү бир окууну териңиз. Бул эксample, the logger will switch to burst logging when the temperature rises above 85°F.

- Эгер сенсордун көрсөткүчү белгилүү бир көрсөткүчтөн төмөн түшүп кеткенде, жарылуу журналынын болушун кааласаңыз, Төмөнкү чекти иштетиңиз. Слайдерди жарылып жазууга түрткү берүүчү окууга сүйрөңүз же маани талаасын таптап, белгилүү бир окууну териңиз. мурдагыample, the logger will switch to burst logging when the temperature falls below 32°F.
- "Бүттү" баскычын таптап, башка сенсор үчүн 4–7-кадамдарды кайталаңыз.
- Tap Burst Logging Interval and select an interval faster than the logging interval. Keep in mind that the more frequent the burst logging rate, the greater the impact on battery life and the shorter the logging duration. Tap Done.
- Logging Mode экранынан чыгуу үчүн Done таптаңыз.
- Эгер баштоого даяр болсоңуз, логгерге жарылуу орнотууларын жүктөө үчүн Конфигурациялоо экранында Баштоо басыңыз.
Эскертүүлөр:
- Once the logger is configured, the high and low burst limits are only checked when the logger’s LCD screen refreshes once every 15 seconds. Therefore, if you set the logging interval to less than 15 seconds and the sensor reading falls outside the levels, the burst logging will not begin until the next 15-second refresh cycle.
- Эгерде жогорку жана/же төмөнкү чектер бирден ашык сенсор үчүн конфигурацияланган болсо, анда ар кандай жогорку же төмөнкү абал диапазондон чыгып кеткенде жарылып жазуу башталат. Бардык сенсорлордогу бардык шарттар нормалдуу диапазонго кайтып келмейинче, жарылуу журналы бүтпөйт.
- Кирүү журналынын чектери үчүн чыныгы баалуулуктар каттоочу тарабынан колдоого алынган эң жакын мааниге коюлат. Мисалыampле, 85 ° Fке эң жакын маани жазуучу 84.990 ° F жана 32 ° Fге эң жакын мааниси 32.043 ° F болот.
- Burst logging mode can begin or end when the sensor reading is within the logger specifications of 0.02°C resolution. This means the value that triggers burst logging may differ slightly than the value entered. For exampле, эгерде температура сигнализациясынын жогорку чеги 75.999 ° F деп коюлса, сенсордун көрсөткүчү 75.994 ° F (бул 0.02 ° C чечилишинде) болгондо жарылуу каттала баштайт.
- Жогорку же төмөнкү абал тазалангандан кийин, кирүү аралыгы убактысы "кадимки режимде" жазылган акыркы маалымат чекити эмес, жардыруу режиминде акыркы жазылган маалымат чекитинин жардамы менен эсептелет. Мисалыample, келгиле, логгерде 10 мүнөттүк каттоо интервалы бар жана 9:05те маалымат чекитине кирди дейли. Андан соң жогорку чектен ашып, саат 9:06да жарылып кыркуу башталды. Андан кийин жарылуу журналы 9:12ге чейин уланып, сенсор көрсөткүчү жогорку чектен төмөн түшүп кеткен. Эми кадимки режимге кайтып келгенде, кийинки каттоо аралыгы акыркы жарылуу журналынан 10 мүнөт же бул учурда 9:22 болот. Эгерде жарылуу журналы болбогондо, кийинки маалымат чекити 9:15те болмок.
- A New Interval event is created each time the logger enters or exits burst logging mode. See Recording Internal Logger Events for details on plotting and viewing the event. In addition, if the logger is stopped with a button push while in burst logging mode, then a New Interval event is automatically logged and the burst condition is cleared, even if the actual high or low condition has not cleared. The logger will check the high and low conditions when logging resumes (if the logger was configured with Allow Button Restart selected).
Статистика журналы
Белгиленген интервалды каттоо учурунда, каттоочу иштетилген сенсорлор үчүн маалыматтарды жана/же тандалган журналдын интервалында тандалган статистиканы жазат. Статистика төмөнкүчө эсептелетamps үчүн натыйжалар менен көрсөткөн линг ченampар бир журналдын интервалында жазылган линг мезгили. Ар бир сенсор үчүн төмөнкү статистиканы жазууга болот:
- Максималдуу же эң жогорку сampled value,.
- Минималдуу же эң төмөнкү сampled value,.
- Орточо бардык сampled values, and.
- Бардык үчүн орточо стандарттык четтөөampбаалуулуктарды алып келди.
Мисалы үчүнample, a logger is configured with both the temperature and RH sensors enabled, and the logging interval set to 5 minutes. The logging mode is set to fixed interval logging with Normal and all four statistics enabled and with a statistics samp30 секунд аралыгы. Каттоо башталгандан кийин, каттоочу иш жүзүндөгү температураны жана RH сенсорунун маанилерин 5 мүнөт сайын өлчөп, жазып алат. Мындан тышкары, логгер температураны жана RH с алатample ар 30 секундда жана аларды убактылуу эстутумда сактаңыз. Журналист андан кийин максималдуу, минималдуу, орточо жана стандарттык четтөөнү s менен эсептейтamples мурунку 5 мүнөттүк мезгилде чогултулган жана алынган баалуулуктарды каттайт. Журналистти окуп жатканда, бул 10 маалымат сериясына алып келет (шүүдүрүм чекити сыяктуу ар кандай туунду серияларды кошпогондо): эки сенсордук серия (температура жана RH маалыматы ар 5 мүнөт сайын киргизилет) плюс сегиз максимум, минимум, орточо жана стандарт четтөө сериясы (температура үчүн төрт жана RH үчүн төрт, 5 секунддун негизинде 30 мүнөт сайын эсептелген жана киргизилген маанилер мененampлинг).
Статистиканы каттоо үчүн:
- таптаңыз and select a logger in the Recently Seen/In Range list to connect to it.
- Туташкандан кийин Конфигурациялоону таптаңыз.
- Каттоо режимин таптап, андан кийин Fixed Interval Logging тандаңыз.
- Ар бир иштетилген сенсор үчүн учурдагы окууну экрандын жогору жагында көрсөтүлгөн каттоо интервалында жазуу үчүн Кадимки тандаңыз. Эгер сиз статистиканы гана киргизгиңиз келсе, муну тандабаңыз.
- Журналисттин ар бир журнал аралыгында жаздырышын каалаган статистиканы тандаңыз: Максимум, Минимум, Орточо жана Стандарттык Четтөө (Стандарттык Четтөөнү тандоодо орто эсеп менен автоматтык түрдө иштетилет). Бардык иштетилген сенсорлор үчүн статистика жазылат. Мындан тышкары, канчалык көп статистика жазсаңыз, журнал жазуунун узактыгы ошончолук кыскарып, эс тутум талап кылынат.
- Статистика Сampлинг Интервал жана статистиканы эсептөө үчүн колдонула турган ченди тандаңыз. Темп жазуу аралыгынан азыраак болушу керек. Мисалы үчүнample, эгерде журналды жазуу аралыгы 1 мүнөт болсо жана s үчүн 5 секунд тандасаңызampлинг ылдамдыгы, андан кийин логгер 12 сек талап кылатampар бир журналдын интервалынын ортосундагы окуулар (бир сample ар бир 5 секунд сайын мүнөт) жана 12 с колдонуңузamples ар бир 1 мүнөттүк журнал аралыкта натыйжасында статистиканы жазуу үчүн. Көбүрөөк сampылдамдыгы, батареянын иштөө мөөнөтүнө көбүрөөк таасир этет.
- Бүттү.
- Logging Mode экранынан чыгуу үчүн Done кайра таптаңыз.
- Эгер баштоого даяр болсоңуз, логгерге статистика орнотууларын жүктөө үчүн Конфигурациялоо экранында Баштоо басыңыз.
Once logging begins, click the Alarm/Stats button on the logger to cycle through the current maximum, minimum, average, and standard deviation data on the LCD screen. Note that the logger will always display the current sensor readings in HOBOmobile even if they are not being logged. You can plot the statistics series once you read out the logger.
Reading Out The Logger
Каттоочудан маалыматтарды түшүрүү үчүн:
- таптаңыз .
- Find the logger you wish to offload in the Recently Seen/In Range list and tap that row.
- Once connected, tap Readout.
- таптаңыз
 чейин view a mini-graph of the offloaded data.
 - үчүн мини-графикти таптап коюңуз view графиктин чоңураак версиясын же бөлүшүү үчүн file.
See the HOBOmobile User’s Guide for details on viewing graphs and sharing data.
Ички Logger окуяларын жазуу
The logger records the following internal events to track logger operation and status. To plot events in HOBOmobile, tap a mini-graph and then tap ![]() . Select the events you wish to plot and then tap
. Select the events you wish to plot and then tap ![]() again. You can also view бөлүшүлгөн же экспорттолгон маалыматтардагы окуялар files.
again. You can also view бөлүшүлгөн же экспорттолгон маалыматтардагы окуялар files.
| Ички иш-чаранын аталышы | Аныктама |
| Хост туташты | Каттоочу мобилдик түзмөккө туташкан. |
| Башталды | The Start/Stop button was pressed to begin or resume logging. |
| Токтотту | The logger received a command to stop recording data (from HOBO mobile or by pushing the Start/Stop button). |
| Өйдө/ылдый баскычы | Start/Stop баскычы 1 секундга басылган. |
| Чан <#> Ойготкуч өчүрүлдү | A sensor alarm has tripped; <#> is the sensor number, where 1 is temperature and 2 is RH. |
| Чан <#> Ойготкуч тазаланды | A sensor alarm has cleared; <#> is the sensor number, where 1 is temperature and 2 is RH. This event also contains the value that was furthest out of range for the sensor before the alarm cleared, which is only available in a shared or exported file. |
| Жаңы интервал | Журналист жардыруу журналы режимине кирген же чыккан. |
| Коопсуз өчүрүү | Батареянын деңгээли 2.5 В төмөн түштү; жазуучу коопсуз өчүрүү аткарат. |
Mounting The Logger
Камтылган материалдарды колдонуу менен журналды орнотуунун бир нече жолу бар:
- Аны магниттик бетке орнотуу үчүн логгер корпусунун артындагы төрт магнитти колдонуңуз.
- Дубалга же башка тегиз бетке орнотуу үчүн логгердин артына буйрук тилкелерин бекитиңиз. Эки буйрук тилкесин магниттердин жанынан чыгып тургандай кылып эки эсеге чоңойтуңуз.
- Кыргычты бетине жабыштыруу үчүн эки тараптуу лента колдонуңуз.
- Илгичтин кайышын эки жагындагы монтаж илмектери аркылуу киргизип, аны ийилген бетке, мисалы, түтүккө же түтүккө орнотуңуз.
Protecting The Logger
Каттоочу үй ичинде колдонууга ылайыкталган жана ным болуп калса коррозиядан биротоло бузулушу мүмкүн. Аны конденсациядан сактаңыз. Эгерде ЖК экранда FAIL CLK билдирүүсү пайда болсо, балким, конденсациядан улам, ички каттоочу саат иштебей калган. Батареяны дароо алып салыңыз жана схеманы кургатыңыз.
Эскертүү: Статикалык электр логист журналды жазууну токтотушуна алып келиши мүмкүн.
Кирүүчү 8 КВга сыналган, бирок токойчуну коргоо үчүн өзүңүздү жерге коюп электростатикалык разряддан алыс болуңуз. Көбүрөөк маалымат алуу үчүн "статикалык разрядды" издеңиз onsetcomp.com.
Батарея маалыматы
Логерге эки колдонуучу алмаштыра турган AAA 1.5 В щелочтуу же кошумча литий батарейкалары керектелет. Батареянын күтүлгөн иштөө мөөнөтү логгер орнотулган чөйрөнүн температурасына, журналга же с.ampling аралыгы, түшүрүү жыштыгы жана мобилдик түзүлүшкө туташуу жыштыгы, активдүү каналдардын саны, үн сигнализациясынын узактыгы, жарылуу режимин же статистикалык журналды колдонуу жана батареянын иштеши. Жаңы батарейкалар, адатта, 1 мүнөттөн ашкан жазуу аралыгы менен 1 жылга жетет. Өтө суук же ысык температурада, 1 мүнөттөн тезирээк жазуу аралыгы, же ошондойamp15 секунддан ашык убакыт аралыгы батареянын иштөө мөөнөтүнө таасирин тийгизет. Батарейканын баштапкы шарттарында жана иштөө чөйрөсүндөгү белгисиздиктен болжолдоолор кепилденбейт.
Батареяларды орнотуу же алмаштыруу үчүн:
- Логердин артындагы батареянын эшигин ачыңыз.
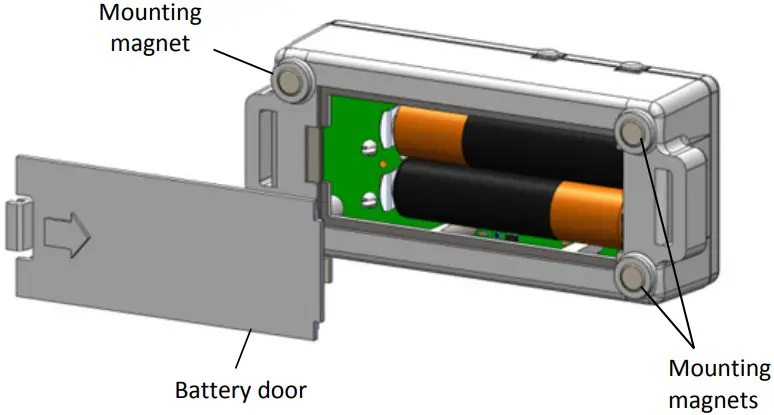
- Эски батареяларды алып салыңыз.
- Полярдыкты сактоо менен эки жаңы батареяны салыңыз.
- Батареянын эшигин кайра салып, кайра ордуна коюңуз.
![]() ЭСКЕРТҮҮ: Литий батарейкаларын ачпаңыз, өрттөбөңүз, 85°C (185°F) жогору ысытпаңыз же кайра заряддабаңыз. Логер өтө ысыкка же батарейканын корпусун бузуп же жок кыла турган шарттарга дуушар болсо, батарейкалар жарылып кетиши мүмкүн. Агрегатты же батареяларды отко таштабаңыз. Батареялардын ичиндегилерди сууга тийгизбеңиз. Батареяларды литий батарейкалардын жергиликтүү эрежелерине ылайык жок кылыңыз.
ЭСКЕРТҮҮ: Литий батарейкаларын ачпаңыз, өрттөбөңүз, 85°C (185°F) жогору ысытпаңыз же кайра заряддабаңыз. Логер өтө ысыкка же батарейканын корпусун бузуп же жок кыла турган шарттарга дуушар болсо, батарейкалар жарылып кетиши мүмкүн. Агрегатты же батареяларды отко таштабаңыз. Батареялардын ичиндегилерди сууга тийгизбеңиз. Батареяларды литий батарейкалардын жергиликтүү эрежелерине ылайык жок кылыңыз.
Fcc билдирүүсү
Федералдык байланыш комиссиясынын кийлигишүүсү жөнүндө билдирүү
Бул жабдуу сыналган жана FCC Эрежелеринин 15-бөлүгүнө ылайык, В классындагы санариптик аппараттын чектөөлөрүнө жооп берери аныкталган. Бул чектөөлөр турак жай орнотулган зыяндуу кийлигишүүлөрдөн акылга сыярлык коргоону камсыз кылуу үчүн иштелип чыккан. Бул жабдуу радио жыштык энергиясын пайда кылат жана нурлантат жана нускамаларга ылайык орнотулбаса жана колдонулбаса, радио байланыштарына зыяндуу тоскоолдуктарды жаратышы мүмкүн. Бирок, кандайдыр бир орнотууда кийлигишүү болбойт деген кепилдик жок. Эгерде бул жабдуу радио же телевизорду кабыл алууда зыяндуу тоскоолдуктарды жаратса, аны өчүрүү жана күйгүзүү аркылуу аныктоого болот, колдонуучуга төмөнкү чаралардын бири менен тоскоолдукту оңдоого аракет кылуу сунушталат:
- Кабыл алуучу антеннанын багытын өзгөртүңүз же башка жерге которуңуз
- Жабдуу менен кабыл алгычтын ортосундагы бөлүнүүнү көбөйтүңүз
- Жабдууларды ресивер туташтырылгандан башка схемадагы розеткага туташтырыңыз
- Жардам алуу үчүн дилерге же тажрыйбалуу радио/телевидение техникине кайрылыңыз
Бул аппарат FCC эрежелеринин 15-бөлүгүнө ылайык келет. Операция төмөнкү эки шартка ылайык жүргүзүлөт:
- Бул аппарат зыяндуу тоскоолдуктарды жаратпашы мүмкүн жана.
- бул аппарат каалаган тоскоолдуктарды, анын ичинде каалабаган операцияга алып келиши мүмкүн болгон тоскоолдуктарды кабыл алышы керек.
FCC эскертүүсү: Сактоо үчүн жооптуу тарап тарабынан ачык бекитилбеген ар кандай өзгөртүүлөр же модификациялар колдонуучунун бул жабдууну иштетүү укугун жокко чыгарышы мүмкүн.
Канаданын өнөр жайынын билдирүүлөрү
Бул аппарат Industry Canada лицензиясынан бошотулган RSS стандарттарына туура келет. Операция төмөнкү эки шартка ылайык жүргүзүлөт:
- бул аппарат тоскоолдук жаратпашы мүмкүн жана
- бул аппарат ар кандай тоскоолдуктарды, анын ичинде аппараттын каалабаган иштешине алып келиши мүмкүн болгон тоскоолдуктарды кабыл алышы керек.
FCC жана Industry Canada RF нурлануусунун жалпы калк үчүн чектөөлөрүнө ылайык келүү үчүн, HOBO MX1101 логгерлери бардык адамдардан кеминде 20 см аралыкты камсыз кылуу үчүн орнотулушу керек жана башка антенналар же антенналар менен бирге жайгашпашы же иштеши керек. өткөргүч.
Кардарларды колдоо
1-800-LOGGERS (564-4377)
508-759-9500
www.onsetcomp.com
loggerhelp@onsetcomp.com
© 2014 Onset Computer Corporation. All rights reserved. Onset, HOBO, and HOBOmobile are trademarks or registered trademarks of Onset Computer Corporation. iPhone, iPad, and iPod touch are registered trademarks of Apple Inc. Bluetooth and Bluetooth Smart are registered trademarks of Bluetooth SIG, Inc. All other trademarks are the property of their respective companies.
тарабынан бөлүштүрүлгөн MicroDAQ.com, Ltd.
www.MicroDAQ.com
603-746-5524

Документтер / Ресурстар
 |
onset HOBO MX1101 Bluetooth Humidity and Temperature Data Logger [pdf] Instructions HOBO MX1101 Bluetooth Humidity and Temperature Data Logger, HOBO MX1101, Bluetooth Humidity and Temperature Data Logger, Temperature Data Logger, Data Logger |